Introduction
Please Note : Safe Update 3 requires
Cryptonite,
StringTheory and
NetTalk to work. These items
are sold separately.
Safe Update allows you to upgrade your program over an
internet connection
securely and
automatically.
It adds a Check for Updates option to your program, and also provides a
framework for pushing updates to your users in a safe manner.
Safety is important here because if your program is being updated
automatically, or manually on-demand by the user, then you want to be sure
that the content they are downloading and using is content you intend for
them to have. If a hacker accessed your web server, and replaced your
install file, then you do not want the upgrade to be applied.
Safe Update can update from a shared network drive, from a local intranet
web server, or from a web server on the internet.
When your application is updated you need to make sure that the update being
downloaded is the genuine article and not a malicious file instead. To
achieve this Safe Update includes security in the form of digital
signatures.
Safe Update supports Clarion 5.5 and later, both ABC and Legacy template
chains.
Clarion 5 is not supported.
Upgrading from Safe Update 1 and 2
Safe Update 3 has been refactored to make implementation much easier to do,
and much easier to maintain in the long run. To this end the simplest way to
update to Safe Update 3 is to remove the Safe Update 1 or 2 support, and
then re-implement Safe Update 3. Since it takes only a few minutes to do
this it is a cleaner solution than trying to maintain backwards
compatibility.
To remove SafeUpdate 1 or 2 from your application;
- Delete the SafeDownload and SafeAutoUpdate procedures from your app
- Remove the Safe Update local extension to your Main procedure.
ClarionLive
ClarionLive
webinar number 183 is an excellent walk-through of the Safe Update
process. Watching the webinar is recommended.
Tip: Right click on the link, and choose "Save Link As..." to save the
webinar as a file on your disk.
The Basics
If you are keen to get started right away it is
recommended that you start with the
JumpStarts
below, but before you get going it's a good idea to read the rest of
this section to make sure that you're familiar with the basic concepts and
how everything fits together.
TThere are three basic areas of functionality that SafeUpdate provides:
- Securing
SafeUpdate uses certificates to secure the entire update process. These
certificates use the industry standard Public/Private key architecture to
sign and authenticate updates. Cryptography can get complicated, so we have
endeavored to make the process as simple as possible.
- Uploading
This is simply the process of getting the update (your application
installer) to the location that the
application will download it from. It includes creating an XML version file for
the update, and uploading the files via FTP
to the web site.
- Check for Updates
This includes downloading an update, either from the internet or LAN and
performing whatever task is required to install that update. This usually
means running
an installer and closing down the application to allow the install to
work. SafeUpdate handles checking for updates, downloading, verifying
updates and running the installer for you.
Jump Start
Getting a certificate
TThe Safe part of Safe Update is done by signing the Install file, and
Version file before they are uploaded to the web site. Signing requires a
certificate.
Getting a certificate can be a time consuming process, because it needs to
be issued by a company that trusts that you are who you say you are. If you
don't already have a code-signing certificate then you can read the section "
Getting a Digital
Certificate" to find out how to get one.
However because this is a JumpStart, and because that process may take some
time, a sample (UNTRUSTED) certificate called "Safe Update Test" has been
included in the Safe Update install file. You would not want to use this
certificate in a real world situation, however it does provide a substitute
for the purposes of getting the basic process in place.
Adding a Version Resource to your Application
Note that while this section is not required in your application, it is
recommended.
Adding a Version Resource to your application embeds a
standard Version Resource file into your EXE. This allows the version
information to be read from the EXE and also provides the version
information displayed from the application in Windows (e.g. In Explorer and
the Programs and Features control panel).
CClarion (6 and later) provides a Global Extension that adds this
Version Resource to your application and CapeSoft WinEvent provides the
ability to extract that information and use it with SafeUpdate (and elsewhere
in your application).
- Add the global extension: cwVersionRes
- Version Resource to your application.
- Enter the details for your application, including
the version number (this should be updated each time you update your
application to a new version). The version number can include an
automatically generated build-number./li>
- IIf you wish to make use of the
WinEvent function
ds_GetFileVersionInfo in your own code, then add the WinEvent global extension to your
application
Adding a "Check for updates" to your application
This Jump Start shows you how to add Safe Update to your application in order
to be able to download updates.
This guide steps you through:
- Adding the global extension to your application
- Importing the SafeDownload function into your application
- Entering the Download settings
- Adding the Local extension to the Main procedure
1. Adding the Safe Update Global Extensions to your Application.
To add the Safe Update template to your program, add the following to your
application's
Global Extensions:
- Activate_NetTalk - Activate CapeSoft's NetTalk.
- Activate_SafeUpdate - Activate CapeSoft Safe Update.
- Activate_Cryptonite - Activate CapeSoft Cryptonite.
- Activate_StringTheory - Activate CapeSoft StringTheory
2. Import the SafeDownload Function
Go to the
Application ->
Template Utility menu item and go to
Class Safe Update - CapeSoft Safe Update.
Select
ImportSafeUpdateDownloadABC (for ABC apps) or
ImportSafeUpdateDownloadLegacy (for Clarion/Legacy apps).
A procedure, called
SafeDownload will then be added to your application. Note that the
names of this procedure must not be changed.
You can however change the "look" of the window if you wish to.
3. Customize the Settings in SafeDownload
On the
SafeDownload
procedure extensions go to the
Safe Update Download Controls local extension.
On the
Files tab of that extension , fill in
the URLs of update file, and the XML version file.
Note that the file names on this tab are either local, or HTTP. Not FTP. The
download uses the HTTP protocol, not the FTP protocol.
The XML version file can have any name - it'll match the name you use in the
SafeUp utility later on. (usually it's the same name as the update file, but
with an xml extension.)
On the
Verify tab enter the name of your certificate in the
Must be signed by setting.
4. Add the Local extension to your Main procedure
Go to the local extension of your
Main procedure.
Add the
AutoUpdate - Safe Update Auto Update local extension. This
will allow your application to check for updates automatically.
Optionally, if you would like a menu item, or button to trigger an immediate
"check for updates", then create the item or button and enter the use equate
for that control on the Manual Update tab.
Signing and Uploading Updates to your FTP server
Creating an Install File
The update being downloaded by your program is typically an Installer. The
installer can be a custom executable or created with an install system such
as SetupBuilder, Wise or even Visual Studio. Using a proper install system to
create installers is highly recommended as it ensures that updates work well
under all versions of Windows, including those such as Windows 8, Windows 7,
Windows Vista and Windows Server 2008, which provide additional security and use
UAC (User Access Control).
If you don't currently have an installer for your application, then you
will probably need to create one using SetupBuilder, or your preferred tool.
Before creating the install for the new version increment the
application version and build the app. If you are entering the version
directly in the SafeUpdate global extension then change the version
here, or if you are using a version resource then change it in the cwVersion Resource global extension.
SafeUpdate Utility
The process of signing and uploading the files is done by a utility called SafeUp3.Exe.
- The SafeUpdate Utility (SafeUp3.exe) is installed
into \Clarion\3rdparty\bin (Clarion 6) or \Clarion\Accessories\bin
(Clarion 7 and up).
- A shortcut to the SafeUpdate Utility is placed in
the Start Menu under All Programs->Clarion Accessories->Safe
Update->SafeUpdate Utility
- In Clarion 7 and up SafeUp can be accessed directly
by selecting the menu Tools->CapeSoft Tools->SafeUp utility
- The source code for the utility is provided in the
Examples\SafeUpdate\Uploader folder. The app can be opened in Clarion 6
or later, and requires WinEvent, xFiles, Cryptonite and StringTheory to
compile.
- Run the SafeUp.Exe utility. It looks something like this;

- The first thing to do, when running it for the first time, is to
click on the Import Certificate (PFX Format) button. This will import
the PFX file into the Windows Certificate Manager.

If you have your own code signing certificate, then go ahead and enter
the details for it here. You will need to know the password to the PFX
file in order to import it correctly. If you do not have a certificate
yet, then go ahead an import the Safetester.Pfx file (which is in the
\examples\safeupdate\uploader folder). The password to this certificate
is capesoft - one word, all lower
case, no punctuation. You can leave the Store field blank.
Once you have imported the certificate you can open the Windows
Certificate Manager using the button provided. If you expand the
Personal Certificates item in the tree, then you should see your
certificate (or the Safe Update Test certificate) listed there.

- Ok, back to the SafeUp main screen. Time to add your product to the list. Click the
Insert button to add a new entry for your install file. The form looks
something like this;

Note there are two tabs of settings, one to do with the signing, and the other
to do with the FTP uploading.
- Enter the settings for the Installer and XML Version File
| Update File (Exe) | The name of the Install file which
contains the update. |
| XML Version File | The name of the xml file which will
contain the version number, and signatures |
| Update File Version | The version of the update (if you
are not using the File Version Resource) |
| Read File Version from File | Tick this on so that the
file version as set by your install script is used. |
| Signed By | The name of the certificate. The example
certificate name is Safe Update Test |
| FTP Server | The URL of the FTP server. |
| FTP User | The User Id required by the server (ie the
server login) |
| FTP Password | The password for the user. |
| Update File Directory | The remote directory, on the
server, where the update file must be placed. |
| XML File Directory | The remote directory on the server
where the xml file must be placed. (Usually the same place as
above.) |
It's also probable that your install file is code-signed as part of the
installer-creation process. The signature added by Safe Update does not
"code sign" the installer, so you should continue to code sign the
install file yourself as part of your build process.
Click on OK to save the new record.
-
Click on the Sign button if you wish to just create the signed files. A
copy of the Exe will be created and signed, and the XML version file
will be created and signed.
-
Click on the Sign and Upload button to sign the file, and also upload it
to the web server.
Examples
We strongly recommend using the
JumpStart provided, as this provides the
best way to get acquainted with the functionality provided by SafeUpdate.
Demo - Demonstrates downloading
and verification of updated using SafeUpdate.
Certificate Information
- Demonstrates retrieving certificate information. For
certificate viewing and management
use the tools provided.
Uploader -
Signing and Uploading application. A compiled version of this SafeUp3.exe
application is shipped with SafeUpdate and installed into the Accessory\bin
directory (or 3rdparty\bin for Clarion 6 and earlier).
These examples are in your \Clarion\Examples\SafeUpdate directory.
Getting a Digital Certificate
A Digital Certificate is needed in order to sign your update file.
For SafeUpdate a Code Signing certificate is required (other certificates types
can also be used, although a code signing certificate is recommended). For
testing purposes free mail certificates can also be used.
Purchase a code signing certificate from a vendor such as
Comodo. Other options are Thawte and VeriSign, although both are typically a great deal
more expensive. Certificates can be renewed every year, two years, or three
years. Purchasing a three year certificate is slightly cheaper per year. For
SetupBuilder users, Comodo certificates can be purchased through
Lindersoft for a major discount.
Comodo
Certificates cost (at the time of writing) $179/year,
or $167 per year if a 3 year certificate is purchased. For SetupBuilder
users purchasing Comodo certificates through
Lindersoft brings the price down to $79 per year, $143 for 2 years, and
$200 for three years.
http://www.comodo.com/e-commerce/ssl-certificates/code-signing-certificate.php
For Lindersoft SetupBuilder users, who need a code signing certificate to
sign their application anyway, purchasing certificates through LinderSoft is
a no-brainer (they also offer SSL certificates for securing web sites at a
major discount):
Comodo allows the inclusion of a support email address in the certificate
details (the only provider who does so at last check).
Verisign and Thawte
Verisign ($499/year):
http://www.verisign.com/code-signing/index.html?sl=a_box
Thawte ($299/year, no three year option):
http://www.thawte.com/code-signing/index.html
Installing Certificates
This section covers installation of PFX certificate files (which is the
file format used by Windows). Certificates come in a variety of formats, and
often the certificate will be provided separately from the private key. If
your certificate is not provided as a PFX file then it can be converted to
one - see
Converting Certificate Formats.
Installing a PFX is as simple as double clicking on it and following the
import wizard. You can also use either of the tools in the Viewing and
Managing Certificates section below to install (import) and export
certificates, as well as viewing their contents.
Alternatively you can use the SafeUp utility to import the certificate.
Viewing and Managing Certificates
Certificates and private keys are provided in a variety of formats, such
as PFX, PEM, CRT etc. Converting between the various formats can be done
using the tools provided with SafeUdate. See
Converting Certificate Formats below.
Certificates can be viewed and managed using one of two tools:
- Certmgr.exe
Provided with SafeUpdate
and installed into the Clarion\3rdparty\bin\SafeUpdate
(Clarion 6 and earlier) or Clarion\Accessories\bin\SafeUpdate
(Clarion 7 and later) directory
- Certificate Manager Snap-in
This is a snap-in for the Microsoft Management Console (MMC) included in
most versions of Windows. Adding the snap-in:
- Choose Run from the Windows Start menu (or use the Windows+R
hot-key).
- Enter "mmc" in the Run dialog and press Run to run the MMC
- From the File menu choose Add/Remove snap-in.. (Ctrl+M)
- Select Certificates from the list, click Add and then OK to add
the certificates for the User account (repeat this to add the
Computer account if desired). Click OK to close the Add/Remove
dialog.
- Choose File->SaveAs to save this console for further use (the
save file can be double clicked on to reopen the console with the
Certificates snap-in).
Both tools allow you to view certificates as well as import and export
them. The Console snap-in also allows certificates to be moved or copied
between stores using drag and drop (hold the Control key while dragging to
copy rather than move), and also allows you to view certificates for all
stores rather than just the user store (although typically the User store
will be used).
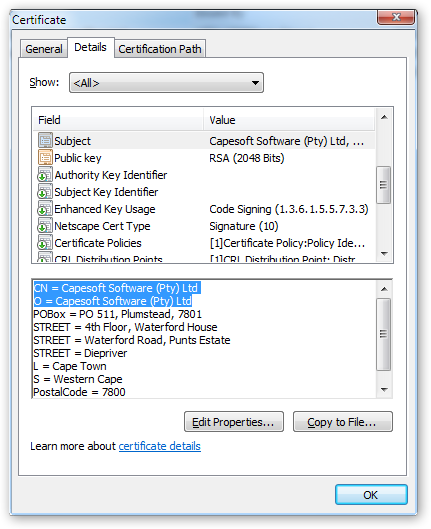
The screenshot below shows an example of a code
signing certificate. The Subject field contains the details used by
SafeUpdate for locating the certificate when signing and verifying.
In this case the CN (Common Name) and O
(Organization) fields would be used to set the Signed By and Certificate
Authority in the verification and signing settings.
Code Signing
Install tools such as SetupBuilder provide built in code signing support,
which is the simplest approach. Code signing can also be done using the
signtool.exe that SafeUpdate installs in the
Clarion\3rdparty\bin\SafeUpdate (Clarion 6 and earlier) or
Clarion\Accessories\bin\SafeUpdate (Clarion 7 and later) directory.
This tool can be called using a Wizard interface, on the command line, or
automated using a batch file:
- Using the Wizard interface for signing
- Run the SignTool.exe with the "signwizard" command line option,
for example:
c:\Clarion8\Accessory\bin\SafeUpdate\signtool.exe
signwizard
- This can either be directly on the command line (as above), or
by adding "signwizard" to the Target of a shortcut to the tool.
- Signing on the command line
- SignTool.exe sign /f mycertificate.pfx
/p Password /t http://timestamp.comodoca.com/authenticode /d
"Product Name" /du http://www.mywebsite.com /v
C:\src\MyApp\*.exe
- The options used are:
- /f mycertificate.pfx - the
name of the PFX file to use for signing
- /p Password - where
"Password" is the password for the PFX file
- /t http://timestamp.comodoca.com/authenticode
- timestamps the signature so that even when the certificate
expires the signature will remain valid (highly recommended)
- /d "Product Name" - the name
of the product being signed
- /du http://www.mywebsite.com
- The URL of the company or product website (optional)
- /v C:\src\MyApp\*.exe - what
to sign, this can be a single file or use wildcards to specify
multiple files. This signs all EXEs in a directory.
- Signing using a batch file
- This is identical to signing on the command line except that the
calls to SignTool are added to a batch file (a text file with the
.bat extension). This batch file can be run to make the calls to
SignTool each time that it is needed.
Converting Certificate Formats
Certificates and private keys are provided in a variety of formats, such
as PFX, PEM, CRT etc.
SafeUpdate installs a folder called SafeUpdate in the
Clarion\3rdparty\bin\SafeUpdate (Clarion 6 and earlier) or
Clarion\Accessories\bin\SafeUpdate (Clarion 7 and later) directory. This contains a number of useful tools,
including two specifically for certificate and key conversion:
Using pvk2pfx
This tool allows a PVK private key file and CER
certificate file to be merged into a PFX file. PVK and CER are common
formats that keys and certificates are provided in. This tool also protects
the private key password by wrapping the new PFX file with a new password
that is then used to access the key within the file without the actual
private key password ever being needed,
The pvk2fx tool is called on the command line as follows:
pvk2pfx.exe -pvk
capesoft.pvk -pi PrivateKeyPassword -po NewPassword -spc capesoft.cer -pfx
MyCompany.pfx
The above command line assumes that the CER and
PVK files have been copied into the same directory as the pvk2pfx.exe.
The options are as follows:
- -pvk: The
PVK file that contains the private key
- -pi: The
password for the private key (PVK file)
- -po: The
new password that will be used for the PFX file created
- -spc: The
certificate to include in the new PFX file.
- -pfx: The
name of the PFX file to create
Using OpenSSL.exe
- Converting a PFX to PEM, CRT and KEY files.
The openssl.exe tool needs to be called on the command line:
openssl pkcs12 -in whatever.pfx -info -out whatever.pem -nodes
openssl pkcs12 -in whatever.pfx -clcerts -nokeys -out whatever.crt
openssl pkcs12 -in whatever.pfx -nocerts -out whatever.key
OpenSSL Convert PEM
openssl x509 -outform der -in certificate.pem -out
		certificate.der
Convert PEM to P7B
openssl crl2pkcs7 -nocrl -certfile certificate.cer -out
		certificate.p7b -certfile CACert.cer
Convert PEM to PFX
openssl pkcs12 -export -out certificate.pfx -inkey
		privateKey.key -in certificate.crt -certfile CACert.crt
OpenSSL Convert DER
Convert DER to PEM
openssl x509 -inform der -in certificate.cer -out
		certificate.pem
OpenSSL Convert P7B
Convert P7B to PEM
openssl pkcs7 -print_certs -in certificate.p7b -out
		certificate.cer
Convert P7B to PFX
openssl pkcs7 -print_certs -in certificate.p7b -out
		certificate.cer
openssl pkcs12 -export -in certificate.cer -inkey
		privateKey.key -out certificate.pfx -certfile CACert.cer
OpenSSL Convert PFX
Convert PFX to PEM
openssl pkcs12 -in certificate.pfx -out certificate.cer -nodes
You can add -nocerts to only output the private key or add -nokeys to
only output the certificates.?
Certificate Information
You will not need to get a certificate if you are only downloading files
as the Update File will already have all the necessary certificate
information embedded in it. However, if you want to check the the serial number of the
certificate, then reading the following paragraph may be useful.
How to Find the Certificate's Serial Number
Open the Windows Certificate Manager. The easiest way to do this is Press
Windows-R (Start / Run) and type
CertMgr.Msc
This will display a list of all the certificate stores on your computer. The
certificate you require should be in the '
Current User/Personal'
store.
Double click on the certificate to open it. Then go to the Details tab of
the certificate and highlight the Serial Number field. From here you can
copy the serial number to the clipboard.
Programmer's Guide
- I want to check for updates on startup
This option is already enabled by default when you add Safe Update to your
application. However, you must make sure the
AutoUpdate local extension has been added to your application's main window.
- I want to check for updates every couple of days
Go to the SafeDownload procedure, to the Extensions, Auto tab,
and enter the options there.
- I want the user to be able to check for
updates manually
See here in the JumpStart.
- I want to use Safe Update in a multi-DLL application
The easiest approach is to add SafeUpdate to the exe app as normal.
- Add NetTalk, Cryptonite, SafeUpdate and StringTheory to the root
DLL, setting their Multi-DLL settings as appropriate.
- Add Safe Update,Cryptonite, NetTalk and StringTheory to your EXE
setting the Multi-DLL settings as appropriate.
- Import the SafeDownload procedure into the exe app.
- My application gets sent to the system tray when the window is
closed. How can Safe Update shut it down properly?
You'll have to add your own code in this case. You would probably set a
global flag that would tell your application to shut down completely. Add your
code to the event:SUshutdown event in your main window.
You will need to add the AutoUpdate
extension to your main window first.
The Global Extension
Global General Tab
Disable All Safe Update features
Disables all Safe Update code, useful for debugging to find out whether
a problem is being caused by Safe Update.
Debugging
Display Errors
Errors will appear
Log Errors
Version Tab
Use WinEvent to extract from Version resource
If you have WinEvent added to this application, then you can check
this box for WinEvent to detect the version of this exe. This means you can
use an external version resource generator to apply the version resource to
your application.
Program Version
The current version of this application. This can be any string, so long
as it is fewer than 40 characters long.
Tip: The global variable
SafeUpdate:AppVersion is set when your program starts (using either WinEvent
or the template setting) so that it can be used in your program - like on
Help / About screens and so on.
Program Name
Used for display purposes only. This name will appear at various places
in the
SafeDownload window.
Multi-DLL Tab
This is part of a Multi-DLL program
Check this box if the application has multiple DLLs and Safe Update
has been added to the root DLL. If this section of the application is
a DLL this will be ticked as the default.
Export Class from this DLL
Check this box if this section of the application is the root DLL of a
multi-DLL application.
Local Extensions
The AutoUpdate Extension
This extension is added to the Main procedure in your application.
OptionsTab
Manual Control
Select the
menu item, or tool bar control, that will allow the end user to trigger an
update manually.
Auto check on startup
You can enter an expression here. If it evaluates to true, then the
download window will (silently) check for an update when your program
starts. (The user will be informed if an upload is available.)
The SafeDownload Control Template
This extension is added to the Safe Download procedure.
Options Tab
Update File
The path to the update file. Can
be either a file on the LAN, and intranet URL or a web URL.
XML version file
The path to the version
file. Can be either a file on the LAN, and intranet URL or a web URL.
Local Folder for downloaded files
By default downloaded files will be placed (if validated) in the temp
folder. However if you want accepted files to be placed in a specific folder
then you can enter it here.
INI File
Some settings are stored in an INI file. Enter the ini file name here/
Ask User before Downloading
If this is on then the user will be asked before an update file is
downloaded. (The user will always be asked before an update file is
applied.)
Installer: Run the following file instead
If the file being downloaded is not an install file, and a separate install
program exists, then you can enter that alternate program name here.
Run the program with the following parameters
Allows parameters to be passed to he downloaded file (or alternate
installer file) when starting the update.
Auto Tab
Do Automatic Checking
If this is on then the program will continue to check for new versions
automatically, at regular intervals.
Check every (days)
Detemine the number of days between checks. Set this to 1 to do a check
every day.
Check from Midnight To
this will randomise the check between midnight and some specific time every
day. By randomizing the check the server is not overloaded by all the sites
checking at the same time. A typical value here is say 4:00 which means that
all sites will do their check sometime between midnight an 4am.
Verify Tab
Must be signed by:
Enter the name of the signer who will sign the updates here. Setting this is
highly recommended
Cert Authority
(not currently used). This will be used to limit certificates to those
issued by a specific authority. Using this will reduce your ability to
change to a new certificate authority in the future.
Cert Serial Number
(not currently used). This allows you to require that the update is signed
by a certificate with a specific serial number for added security.
Errors to check
Various items in the certificate which should be checked. It is recommended
that all these options are set on.
Failure Option
(not currently used). Currently if a certificate check fails the update is
discarded.
Objects Tab
Enter the name of the class, and the name of the object to use here. Usually
you can, and should, leave the default values as they are here.
Version History
Download latest version
here
Version 2.02 Beta (23 December 2011)
Requires Cryptonite 1.42 or later.
- Update: Compatible with Cryptonite 1.42
- Added File Locked methods
- Added ability to suppress messages
Version 2.01 Beta (23 December 2011)
Requires Cryptonite 1.24 or later.
- Added: If the root DLL name is blank
then no prototypes for the SuAutoUpdate and SuDownload procedures are
exported in Multi-DLL applications. This only applies to those using
prototype exporters.
- Fixed: A typo in the template causing an
compile error in Legacy when the SafeUpdateDownload template utility was
used (TakeEvent called without an object name).
- Fixed: Error in the Server class which
did not always copy the XML version file into the store folder,
resulting in the update being downloaded at each check.
Version 2.00 Beta (15 April 2011)
Requires Cryptonite 1.15 or later.
- Added: ClientServer example which demonstrates the new client/server
update functionality.
- Added: Safe Update Server
- Added: Safe Update Server local extension
- Added: Safe Update Client
- Added: Safe Update Client local extension
- Added: Auto closedown of running clients when
using the client/server when a new update is received
- Added: Automatic update from server on startup
for client applications
- Added: "SafeUpdate Server" Option to the Safe
Update Download Controls local extension. Switches the object to work as
an update server, rather than downloading and installing as a client.
- Changed: refactor of the SafeUpdate classes
- Added: Cryptonite base
- Added: SafeDownload class
- Changed: SafeAutoUpdate moved to using new
classes rather the all template generated code.
- Changed: All template generated download code moved to the SafeDownload class
- Added: HttpClient class
- Fixed: potential GPF in file verification
- Fixed: incorrect temp directory
- Fixed: incorrect parameter passing to the SafeDownload procedure
- Changed: Moved the file loading class to a base class
- Changed: Refactoring of the XML handling class
- Fixed: error in the SignFile method when assigning
the signer
- Fixed: error in the SignFile method when assigning
the certificate provider
- Added: support for additional signer verification
parameters
- Fixed: Modified all signing and verification methods
with correctly typed parameters
- Added: logging to all methods
- Changed: error handling to be consistent
throughout classes and to use a single shared mechanism.
- Fixed: incorrect thread number posting in the the
shutdown process
- Changed: Moved all HTTP connection code and error handling
to the SuHttpClient class
- Changed: Removed temp files for HTTP handling
- Added: SuHttpClient class methods
- ErrorTrap procedure(string errorStr, string
functionName), derived
- PageReceived procedure(), derived
- Process procedure(), derived
- Added: SafeDownload class methods:
- Construct Procedure ()
- Destruct Procedure ()
- Init Procedure (*SafeUpdate su, *Window wnd,
string iniFile, bool pOnStartup, string pXmlFileName, bool
pVerifyFiles), virtual
- SetControls Procedure (long cStatus, long
cPromptNoUpgrade, long cProgress, long cGroupDl), virtual
- SetButtonControls Procedure (long cButtonYes,
long cButtonNo, long cButtonOK, long cButtonCancel, long
cButtonCancel2, long cButtonInstall), virtual
- SetInfoControls Procedure (long cInfo, long
cInfo2, long cInfo3, long cInfo4), virtual
- Display Procedure()
- GetUpdateFile Procedure (), virtual
- GetLocalFile Procedure (), virtual
- VerifyMsgFile Procedure (), virtual
- ProcessVersionInfo Procedure (), virtual
- ProcessFile Procedure (), virtual
- InitialWin Procedure (), virtual
- AskToUpgradeWin Procedure (), virtual
- NoNewVerWin Procedure (), virtual
- NoVersionWantedWin Procedure (), virtual
- SetOption Procedure (long pOpt, ? pVal),
virtual
- GetOption Procedure (long pOpt), string,
virtual
- RunSetup Procedure (), virtual
- ButtonYes Procedure (), virtual
- ButtonNo Procedure (), virtual
- ButtonOK Procedure (), virtual
- ButtonCancel Procedure (), virtual
- CheckNoUpgrade Procedure (), virtual
- TakeAccepted Procedure (), virtual
- TakeEvent Procedure (), virtual
- WindowInit Procedure (), virtual ! Call from
Windows.Init to load setting and set up the object
- SetDownloadOptions Procedure (bool
askUser=true, bool isServerApp=false, <string clientXmlFile>, |
string downMsgFile,
string downXmlFile, <string clientUpdateFile>, |
<string
clientInstallPath>, string versionTag), virtual
- SetInstallOptions Procedure (bool
downloadAndInstall=true, bool runAfter=true, bool
seperateInstaller=true, |
<string installer>, bool storeDownload=true, bool keepSig=false,
bool userLocation=false, |
<string storePath>, bool askFirst=true, bool cacheOff=false),
virtual
- SetVerificationOptions Procedure (bool
verify=true, <string signer>, <string certProv>, <long serial>, |
long failures, <string csp>, string action), virtual
- StartUpdate Procedure (), virtual
- WindowKill Procedure (), virtual
- Changed: Cleanup of SuXml class
- Changed: SuXml is no longer the base class, the generic
suFile class is the base class and SuXml inherits and builds on the
functionality that it provides.
- Changed: Removed all old source files. SafeUpdate now
comprises of suxml.clw, suxml.inc, supdate.clw and supdate.inc. All
other core functionality is provided by Cryptonite.
- Deprecated: (and removed) the CheckForHTTPError
method. All error handling is done in the HTTP client object itself.
- Changed: Removed temp file stored for HTTP error handling.
Error handling and checks are now done directly on the data returned by
the server.
- Changed: Refactored the csFile class into a generic file
reading and writing class with additional methods for handling
signatures etc.
- Fixed: Incorrect parameter passing for the file
handling APIs
- Fixed: The Signature reading, writing, removal
and verification could fail if the file pointer happened to fall on the
same value as the API error code for an invalid file pointer (the API
error code is only relavant if GetLastError indicates tha the API
failed, otherwise the return value is a valid file pointer).
- Fixed: Certificate fields other than the common
name were not correctly parsed and not available for validation.
- Added: Improved certificate field handling. All
certificate fields are now processed and available.
- Added: New types for storing certificate and other
data to allow easy processing and handling.
- Fixed: AutoUpdate calling the Download function
multiple times at startup.
- Added: SafeUpdate Server and Client for automated
downloading of client updates and distribution of client updates across
a LAN
- Added: New SafeUpdate Server and Client Example
- Deprecated: Old "server" option is now deprecated
(use the improve client/server functionality)
- Added: Auto-shutdown for SafeUpdate Servers to
inform clients of a new update
- Added: Automated updated on startup for client
applications
- Added: Automated retrieval and verification of new
versions of the client software by SafeUpdate Servers
- Added: Client update version number retrieval
methods
- Added: suServer class to implement the Safe Update Server side of
automatic update notification and client closedown.
- Added: suServerCloseClients class to implement the Client side of
automatic update notifications across the LAN and client closedown.
- Fixed: SafeUp application not reporting the status correctly after
signing/uploading.
Version 1.27 (18 March 2010)
- Fixed Clarion 7 compatibility (a template issue
was preventing the update code from actually being called).
Version 1.26 (7 January 2010)
- Fixed Mult-Proj compatibility. The Crypt32.lib is
now included in the correct section of Multi-Proj generated projects.
- Changed docs to cover purchasing a certificate as
the free certificate from Thwate is no longer available.
Version 1.25 (8 September 2009)
- Improved support for legacy apps when multiple
global class templates are used. (update tpw to edition 1.63)
Version 1.24 Beta (1 September 2009 )
- Updated the SafeUp signing application. An additional SafeUpExtra.app is
now also shipped, which includes additional templates to provide enhanced
functionality (this app is completely optional and provided for those who
have the additional templates).
Version 1.23 Beta (28 April 2009 )
- Fixed: GPF when signing updates and generating an XML signature file.
- Updated the SafeUp signing application.
Version 1.22 Beta (06 January 2009 )
- Fixed incorrect template in C7 install.
Version 1.21 Beta (10 November 2008)
- Clarion 7 compatible install.
Version 1.20 Beta (21 August 2008)
- Fixed: Potential GPF in SafeUpdate when checking signatures.
- Fixed: The Windows\Temp\ directory being used for storage. Temporary
files are now stored in the system Temp directory, which is Vista compatible.
- Added: Option to use the version resource information for the
ProgramName and Program Version.
Version 1.16 Beta (31 August 2007)
- Store file after download now defaults to 1.
- Template - fix for legacy class generation (includes SafeUpdate01.tpw 1.54).
Version 1.15 Beta (12 June 2006)
- New SafeUp01.tpw - fix for interference with other templates (using the Object01.tpw template).
- The download path is for storing the file defaults to the current directory instead of blank.
- If the download path is set to blank, then the application automatically uses the current directory.
- SafeUp now reports all errors as well as logging them.
- SafeUp displays the status of the last request, informing the user of success or failure.
- Fixed problems with FTP and added an icon to the window to ensure that it does
not get "lost" in the background.
- Added error reporting for FTP, so if it encounters an error it is reported to the user etc.
Version 1.14 Beta (24 April 2006)
- New automated certificate installation.
- Fixed problem with an installer than had zero size files.
Version 1.13 Beta (23 January 2006)
- Reworked a number of options, the documentation and main example
application in order the make basic use simpler.
- The Demo application can now simply be compiled and run to demonstrate updating,
removed the necessity to compile multiple version, copy files etc.
- Added test certificate that can automatically be installed, this certificate
is used by the example applications
- Made using the SafeUp program the default rather than creating .cfg files and
manually entering details (which is now completely superfluous, enter them
once in SafeUp and press the button to sign, or to sign and upload the updates)
- Remove sections of the docs that were superfluous.
- Simplified demo documentation
- Added a compiled version of the "update" file for the demo, allowing the demo
to be run and the update to be tested immediately
- New updater application that ships with the demo (source code included), this
acts as a "mini installer" allowing an EXE or other file to be downloaded,
updated and the program restarted without a full installer.
- Changed the template to use the new mini installer to copy files.
- New Installer, added shortcuts, certificate browser shortcut, test certificate etc.
- Still to do: Overhaul Client\Server example to new format.
Version 1.12 Beta (6 December 2005)
- Simplified the general use of SafeUpdate. This means that a number of
options have been removed in order to simplify the product. Options removed:
Create (or not) the XML version file, specify the version tag in the XML
file, specify an external method of FTP (only NetTalk is used), optional
signing removed (always signs). Requires a new version of SafeUploader.
- SafeUploader documented.
Version 1.11 Beta (25 November 2005)
- You can now hide the file path details while the update file is downloading.
- Added an option in the AutoUpdate extension to make SafeDownload silent when the procedure is added
from the AutoUpdate extension.
- Bug fix: SafeAutoUpdate did not always check for an update on startup.
Version 1.10 Beta (16 November 2005)
- Added an item to the AutoUpdate extension so that you can specify a
control that will start a manual check for updates. This was done so that
you don't have to use the SafeDownload embed. It's much easier to use too.
- Added helpful default values to the templates.
- Bug fix: Programs that only used the SafeUpload template didn't compile in v1.09.
- SafeUp: Removed the Add To Signed Name option. The default name extension is now '_signed'.
Version 1.09 Beta (21 October 2005)
- Added the SUshutdown event to the main window. This gets sent immediately
after the update file is run by SafeDownload. Put your shutdown code here:
this will be needed if your application gets sent to the system tray.
- Bug fix: when an SUactivatewindow event was received, the window was put
into AcceptAll mode by the Select() procedure. The Select() code has now been removed.
- Bug fix: When SafeDownload was hidden, no auto-run of the update file took
place. Also, the window would remain open but hidden.
- Revised the documents.
Version 1.08 Beta (6 October 2005)
- Bug fix: fixed client/server process.
- Bug fix: the update file that is run by SafeDownload was opened maximized.
- Number of days between updates can now be entered as a variable.
- Better-looking icon in the SafeDownload window.
- Extra option in SafeAutoUpdate to show the SafeDownload window as well.
Version 1.07 Beta (4 October 2005)
- Bug fix: SafeDownload embed: parameter list options were switched. This
made it look as if the download was not working.
- Bug fix: SafeAutoUpdate prototype had changed in v1.06: reverted to old prototype.
- Bug fix: SafeDownload embed also reverted to previous version.
- Bug fix: fixed demo apps. Broken because of the above change.
Version 1.06 Beta (3 October 2005)
- Bug fix: Template fix: 'window' should have been '%window'
- Close-down code for SafeDownload has been changed.
- New support for client/server applications has been added. This allows the
server to download the latest client update.
Version 1.05 Beta (29 September 2005)
- Bug fix: The Start Safe Download code embed didn't work when Auto-update
was disabled and a quiet update was required.
- Provision for a variable has now been made in the Start Safe Download code
embed.
Version 1.04 Beta (23 September 2005)
- Bug fix: SafeDownload didn't display No New Version when the program
didn't need updating and an XML file error occurred.
- The digital certificate serial number was not parsed correctly when
verifying.
- This document now draws attention to the fact that if you ever need to
re-install your digital certificate, the serial number will change.
Version 1.03 Beta (21 September 2005)
- Bug fix: minor change to the SendFTP template.
- The issuer certificate is now not checked for by default (SafeDownload
verification tab). Checking for this created problems with the demo.
Version 1.02 Beta (20 September 2005)
- Bug fix: didn't read the application name from the cwVersionRes file.
Version 1.01 Beta (16 September 2005)
- Bug fix: Nettalk error suppression was not turned on in the TXA files.
- Added support for the cwVersionRes template. Can now read the version and
application name from the file that this template generates.
Version 1.00 Beta (14 September 2005)
- First release of CapeSoft Safe Update.
License & Copyright
This template is copyright 2012 by CapeSoft Software. None of the included
files may be distributed. Your programs which use Safe Update can be distributed
without any royalties.
This product is provided as-is. Use it entirely at your own risk. Use of this
product implies your acceptance of this, along with the recognition of the copyright
stated above. In no way will CapeSoft Software, their employees or affiliates
be liable in any way for any damages or losses you may incur as a direct or
indirect result of using this product.