 |
 |
||
 |
|||
Version
  www.capesoft.com |
 |
||
| Contents | |||
|
|
Getting Started - some basics | ||
| Introduction [Suggested Reading] | |||
| Feature List | |||
| Installation Instructions [Suggested Reading] | |||
| Jump Start [Suggested Reading] | |||
| Examples | |||
|
|
Some More Detail | ||
| Capesoft's Messaging Features [Suggested Reading] | |||
| Using the Capesoft MessageBox Templates | |||
| General Info - for manual procedure adding | |||
| International Language Support | |||
| Relationship with other products [New in Version 1.53] | |||
|
|
Support | ||
| Frequently Asked Questions | |||
| Object Documentation | |||
| How to get Technical Support | |||
|
|
General Information | ||
| What the users are saying | |||
| Source Code Policy [Important] | |||
| Copyright and License | |||
| Distribution | |||
| Where can you get it | |||
| Version History [NB for existing users] | |||
|
NB:
Existing users upgrading from a previous version, should read all the Version
History notes of the subsequent versions as
well as the release notes for this version.
|
|||
 Introduction
Have you ever heard the saying: "I got an error message which said something
like..."? or: "This program never works!" Getting the actual message
out of the user can be a lengthy process. To try and make a logging system for
every message that you make, gets a bit tedious. It either means making a window
and calling that window every time, or else calling a function whenever you call
the message. Sounds like the job for an object or a template!Thus came forth Capesoft MessageBox, which has some useful features enhancing our other products. I found whilst using Special Agent, that there were many occasions where I had to work around that "Are you sure you want to delete this record?" message. Wouldn't it be great to integrate Makeover into your messages and stops to make them look like the rest of your program?
The advantage of using Capesoft MessageBox is you can use the Message(), Stop() and Halt() commands as usual, but they'll call the Capesoft MessageBox functions instead of the Topspeed ones, so you don't have to go changing all your existing code!!
Capesoft MessageBox comes in the form of a global object set and a template that makes it easy to use the objects. Because MessageBox is managed in a window that the programmer controls, there really isn?t anything you can?t do!
Note: Although Capesoft MessageBox is written using objects, you can use Capesoft MessageBox in legacy applications as well.
Note: It his highly recommended that you take a bit of time to read up about the Message (in particular), Stop and Halt functions in the Clarion manuals to be able to obtain the full functionality of Capesoft MessageBox.
Features
- Logging Messages to a file (you can determine the file structure and what gets written there)
- Message time-outs
- Message with the DontShowThisAgain check box
- Message with the PlaySound feature
- Skip x next Messages
- Static Features (switch one/more of the above features on for the whole program)
- Button Icons (left/right justified or no text)
- Larger buttons for longer text
- Interacts with HyperActive to: mail you the message from your user; or place a Hyperlink on your message box to a website, etc.
- Integrate your MESSAGE() with other 3rdparty products like Special Agent, Makeover, etc.
- Supports translation.
- Compatible with ClarioNet and WebBuilder.
- Change message/heading/button text in the Message window.
Note: The MessageBox text is limited to 1024 characters.
![]()
Installation
Instructions
| 1. | Run the supplied installation program. (You may have already done this, to get this far). |
Note: Please take note of the example applications
section of this doc to demonstrate
some of the features of Capesoft MessageBox.
![]()

Getting
Started
 Step 1
(optional - if you want to log messages to a file in your dictionary):
Step 1
(optional - if you want to log messages to a file in your dictionary):
Open your dictionary (of your application that you want to add MessageBox to) and import the MessageBox.txd that is found in the clarionx\3rdparty\libsrc directory.
Step 2:
Open your application (that you want to add MessageBox to) in the Clarion IDE.
If this is a Multi-DLL application, then the application to open is the
Data-DLL.
Run the Template Utility 'ImportCSMessageBoxxxx' (In the 'Application' menu, select the 'Template Utility'). xxx meaning abc or leg (for legacy) depending on which template set you are using for this application (for multi-DLL projects - do this only on the data DLL).
Note the names of the 3 procedures added: ds_Stop, ds_Halt and ds_Message (these are the names of the 3 procedures that will be used for the stop(), halt() and message() functions).
Step 3:
Add Capesoft MessageBox's Global Extension
Template (for more details on the various options, click here) to your
application.
On the Basic tab of the MessageBox Global Extension template select the corresponding procedure for each of the procedures required. So for the Message Box Procedure, select the ds_Message procedure.
For Multi-DLL applications:
- For Legacy applications you must complete Step 2 in both the Data DLL application and all EXE applications in the project.
- For ABC applications you need only complete Step 2 in the Data DLL application.
- You must set-up the multi-DLL relationship in the Global Extension template correctly.
- If you require any of the features in your other applications, then you need to add the Global extension template to those DLL applications (where the features are required).
- Note: In Clarion5 ABC Data DLLs you will receive a whole bunch of compile warnings (for a duplicate class generation). You can ignore these warnings (a glitch fixed in Clarion5.5).
Step 4 (optional - if you want to set features using templates):
Using the 'Capesoft MessageBox Set Features'
code template (or you can do it manually), set the features
properties that you require, if you're using the 'CapeSoft
MessageBox with Features' objects.Example
Applications
Capesoft MessageBox ships with a number of examples to aid you in implementing
some of the features, which you
can find in the clarionx\3rdParty\examples\CapesoftMessageBoxl.There is only one application in each directory, except the Multi-DLL application example, which has all the applications for the multi-DLL in the one directory
The Examples are as follows (all apps are 32bit, stand-alone unless specified):| AppName | Feature Description |
| msgbox.app | 1. Illustrates the use of Messages, Stops and Halts using
the 'Capesoft MessageBox with Features' objects. 2. It uses the example tps logging file that is shipped with Capesoft MessageBox to log messages. 3. It uses graphics and text coloring on the message box window (Transparent Strings for the message text). 4. A Browse window to show the Log File. |
| Legacy Multi DLL | Illustrates the use of messagebox in a Multi-DLL application. Compile the rootdll.app, then the function.app, then the mainexe.app. |
| MesBox&HyperActive | 1. Demonstrates Capesoft MessageBox in conjunction with HyperActive functionality. |
Capesoft's
Messaging Features
1.
Message Logging to a file
Using this feature enables you to track the messages that occur while the user
is using your program. At present, the fields that can be tracked are: Message,
Heading, Time and Date of occurrence, Duration (that the message was open), Button
Pressed and User (if the message box times out, then the User = 'Timer'). The
beauty of using objects for this messaging is you're not tied to the default file
structure. You can add extra fields and prime them just before the record is added
to the file.You can set the TempLogOff property on if you would like to disable logging for a single message. This property is always cleared at the end of the MessageBox procedure. So the logging will be reactivated after the first Message is called after the TempLogOff property is set.
1.1. Steps to implement Message Logging
Step 1
You should add a logging file to your dictionary, or you may use the Capesoft MessageBox default ASCII file if you like, in which case you may skip this step. There are two ways of doing this, you can either:1. Import the CapeSoft Message Logging file (recommended) (Details).
2. Add your own file to your dictionary. You don't need to use the Topspeed driver.
Step 2
You need to complete the steps for implementing the CapeSoft Messaging laid out in the Getting Started sectionStep 3
You need to ensure that the Global Extension template has been set to allow Message Logging.| 1.1 | In your application's global template open the Capesoft MessageBox's Global Extension template and follow the steps 1.11 through 1.17 to activate the message logging. |
Step 4
You need to set the Logging feature property to activate the logging. You can
either:1. Use the Set Features Code Template to set the property or
2. Set the object's LogMessages property directly
Example Code
ThisMessageBox.LogMessages = 1 !Activate Message Logging
ThisMessageBox.LoggedIn = UserName !UserName is a string(100) of the user logged in
Step 5 (optional)
It's a good idea to add a browse and/or report for the logging file. You can use the Clarion (abc or legacy) templates to do this. Check the example applications for ideas.For tips on logging and doing special and unique logging, see the FAQs.
2.
Message time-outs
It's often useful to have a time out on a message. A message may be a non-essential,
that you don't want a process to be halted if no-one's around, but if someone
is around, then they have a chance to respond to the message. You can create a
message with a default button and set the time-out length. When the time-out occurs,
the default button will be "Pressed" and the message closed so that
your program can continue. This feature will not be usable in stops, as the default
button is the abort button. It is sometimes handy to inform your user on how much
time the window will be open before the TimeOut occurs. There's an object property
which you can set to display a counter that indicates the time remaining before
the TimeOut occurs in hh:mm:ss.|
Note: If you want to have
more than one button on your message box and you want to use this
feature, then you must have a default button!!!
|
2.1. Steps to implement the Timeout Feature
Step 1
If you have not done so already: complete the steps in the Getting Started section. You need to select the CapeSoft Message Box with features radio button in the Global Extension Template. If you would like to display the TimeOut counter in all the messages that use the TimeOut feature, you can set this up in the Global Extension Template.Step 2
You need to set the Time-out object property. You can either:1. Use the Set Features Code Template to set the property; or
2. Set the object's Timeout property directly
Example Code
ThisMessageBox.TimeOut = 3000 !30 second TimeOut
ThisMessageBox.ShowTimeOut = 1 !Show the TimeOut down-counter to indicate the time until TimeOut occurs
Step 3 (optional)
You can also set the ShowTimeOut property in order to display the time remaining until TimeOut if you don't want to set this in the global extension template.
3.
Message with the DontShowThisAgain check box
If the user checks the 'DontShowThisAgain' check box, then the next time the message is called, the message object will first check if the message should be displayed, and return the button the button that was clicked immediately (without displaying the window).
Thus in this instance, 3 will be returned in future without the message window being displayed:
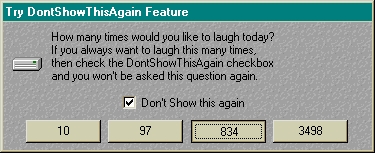
So you can safely code the following, and it will be immaterial whether the user sees the MessageBox again:
ThisMessageBox.NotAgain = 1
case Message('How many times would you like to laugh today?|If you always want to laugh this many times,|then check the DontShowThisAgain checkbox| and you won't be asked this question again.','Try DontShowThisAgain Feature','C:\My Documents\drive.ico','10|97|834|3498',3)
of 1
NoOfLaughs = 10
of 2
NoOfLaughs = 97
of 3
NoOfLaughs = 834
of 4
NoOfLaughs = 3498
end
Caution: Older versions of MessageBox (ver 1.3 and earlier) saved a 1 if the user checked the DontShowThisAgain checkbox. Thus if the above code existed in a program with ver 1.3, then it would return a 1 if the user ever checked the 'DontShowThisAgain' checkbox, even once the program has been updated to ver 1.4. You should alter the Heading or Message text slightly or use a different storage file/section, thus forcing another instance of this messageBox to appear and allowing the user to select an appropriate option.
Note 2: You should use the vertical bar ('|') when indicating line breaks rather than the carriage return character set ('<13,10>') when using the 'DontShowThisAgain' feature, as the ini file does not reproduce the carriage return character set correctly.
Note 3: The entry details of the ini file are as follows: 'DontShow: ' & sub(HeadingText,1,len(clip(HeadingText))) & sub(MessageText,1,len(clip(MessageText))). The entry text length can only be a maximum of 42 characters. This means that the following 2 messages will be saved in the same ini entry, and when called will receive the same values back:
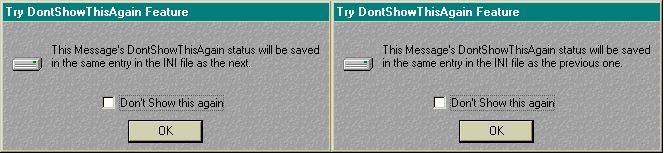
Tip: You could set the INI section and file (in your MessageBox Global Extension template) to ensure that each application does not use another application's settings.
3.1. Steps to implement the 'DontShowThisAgain' Feature
Step 1
If you have not done so already: complete the steps in the Getting Started section. You need to select the CapeSoft Message Box with features radio button in the Global Extension Template.Step 2
You need to set the 'DontShowThisAgain' object property. You can either:1. Use the Set Features Code Template to set the property; or
2. Set the object's NotAgain property directly
Example Code
ThisMessageBox.NotAgain = 1 !Activate the NotAgain feature, which will display the 'DontShowThisAgain' check box.
Step 3 (Optional)
You can set the text to appear next to the checkbox if you don't want the default 'Don't show this again' text to appear next to the check box.Example Code
ThisMessageBox.NotAgainText = 'Save this option'
4.
Message with the PlaySound feature
Sounds can be a way of alerting a user when a message occurs, especially when
the message pops-up in the middle of a long process.4.1. Steps to implement the PlaySound Feature
Step 1
If you have not done so already: complete the steps in the Getting Started section. You need to select the CapeSoft Message Box with features radio button in the Global Extension Template.Step 2
You need to set the wavfile (an object property) that the PlaySound must perform when the message occurs. You can either:1. Use the Set Features Code Template to set the property; or
2. Set the object's PlayWavFile property directly.
Example Code
ThisMessageBox.PlayWavFile = WavFileName !WavFileName is a cstring(255) of the sound file to play.
5.
Skip x next Messages
If you're debugging a loop, it can be useful to use a stop or message to watch
what's going on. The problem is that you often want to skip a lot of the messages
until you're at the right one. It gets tedious pressing the ignore button so many
times, and in many instances you go past the point where you're wanting to stop.
So you use this feature to skip the correct amount of messages or stops until
you're at the right one.Note: The counter (for how many messages are to be skipped) is stored in a queue, which will be reset when the program is restarted.
Note: If you set the SkipNext property to 10 then, the 1st, 11th, 21st, etc. messages will be displayed. The number (-1) indicates the amount of messages skipped between messages displayed.
5.1. Steps to implement the SkipXNext messages feature
Step 1
If you have not done so already: complete the steps in the Getting Started section. You need to select the CapeSoft Message Box with features radio button in the Global Extension Template.Step 2
You need to set the Object property so that the object knows how many messages to skip before displaying the next one. The object tracks what messages to skip in a queue so that you can skip (for example) 20 of Message A and skip 27 of Message B and 12 of Message C. You will need to set the property of this message before you display it. You can either:1. Use the Set Features Code Template to set the property; or
2. Set the object's SkipNext property directly
Example Code
loop 57 times
ThisMessageBox.SkipNext = 56 !Skip the following stop 55 times - so it will be shown on the 1st and 57th times
stop('First/Last time')
loop 12 times
ThisMessageBox.SkipNext = 11 !Skip the following stop 10 times - so it will be shown on the 1st and 12th times
stop('First/Last time Sub')
end
end
ThisMessageBox.SkipNext = 0
6.
Icons on the Buttons
NB: Before continuing, at present Clarion does not support Icons on XP-type buttons. So if you use an icon on a button you will loose the XP type look (if you have a manifest file attached to this EXE) of the buttons.
Sometimes it can be handy to display an icon on a button instead of or as well as text. There are 2 ways of doing this:
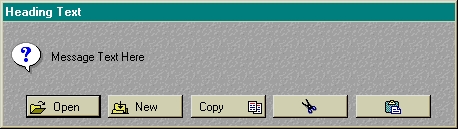
1. Including the icon in the button parameter:
The button parameter will need to be a string, so you will not be able to use the Clarion Button equates when using icons on the buttons as well - using this method (more about this in method 2). You can use the Clarion Icon equates in the string though for the relevant icons. The icon equate or icon file must be enclosed in square brackets. If the filename is placed before the button text, then it will be positioned to the left of the button text, otherwise it will be placed to the right of the button text.Example Code
message('Message Text here','Heading Text',icon:question,'[' & icon:Open & ']Open|[' & icon:New & ']New|Copy[' & icon:Copy & ']|[' & icon:cut & ']|[' & icon:paste & ']',1)
will display the following MessageBox:
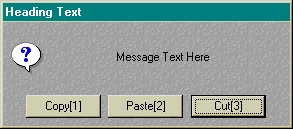
Note: If you want to use square brackets('[]') in the ButtonsString, then you must repeat the first one as follows.
message('Message Text here','Heading Text',icon:question,'Copy[[1]|Paste[[2]|Cut[[3]',3)
will display the following MessageBox:
2. Setting the Default Icon parameters:
7.
Hyperlinks and Mailing the Message
Together with Capesoft's HyperActive, you can place a HyperActive string on the
MessageBox. You can even (with a few easy steps) add email support so that your
users can mail you the precise message, straight from the MessageBox. Using the
email support they won't even have to fill in the MessageBox Text, heading and
Date and time of occurrence. This will all be done for them.7.1. Steps to implement a Hyperlink onto your MessageBox
Step 1
If you have not done so already: complete the steps in the Getting Started section. You need to select the CapeSoft Message Box with features radio button in the Global Extension Template.Step 2
You need to add the HyperActive Global Extension to your application and add the HyperActive Local Extension Template to your MessageBox procedure (the message window - probably called ds_message). Note: You will need to add the HALink control to the HyperActive controls list on the HyperLinks tab. Check the HyperActive docs for more details on making controls HyperActive.Step 3
You need to set the HyperLink that the URL must point to in the MessageBox. You can either:1. Use the Set Features Code Template to set the property; or
2. Set the object's HyperLink property directly.
Example Code
ThisMessageBox.HyperLink = OurWebSite !OurWebSite is a cstring(255) of the URL
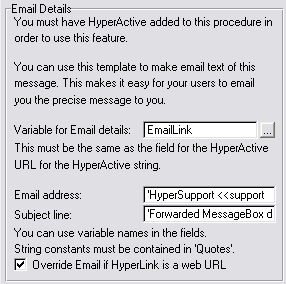
Step 4 (For mailing)
If you would like the URL to create an email of the MessageBox, then you need to set up the following:| 1. | In your Local Message Control Template you need to change the following options on the 'Features' tab: |
| 1.1. | You need to enter a variable for the Email details in the field provided. There is a field already supplied which you may use called EmailLink. |
| 1.2. | You need to enter an email address (use quotes or a variable).
If you want an addressee rather than a mail address to appear in the 'To'
field of the email, then you can enter the address as follows (for e.g..):
'Joe McRidgson <<joem@worldwidesupport.com>' |
| 1.3. | You can specify a descriptive subject line which will enable
the reader of the email to realise that the originator of the email is
the program.
|
| 1.4. | You can specify whether you would like MessageBox to automatically confirm whether the URL on the MessageBox (that is the hyperlink) is a web URL or not. If you check the 'Override Email if HyperLink is a web URL' checkbox then this will confirm if there is a 'www.' or a 'http://' at the beginning of the URL. If these strings are found at the beginning of the URL string, then the Email construction will be by-passed and the URL will be passed to the browser. |
| 2. | In your HyperActive Local Extension Template you need to set the URL of the Hyperlinked string. In the HyperActive Control list on the Hyperlink tab, select the ?HALink control and set the URL to the same variable that you set in 1.1. above (probably EmailLink). |
| 2.1. | The ThisMessageBox.HyperLink property (in step 3) should
be set to the text that must appear in the HyperActive string control
on the MessageBox. If this is left blank, then the Hyperlink will be hidden.
Thus (with the above template setup): ThisMessageBox.HyperLink = 'Mailto: Capesoft support' will yield the following message and email (when the URL is clicked): 
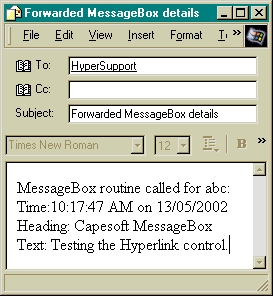 |
8.
The DontShowWindow Feature
There are times when you cannot access a message that is being displayed, such
as a Clarion message or a 3rdparty DLL of which you do not have the access to
modify the source. If you set this property, then you can prevent this message
from being displayed. If the logging is on, then it will still be logged. The
message() function will return the default button when the window is not displayed
(unless the DontShowThisAgain checkbox was previously checked.8.1. Steps to implement the DontShowWindow Feature
Step 1
If you have not done so already: complete the steps in the Getting Started section. You need to select the CapeSoft Message Box with features radio button in the Global Extension Template.Step 2
You need to set the DontShowWindow (an object property). You can either:1. Use the Set Features Code Template to set the property; or
2. Set the object's DontShowWindow property directly.
Example Code
ThisMessageBox.DontShowWindow = 1
9.
Static Features
It's often useful to be able to set a feature once and then not have to set the
feature again, like in the case of Message Logging.
9 times out of 10 you'll want all the messages that occur to be logged, so it's
useful to set this feature to be static. But with most of the other features you'll
probably not want to make them static as you probably won't want all your messages
to (for instance) have the DontShowThisAgain
check-box or a Timeout. In the case of the
SkipNext feature, this is a static feature,
so the property should be cleared after the message (which the property is required
for) has been displayed.You will be able to set these features in the Set Features Code Template or you can set the object's property directly.
Features that can be made static are: the DontShowThisAgain check-box , Timeout , Message Logging , MessageBox HyperLinks , Playing Sounds and DontShowWindow.
Example Code to set the Static Features:
ThisMessageBox.StaticFeatures = bor(ThisMessageBox.StaticFeatures,Glo:Set_NotAgain)
ThisMessageBox.StaticFeatures = bor(ThisMessageBox.StaticFeatures,Glo:Set_MsgLogging)
ThisMessageBox.StaticFeatures = bor(ThisMessageBox.StaticFeatures,Glo:Set_TimeOut)
ThisMessageBox.StaticFeatures = bor(ThisMessageBox.StaticFeatures,Glo:Set_HALink)
ThisMessageBox.StaticFeatures = bor(ThisMessageBox.StaticFeatures,Glo:Set_DontShowWin)
Example Code to clear the Static Features:
ThisMessageBox.StaticFeatures = band(ThisMessageBox.StaticFeatures,65535 - Glo:Set_NotAgain)
ThisMessageBox.StaticFeatures = band(ThisMessageBox.StaticFeatures,65535 - Glo:Set_TimeOut)
ThisMessageBox.StaticFeatures = band(ThisMessageBox.StaticFeatures,65535 - Glo:Set_MsgLogging)
ThisMessageBox.StaticFeatures = band(ThisMessageBox.StaticFeatures,65535 - Glo:Set_HALink)
ThisMessageBox.StaticFeatures = band(ThisMessageBox.StaticFeatures,65535 - Glo:Set_DontShowWin)
10.
Property changing
Sometimes you cannot get at the message() commands that are passed to your message
window. The message() function could be called from 3rdparty DLLs, Clarion itself,
or buried in a class somewhere. Often these messages contain text that is even
difficult to interpret for the programmer, let alone the user.MessageBox makes it easy for you to change the text that will be visible to the user.
1. Go to the Embeds of your Message window (probably called ds_message) and highlight the following embed:
2. Insert source such as the following:
if clip(LMBD:MessageText) = 'Change this text' !If this text is used
if (LMBD:Buttons = button:yes+button:no) and (LMBD:HeadingText = 'Now')
!If these buttons are on the window then exit without showing the window.
ThisMessageBox.DontShowWindow = 1
else
!Otherwise just change the displayed window text.
LMBD:MessageText = 'What should I change this text to?'
end
end

The following variables can be used:
LMBD:MessageText contains the text in the first parameter of the Message() call, which is the body text of the message window.
LMBD:HeadingText contains the text in the second parameter of the message() call, which is the text used for the heading of the message.
LMBD:UseIcon contains the equate or file for the icon to be displayed on the message() window.
LMBD:Buttons contains the value of the fourth parameter of the message() call, which is used to determine which buttons must be on the window and what the text on those buttons is.
![]()
Template
Guide
1.
Global Extension Template
The first step (once your application is open) is to add the Global Extension.
To do this: | 1.1 | Click the 'Global' button on the Application tree window. |
| 1.2 | Click on the 'Extensions' button on the 'Global Properties' window. |
| 1.3 | Click on the 'Insert' button on the 'Extension and Control Templates' window. |
| 1.4 |
Select the 'Activate_MessageBox' template from the list
of extension templates and click on the 'Select' button.
 |
| 1.5 |
Back at the 'Extension and Control Templates' window there
should appear the template with its details on the right.
 |
| 1.6 | Debugging: Check the 'Disable All Capesoft MessageBox Code' checkbox if you don’t want to generate any Capesoft MessageBox code. This is useful if your app doesn't compile and you want to exclude all Capesoft MessageBox source when compiling. |
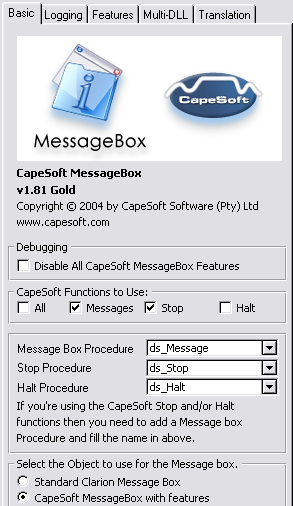
| 1.7 | Capesoft Functions to Use: If this is part of a Multi-DLL app, then jump to 1.26. Alternatively, select the Capesoft MessageBox functions that you require. For example, if you would like to use just the Messaging function, then uncheck the 'All' check box and check the 'Messages' check box in the 'CapeSoft Functions to Use:' group. |
| 1.8 | Once you've selected which functions you require, the object selection will be enabled. |
| 1.9 | Procedure Selection: Select a window procedure on which the message code will be populated. Use the 'Message Box Procedure' drop list to do this. You need to do this even if you do not require the 'Messages' function as the Stop and Halt functions require this procedure. |
| 1.10 | You will need to enter a Stop procedure name if you require the Stop function (and like-wise for the Halt function). |
| 1.11 | Select the object to use: You can either choose to use the 'Standard Clarion Message' objects, or you can use the 'CapeSoft Message Box with features' objects (see Capesoft's Messaging features). |
| 1.12 | ClarioNET support: If you have the ClarioNET global extension template added to this application, then the ClarioNET Support option will appear. Similarly for WebBuilder applications, you can enable the WebBuilder support in MessageBox. |
| 1.13 |
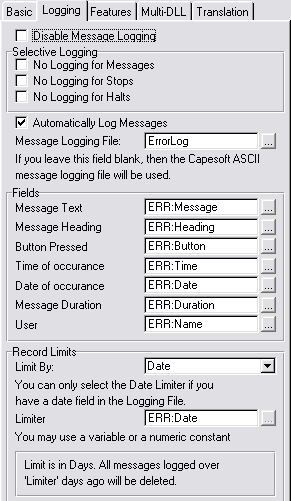 Change to the 'Logging' tab to set up the logging options. Leave the 'Disable Logging' check box unchecked (if you require Message logging) and select a file from your dictionary for the Message Logging File. (see Importing the Message Logging File to use the file shipped with MessageBox) You can also leave this blank to use the default ASCII file ('c:\MessageBox.Log'). |
| 1.14 | Selective Logging: If you only want to log Stops and Halts, then you can check the 'No Logging for Messages' check box. Similarly for only logging Messages, check the other two check boxes, etc. |
| 1.15 | If you want to turn message logging on at program startup, then check the 'Automatically Log Messages' check-box. |
| 1.16 | Fields: You can equate some fields in your file to the Capesoft MessageBox Fields if you require them in the entry fields supplied. These fields are optional, and are there because we find them useful. You can create extra fields if you would like to and populate them with your own info. You can use the object embed in the PrimeLog method. These fields are not available if you are using the default ASCII file. |
| 1.17 | Record Limits: You can limit the logging file if you want to. You can either limit it by Date or Count. Select either from the 'Limit By:' drop list box. If you are using the default ASCII file, then you will not be able to limit it. |
| 1.18 | If you selected to limit the file to Date, then you can select how far back you want to store records. The limiter is in days, so any messages logged more than this 'limit' ago will be deleted. If you selected to limit the file to Count, then you can select the maximum amount of messages to be stored in the log file. The messages will be logged until the limit is reached, when the oldest record will be removed every time a new message is logged to the file. You can use a variable if you like, although you must be sure to set the variable before the first message()/stop()/halt() is called. |
| 1.19 | 
Go to the 'Features' tab if you selected to use the 'CapeSoft Message Box with features' objects then you will be able to tweak the template to suite your needs on the 'Features' tab. If you don't require logging, then you can check the 'Disable Logging' check box. This will save you the time of having to create the Logging file in your dictionary (see Creating the Logging File). All the other features will be available as and when you require them, simply by setting the respective properties. |
| 1.20 | Remember Features: You can remember Some, All or None of the feature settings by checking/ unchecking the respective check boxes. If you check the 'Remember xxx' check box, then this property becomes static and you need to manually reset the activating property when you do not require it. Alternatively, the property gets cleared after the message box is displayed. |
| 1.21 | When the TimeOut feature is used, you can display a counter to indicate the time left before the TimeOut occurs. Check the 'Display TimeOut Counter' checkbox to set this property by default. You can set this feature on at any time using the ShowTimeOut property. |
| 1.22 | You may want to display a vertical bar in your Message windows. You can use || double vertical bars and check the 'Allow Double Vertical bars to be displayed as a bar' checkbox in order to display a vertical bar. Otherwise, || will mean two line breaks in your message text. |
| 1.23 | Dont Show This Again Settings: You can choose whether you would like to store the DontShowThisAgain setting in an INIFile or the windows registry. If you selected the Registry, then you can set the Registry sub-folder (inside the HKEY_LOCAL_MACHINE\SOFTWARE) which will contain the status of the DontShowThisAgain for your messages. There is also an option to select 'Other' and enter your own Registry sub-folder in the field provided (use quotes for constants or a variable name). |
| 1.24 | If you selected an INIFile then you can set the INI file which will
contain the status of the DontShowThisAgain for your messages. It was
previously set to 'CSMesBox.ini', so existing programs should retain this
setting. Appame.ini will be the name of your application file, or you can
use the existing default or the win.ini file. There is also an option to
select 'Other' and enter your own ini file in the field provided (use
quotes for constants or a variable name).
You can set the INI Section which will contain the status of the DontShowThisAgain for your messages. It was previously set to 'CS_Messages', so existing programs should retain this setting. Application will be the name of your application file, or you can use the existing default or the command that was used to start the application (This is useful for DLLs used with different EXEs so that you can retain different settings for the different EXEs). There is also an option to select 'Other' and enter your own section name in the field provided (use quotes for constants or a variable name). |
| 1.25 | You can enter a HotKey to create a GPF if the Message window is open. This is particularly useful when you have a infinite loop with a stop in it, or you want to debug using GPF Reporter. |
| 1.26 | |
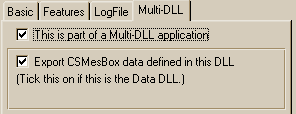
| 1.27 | If this is a Multi-DLL application and you want to define the Capesoft MessageBox code in this DLL and export it to the other DLLs and EXEs (i.e. this is the data DLL), then check the 'Export Capesoft MessageBox data defined in this DLL'. If you've checked this, then you'll need to fill in all the relevant settings (1.7 - 1.26). |
| 1.28 | |
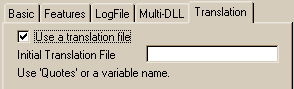
| 1.29 | If you would like the default language to be a language other than English, then you can enter an Initial Translation File. This should include the path() if the file is not in your windows directory. |
2.
Local Message Control Template
You need to add this template to the window which you will use for the message
box. You will need to create a window procedure. (Details)
Once you've created the window, you can add the local Control template.| 2.1 | In the application window, select your message box window procedure and click the 'Properties' button. |
| 2.2 | In the 'Procedure Properties' window, click the 'Window' button. |
| 2.3 | Click the 'Control Template' item in the 'Populate' menu. |
| 2.4 |
Select the 'CSMesBox_MessageBoxControl - Capesoft MessageBox
Controls' template, and click on the 'Select' button.
 |
| 2.5 | To edit the control properties, quit and save from the window editor and click the 'Extensions' button on the Procedure Properties window. |
| 2.6 | Select the 'Capesoft MessageBox
Controls' template and change to the 'Appearance' tab to edit the following: 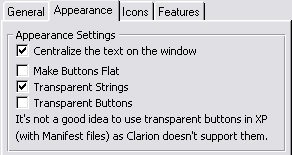 |
| 2.7 | You can check the 'Make Buttons Flat' for flat buttons on the message window. |
| 2.8 | You can check the 'Transparent Strings' to make the message text (DontShowThisAgain checkbox, Timer notifier and the Hyperlink string - where used) transparent. This is useful if you are applying Wall paper to the window. |
| You can check the 'Transparent Buttons' to make the message buttons transparent. This is useful if you are applying Wall paper to the window, although transparent buttons are not supported by manifest files in Windows XP. | |
| 2.9 | You can check the 'Centralize the text on the window' check box in order to center the message text (other wise the text is left justified). |
| 2.10 | On the Icons Tab:
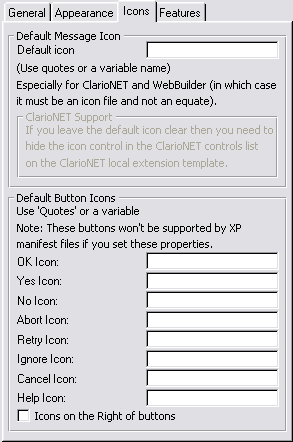
Default Icon: You may enter a default icon for the messages that don't have icons. If you are using ClarioNET and you would like to make use of icons in your message windows, then you need to enter a default icon. This will ensure that message()s without icons have the default icon assigned to them. You cannot use an equate for a default icon when using ClarioNET and WebBuilder as the equates are not supported by ClarioNET and WebBuilder. You can enter Default icons for the buttons as well. Use the fields in the Default Button Icons group to stipulate the icons for each button equate. |
| 2.11 |
On the
'Features
Tab':
If you would like to maintain the status of the GlobalRequest and GlobalResponse variables (on by default), then you can check the 'Preserve GlobalResponse and GlobalRequest' checkbox on the Advanced tab. The diagram below shows the ABC ErrorClass name (in the
global properties) on the left and the field where you should fill this
in in the MessageBox control template on the right. The procedure name
is only available in ABC applications.
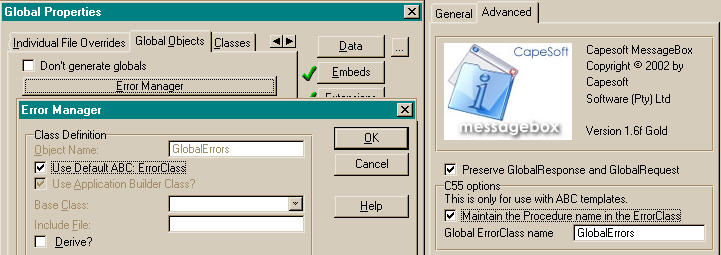 |
| 2.12 |
Clarion 5.5 (and
higher) users
only. If you would like to maintain the Procedure name in your GlobalErrors
class then you need to check the 'Maintain the Procedure name in the ErrorClass'
checked. Checking this checkbox will ensure that the procedure name, from
which the message/stop/halt was called, remains the procedure name in the
ErrorClass. Alternatively, the name of your MessageBox window will be the
name that appears in the procedure name of the ErrorClass. If you checked
this checkbox then you need to enter the correct name in the 'Global Error
Class name' field. The default is 'GlobalErrors', which is what is normally
used. If you have a different name for your global ErrorClass (see on the
'Global Objects' tab in your 'Global Properties') then you need to match
that name here.
Note: Checking this will also mean that the FromProcedure property is set with the procedure that is currently active. This means that you will be able to log the procedure name from where the Message() command was called. If you would like to display the procedure and application name that called the Message() function, then you can check the relevant checkboxes. This will place the Procedure and/or application name in square brackets in the title bar. |
| 2.13 | If you would like to display the calling Application name, then check the 'Display the Application name calling the message' checkbox. This useful in a Multi-DLL application (or Multi-EXE), also so that the message is automatically identified with your application. |
| 2.14 | HyperActive users only. If you would like to be able to mail your message as a support facility, then you can set this up on the 'Features' tab. (more details) |
| 2.15 | Click 'OK' a couple of times to return to the Application window. |
3.
Local Stop Extension Template
You need to add this template to the procedure, which you will use for the stop
function. You will need to create a source procedure. (Details)
Once you've created the procedure, you can add the local extension template.| 3.1 | In the application window, select your Stop source procedure and click the 'Properties' button. |
| 3.2 | In the 'Procedure Properties' window, click the 'Extensions' button. |
| 3.3 | Click the 'Insert' button on the 'Extension and Control Templates' window. |
| 3.4 |
Select the 'CSMesBox_ActivateStop - Capesoft Stop' template,
and click on the 'Select' button.
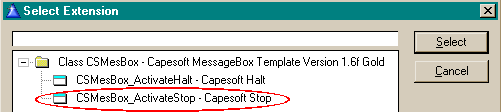 |
| 3.5 | Click 'OK' a couple of times to return to the Application window. |
4.
Local Halt Extension Template
You need to add this template to the procedure, which you will use for the halt
function. You will need to create a source procedure. (Details)
Once you've created the procedure, you can add the local extension template.| 4.1 | In the application window, select your Halt source procedure and click the 'Properties' button. |
| 4.2 | In the 'Procedure Properties' window, click the 'Extensions' button. |
| 4.3 | Click the 'Insert' button on the 'Extension and Control Templates' window. |
| 4.4 |
Select the 'CSMesBox_ActivateHalt - Capesoft Halt' template,
and click on the 'Select' button.
 |
| 4.5 | Click 'OK' a couple of times to return to the Application window. |
There's nothing to be done in Capesoft MessageBox's Local Halt Extension Template. Remember that the Halt command will use the Message window that you've defined above, so the same settings that will be applied to the Halt as to the message window.
5.
The Set Features Code Template

You will see that each feature has a group with the property activator (a field or check box), a remember checkbox and a clear checkbox.
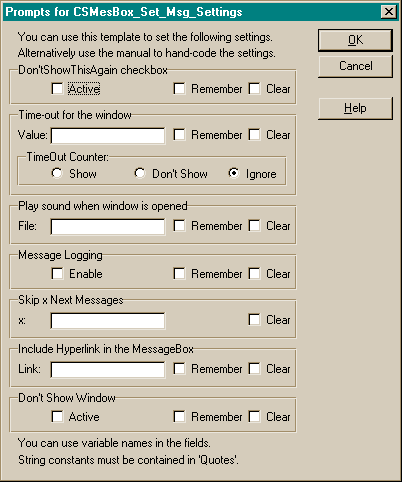
| 5.1.1. | The 'Active' check box will activate the 'DontShowThisAgain' check box feature. |
| 5.1.2. | The 'Value' field sets the length of the Timeout for the message. The time out value is in One Hundredths of a second. So for an 8 second time-out, set the value to 800. You can also enter the name of a variable. |
| 5.1.3. | The 'File:' field indicates the wavfile to be played when the next message is opened. You must use quotes for a string, alternatively you can use a variable. |
| 5.1.4. | The 'Enable' check box will enable message logging. You must not have disabled this feature in the Global Extension Template. |
| 5.1.5. | The 'x:' field entry is used to set the amount of messages that must be skipped. |
| 5.2. | The 'Remember' check box is used to set the Static attribute for the feature. The SkipNext feature is by nature a static feature, so it has no Remember check box. If you set the Static Attribute on in the global extension |
| 5.3. | 'Clear checkbox' will place code to clear both the static and the active properties. |
If you don't require a property to be changed then leave all the fields unaltered. Thus in this template you will be able to set all or some of the features.
6.
The ImportCSMessageBox Utility Template
This template utility is used to import a standard set of Message, Stop and Halt
functions to your application. These functions can then be modified (or used as
is) to suite your needs.| 6.1. |
In your application window, select the 'Template Utility'
item from the 'Application' menu in the window menu bar.
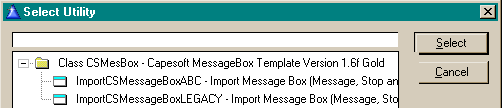 |
| 6.2. | Select the ImportCSMessageBoxABC or the ImportCSMessageBoxLegacy (depending on whether this is a legacy or ABC application) to import the 3 procedures. |
![]()
General
Info
1.
Adding a Blank Window Procedure for the Message Function
You should first consider using the Utility
Template to perform this function.| 1.1 | In the Application Tree window, select the 'New' item from the 'Procedure' menu. |
| 1.2 | In the window that appears enter a name for your window (like MyMessageBox) and click the OK button. |
| 1.3 | In the 'Select Procedure Type' window that appears, select the 'Window - Generic Window Handler' and click the Select button. |
| 1.4 | Click the 'Window' button in the Procedure MyMessageBox Properties screen that appears. |
| 1.5 | Select the 'Window' option in the list that appears (the object will do all the fancies - so the bare minimum is all we need) and then click OK. |
| 1.6 | You don't need to do anything in the window that appears, but it is advisable that you set the Font to the Font you require. You can also add a wallpaper to the background of the window. If you add wall paper, then it is advisable that you check the 'Transparent Strings' check box on in the MessageBox Local Control Template that you will add just now. You can quit the window editor, as the template and objects will do the rest. |
|
Note: You must get the
following prototype (1.6) in your Message Window's prototype correct!!!
|
| 1.6 | In the Prototype field enter the following prototype (with parameters): (STRING MessageTxt,<STRING HeadingTxt>,<STRING IconSent>,<STRING ButtonsPar>,UNSIGNED Defaults=0,BOOL StylePar=FALSE),UNSIGNED,PROC It is essential that this prototype is correct. |
| 1.7 | In the Parameters field, enter the same string for the parameters (leave
the return definition off). For example: (STRING MessageTxt,<STRING HeadingTxt>,<STRING IconSent>,<STRING ButtonsPar>,UNSIGNED Defaults=0,BOOL StylePar=FALSE) |
| 1.8 | Check the 'Declare Globally' checkbox. |
| 1.9 | Enter a variable in the 'Return Value' field. This should be a variable of type 'UNSIGNED'. |
| 1.10 | Click the OK Button to exit the window. |
You'll need to add the Local Message Extension Template to this procedure.
2.
Importing the CapeSoft Message Logging File into your Dictionary
| 1.1 | If you're in the Application editor, then quit it and from the File menu, select the Open item. Select your dictionary in the file dialog box (you will probably need to change the 'Files of type' drop list to 'Dictionary (*.dct)') and click the 'Open' button. |
| 1.2 | In the dictionary editor, click the 'Import Text' from the File menu. |
| 1.3 | Select the MessageBox.txd file that is found in the clarionx\3rdparty\libsrc directory. |
3.
Adding a Blank Source Procedure for the Stop and Halt Functions
You should first consider using the Utility
Template to perform this function.| 1.1 | In the Application Tree window, select the 'New' item from the 'Procedure' menu. |
| 1.2 | In the window that appears enter a name for your window (like MyStop or MyHalt) and click the OK button. |
| 1.3 | In the 'Select Procedure Type' window that appears, select the 'Source - Source Procedure' and click the Select button. |
|
Note: You must get the
following prototype (1.4.1 for Stop or 1.4.2 for Halt) in your Stop/Halt
Procedure's prototype correct!!!
|
| 1.4.1 | In the Prototype field enter the following prototype (for the Stop
function): (<string StopText>) It is essential that this prototype is correct. |
| 1.4.2 | In the Prototype field enter the following prototype (for the Halt
function): (UNSIGNED Level=0,<STRING HaltText>) It is essential that this prototype is correct. |
| 1.5.1 | In the Parameters field (for the Stop function), enter a parameter
for each field in the prototype (i.e. there must be 1 parameter). For example: (<string StopText>) |
| 1.5.2 | In the Parameters field (for the Halt function), enter a parameter
for each field in the prototype (i.e. there must be 2 parameters). For example: (UNSIGNED Level=0,<STRING HaltText>) |
| 1.6 | Check the 'Declare Globally' checkbox. |
| 1.7 | Click the OK Button to exit the window. |
4.
Adding derived code into your MessageBox object
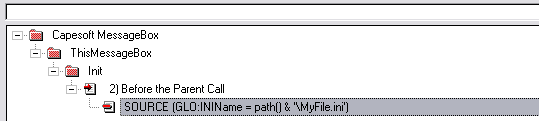
It is really useful to be able to add your own code to some of the MessageBox objects. You can derive these locally (i.e. for this application only), by going to the Global Embeds and selecting the Capesoft MessageBox | ThisMessageBox and the name of the method that you want to derive as follows (where the Init method has been derived):
The above embed point is really useful for setting variables and
properties, before initialising MessageBox. In each method you will find 3 (or
perhaps 4) embed points: a Data, Before the Parent Call and After the Parent
call embed point. If the template generates code after or before the parent
call, then there will be an extra embed point to enable you to place code on
either side of the parent call as well as on either side of the template
generated code.
![]()
International
Language Support
In order to activate the Translation features, you need to check the 'Use
a Translation File' check box on in the Global Extension Template (on the
Translation tab).1.
Translating the MessageBox default text
| 1.1 | You can start with a default translation file if you don't want to start your program with the default in English. You can do this in the global extension (in your EXE if this is a multi-DLL project). |
| 1.2 | If you are supporting multiple
languages then you can change the language at run-time using the TranslationFile
property. You should have one translation file for each language that your
program will use. For example: case Selected_Language of 'English' ThisMessageBox.TranslationFile = path() & '\English.trn' of 'Brazilian Portuguese' ThisMessageBox.TranslationFile = path() & '\Brazil.trn' of 'Spanish' ThisMessageBox.TranslationFile = path() & '\Spanish.trn' else if FileDialog('Select Translation File',ThisMessageBox.| TranslationFile,'Translation Files|*.trn|All Files|*.*',16) . end |
| 1.3 | When you run your program
and call a message/stop/halt, the translation file will be created (if it
is non-existent) as an ini-type file. There will be a section for the button
text and one for miscellaneous other text as follows: [MessageBox_Buttons] Button:OK=OK Button:Yes=&Yes Button:No=&No Button:Abort=&Abort Button:Retry=&Retry Button:Ignore=&Ignore Button:Cancel=Cancel Button:Help=&Help [MessageBox_Text] StopHeader=Stop StopDefault=Exit? HaltHeader=Halt TimeOutPrompt=Time Out: DontShowThisAgain=Don't Show This Again LogTimer=Timer |
| 1.4 | Once the entries are
placed in the ini file, you will need to edit these with a text editor.
Example: Button:Cancel=Cancel would appear in the text file as the default text for the Cancel button. To change the text to Portuguese edit as follows: Button:Cancel=Cancelam |
2.
Setting and Changing the MessageBox language file to use
You can set the initial language file (if you require an initial language other
than English) in the Global
Extension Template.If you would like to change the language at some stage during the program, you simply need to change the TranslationFile property (see 1.2 immediately above). Of course, you must be sure that the translation file is in the path that is specified by the TranslationFile property, or else the message box buttons and default text will appear in English.
There is an example application of the Translation File usage.
3.
Translating your messagebox text at runtime
For this you will need your own method of translation (the one that you use for
your application). To add translation support for Message Headings, text and
text buttons - you'll need to add the following code in the ds_Message
procedure. Here's the embed point:
Here's an example of the code you would use:
LMBD:HeadingText = TranslateFunction(LMBD:HeadingText)
LMBD:MessageText = TranslateFunction(LMBD:MessageText)
if not numeric(LMBD:Buttons)
LMBD:Buttons = TranslateFunction(LMBD:Buttons)
end
Relationship
with other products
ClarioNET
support
MessageBox supports ClarioNET with the following limitations:- TimeOuts for the window do not work, as these are based on EVENT:Timer which is not recognised by the ClarioNET client.
- Icons must be files and not icon equates (you cannot use ICON:Exclamation, ICON:Hand, etc). If you require the standard messaging icons you will need to make icon files for them (or make use of the ones provided with MessageBox in the clarion\3rdparty\image directory).
- The Image that is used on the window cannot be hidden at runtime, so you can either make the image have a default icon (if no icon is passed to it) or hide the image (set in the ClarioNET local extension template) so that no icons may be used with your message() functions.
- ClarioNET does not support prompt paragraphing. This means that all text will stream into one sentence, although the text will be wrapped automatically to fit the message window.
- ClarioNET cannot play a sound on the client, and so MessageBox's playsound feature will not be supported in ClarioNET applications.
- ClarioNET does not support more than 511 characters in a prompt control. This means that your MessageBox text is restricted to 511 characters.
Steps to implementing ClarioNET support:
- In the MessageBox Global Extension template, on the Basic tab, you need to check the 'Enable ClarioNET support'.
- In the MessageBox local Extension template on your Message() window, it would be advisable to set a default icon. This is incase you have messages that do not have an icon parameter, as the image cannot be hidden at runtime.
- For handcoders: You need to set the ThisMessageBox.WebSupportHere
property in order for the built-in ClarioNET support to be activated.
HyperActive
support
The best way to make your message()s HyperActive is to set the HyperLink
property so that the HyperLink will appear on the MessageBox. If you add you
own HyperActive control to the MessageBox window, you will need to position and
size it upon receipt of an EVENT:OpenWindow in your own Message() procedure.WebBuilder
support
MessageBox supports WebBuilder with the following limitations:- TimeOuts for the window do not work.
- Icons must be files and not icon equates (you cannot use ICON:Exclamation, ICON:Hand, etc). If you require the standard messaging icons you will need to make icon files for them.
- WebBuilder does not support prompt paragraphing. This means that all text will stream into one sentence, although the text will be wrapped automatically to fit the message window.
- WebBuilder cannot play a sound on the client, and so MessageBox's playsound feature will not be supported in ClarioNET applications.
- WebBuilder does not support the DontShowThisAgain checkbox and the DontShowWindow feature. These two features cause a program GPF when attempting to close the message() procedure before the window is opened.
- WebBuilder does not support icons on buttons.
Steps to implementing WebBuilder support:
- In the MessageBox Global Extension template, on the Basic tab, you need to check the 'Enable WebBuilder support'.
- In the MessageBox local Extension template on your Message() window, it would be advisable to set a default icon. This is incase you have messages that do not have an icon parameter, as the image cannot be hidden at runtime.
- For handcoders: You need to set the ThisMessageBox.WebSupportHere
property in order for the built-in WebBuilder support to be activated.
UBeaut
support
If you have a thread manager (e.g. UBeaut) installed, then by default only one copy of your message window can run. So if you happen to have a message window open and then call it from another thread, it will return immediately. This can have tragic results if the user's being asked to confirm some major action.
You will need to disable your thread manager on your MessageBox window. If you are unsure as to how to do this, you will need to contact your Thread manager supplier.
Other
Products
Most other 3rdparty products will be completely supported by MessageBox. MessageBox
has been tested with all of Capesoft's products and numerous other 3rdparty products.
For queries on specific other 3rdparty products please contact our support
division.Frequently
Asked Questions
My app seems to hang when a Message() appears. What's wrong?
I'm getting Compile Errors
| 1.1 | If I get an error in my logfile, it GPFs without warning when I log a message. How do I inform my users of this? |
| Answer: |
The problem is you can't use your message() function to report the
error (as it is open already). One solution is to not use the MessageBoxHalt()
function and call the halt if you encounter an error in this instance.
This will ensure that the user is given some feedback when the program
exits (after all - the program is about to GPF in any case).
Thus:
If errorcode() then halt(,'There
is a problem with the MessageBox file...') .
!For Legacy
If access:<MessageBoxFile>.Errors.SaveErrorCode then halt(,'There is a problem with the MessageBox file.') . !For ABC - Clarion5 and C55 If you are using Clarion 6 then: If access:<MessageBoxFile>.Errors.Status.V.SaveErrorCode then halt(,'There is a problem with the MessageBox file.') . !For ABC - Clarion6 You can put this code in the embed point - ThisMessageBox|InsertLog|(4) After the Parent Call and generated code. Alternatively, if you are using the LimitLogFile feature, you must put this check in the ThisMessageBox|LimitLog|(4) Before Generated Code, as the LimitLog method is called before the above embed point is reached. Note for ABC users: Unfortunately the writers of the ABC classes have deemed it beneficial (for reasons best known to them) to make the Errors class a protected property. You need to remove the PROTECTED attribute of the Errors property and the SaveErrorCode property in the ErrorClass. You can do this in the abfile.inc and the aberror.inc header files. |
| 1.2 | I am having a problem with logging. Nothing is being logged to my logfile. What could I be doing wrong? |
| Answer: |
You need to check that you:
1. are in fact using your own stop - check that the 'Functions
To Use' options group on the Basic tab of your MessageBox Global Template
has either the 'All' Checkbox checked or the 'Stop' checkbox.
2. have selected the 'Capesoft MessageBox with features' object
on the Basic tab of your MessageBox Global Template.
3. have not disabled MessageLogging (on the Features tab of your
Global MesageBox Template).
4. have either checked the 'Automatically log messages'
on the Features tab of your MessageBox global Extension template your
you have set the ThisMessageBox.LogMessages = 1 at the beginning of your
program.
5. have checked the 'Remember logging' on the Features tab of
your MessageBox global template.
6. have all the checkboxes cleared in the Selective logging group
on the Features tab of your global template.
7. have specified your file as the logging file on the LogFile tab
of your messageBox global template.
if you have checked all these and are still not logging:
8. Do a scan of your source routines for ThisMessageBox.LogMessages
= 0 to make sure that the logging is not being turned off.
if you have checked this and are still not logging:
9. Place a trial stop in your code and set the ThisMessageBox.LogMessages
= 1 immediately before this. If this is the last step and you can see
the stop being logged, then your static property has not been set for
logging, or has been cleared at some point.
|
| 1.3 | I'm trying to use the logging feature in my Message/stop/halt functions but it GPFs when the window closes. |
| Answer: | You've probably checked the 'Disable Logging' check box in the Global Extension Template, but you're setting the logging feature flag. You need to uncheck this 'Disable Logging' check box in order to allow you to use and activate the Logging feature. |
| 1.4. | If I set my MessageLog file to Current/DataDir(Messagebox.log) I can't find it. |
| Answer: |
The ASCII message file name is set in the Init method of the MessageBox
class. If you're only setting your path after the call to the
ThisMessageBox.Init, then the logfile will be placed in whatever path
your application started in.
Example:
GlobalErrors.Init(GlobalErrorStatus)
INIMgr.Init('.\msgbox.INI', NVD_INI) ! Configure INIManager to use INI file DctInit
!You need to set your datapath here
!CapeSoft MessageBox init code ThisMessageBox.init(1,1) !End of CapeSoft MessageBox init code SystemParametersInfo (38, 0, lCurrentFDSetting, 0) ! Configure frame dragging |
| 2.1 | How do I add information to the log about where the message box was invoked from (i.e. the procedure that called it)? |
| Answer: |
You can do this in C5.5 or later and is only available in ABC
applications.
1. In the MessageBox procedure - extensions - Capesoft MessageBox
Controls template, go to the 'Advanced' tab and check the 'Maintain the
Procedure name in the Error Class'.
2. If you are using a table in your dictionary to log the messages,
then make sure that you have a field in your MessageBox logfile to store
the Procedure name in it (setup in the MessageBox Global Extension
template - in the Logging tab)
|
| 2.2 | I want to just log all/some of the Clarion Messages without displaying them. How do I do this? |
| Answer: | There's a
DontShowWindow Property property in the 'CapeSoft Message Box with features'
class, which (if set) will just log the message without displaying it.
This is easy in Clarion5.5 (and above) if you are using ABC methods: 1. Turn off Remember logging in the Messagebox
Global Extension Template. case ID
|
| 2.3 | How do I log extra details to my log file? |
| Answer: | This depends whether you are using the Default
ASCII text file or your own log file. The best place to add the code is
in the Capesoft MessageBox | ThisMessageBox | PrimeLog | Before the Parent
Call global embed point. There is an example in the abcASCIILogFile\useascii.app
application that comes with MessageBox that demonstrates the first instance.
Using your own log file is a bit simpler, because you simply make the equates
in the above embed points. You must remember though, that if the DontShowWindow
property is set, then some of the object properties have not been set when
the PrimeLog method is called.
For Example, if you wanted to log the text of the button that was pressed you could insert the following into the above embed point:
|
| 2.4 | I use Secwin (or another Security template) with this app. How do I get the user name into the MessageBox user name field? |
| Answer: |
It's just one line of code (for Secwin and most other Access Control
software).
ThisMessageBox.LoggedIn
= ds_CurrentName(ApplicationNumber)
You can put this code straight after your Secwin login. Please
check your Access Control software's documentation for the correct function
name (if you're not using Secwin).
|
| 2.5 | I only want to log messages, without logging stops as well. Can I do this? |
| Answer: | Yes, there's a checkbox where you can disable logging for stops/messages/halts in the global extension template to do this. |
| 2.6 | I only want to log system messages without logging other messages. How do I do this? |
| Answer: | This is easy in Clarion5.5 (and above) if you
are using ABC methods:
1. Turn off Remember logging in the Messagebox
Global Extension Template. ThisMessageBox.LogMessages
= 1 |
| 2.7 | My users reboot the computer when a MessageBox appears. How can I log this? |
| Answer: | MessageBox logs the message at the point of
exit (so that it can track which button was pressed). You need to put the
following code in your Global Embeds: Capesoft MessageBox | ThisMessageBox
| Open | After the Parent call:?
and the following code in your Global Embeds: Capesoft MessageBox | ThisMessageBox | Close | BEFORE the Parent call:
|
| 4.1 | I'm trying to use the Timeout, but it doesn't work. |
| Answer: | You may be using more than 1 button on your window without having a default button. You must have a default button if you're wanting to use the Timeout Feature with multiple buttons. |
| 4.2 | I want other text on my message box buttons than the standard OK/Yes/No/Abort/Retry/Ignore/Cancel/Help text. Is this possible? |
| Answer: | Yes, Capesoft MessageBox can do all that the
normal message function can do and more. Here's an example of how you do
this: Example Code: case Message('Would you like to continue or reprocess?','Question',ICON:Question,'Continue|Reprocess',1) of 1 |
| 4.3 | Can I put Icons on the buttons? |
| Answer: | Yes you can. This is one of the additional features of Capesoft MessageBox (details). |
| 4.4 | How do I use variables in my MessageBox when I want to use the 'DontShowThisAgain' feature? |
| Answer: | The easiest way is to set the NotAgainID property
as follows:
ThisMessageBox.NotAgain = 1 Otherwise: You will need to change the way MessageBox stores the Registry
entry that shows the status of the DontShowThisAgain for that specific
message. For example, you could decide that no variables should appear
in the heading and first line of the text as follows: In the Global Embeds,
in the embed "Capesoft MessageBox.ThisMessageBox.PutDontShow.2) Before
the Parent Call" you could put the following code: |
| 4.5 | I am trying to use the Hyperlinked email message, but it doesn't seem to work. I am not getting any compile errors. |
| Answer: | 1. If your HyperLink is not appearing on the
MessageBox window then you are not setting the ThisMessageBox.HyperLink
property before calling the message. If you would like the HyperLink to
appear on all messages, then set the Hyperlink's
Static property on. You will only need to set this property once then. 2. If your hyperlink string is appearing, but is not 'HyperActive', then you have not added the control to the list of HyperActive controls (see the HyperActive Local Extension Template). 3. If the string is 'HyperActive' but it does not point to the Mail, then you have not entered the same HyperLink variable (EmailLink by default) on both the Local Message Control Template ('Features' tab) and the URL for the ?HALink control on the HyperActive Local Extension Template. |
| 4.6 | I want to change the text on a message that is generated by Clarion (or a 3rdparty DLL). Is this possible? |
| Answer: | You need to handcode the changes - but it simple to add the code. Check out the Property Changing section. |
| 4.7 | I would like to alter the parameters that are passed to the Message window (Text, buttons and the like). |
| Answer: | You can do this in the MessageBox
- Alter Message Parameters embed point. For example, if you would like to
change the default button of the confirm delete message, you could do this
here with the following code:
if clip(LMBD:HeadingText) = 'Confirm Delete' and | You could also include a condition to check for a specific procedure (ABC in Clarion5.5 and higher) and only perform the changes for that procedure. For Example: if clip(ThisMessageBox.FromProcedure) = 'UpdateTables' end |
| 5.1 | I'm trying to use the LOCALE command to set the default button text, but it does not affect my message() buttons. |
| Answer: | At this stage there is no way of reading what was set by the Locale command, so we've made a method called CSLocale (ThisMessageBox.CSLocale). This method takes the same parameters as the LOCALE function, which you need to call instead. |
| 5.2 | When I issue a stop and/or message command the program closes immediately without warning. If I use the Clarion stop and/or message then it works. |
| Answer: | You probably have the procedures mixed up. In your MessageBox global extension template, check the procedures in the drop lists where the procedure names are entered. |
| 5.3 | I can't get rid of the Message, Stop and Halt TODO procedures in my application |
| Answer: | If you are wanting to delete MessageBox from
your application, then check out FAQ
5.10
This either means: - OR - 2. that you have originally set this application to be a
root DLL or stand-alone EXE, which is now part of a Multi-DLL application,
but is not the root (or data) DLL. You need to: |
| 5.4 | I'm using messagebox in a couple of my programs which are running locally without problems. As soon as I try to access a network the programs are crashing with a stack overflow. Am I doing something wrong? |
| Answer: | You're probably using the CSMesBox.tps file with a variable for the path. This variable must be set before the first Message() is called. |
| 5.5 | I'm getting buttons with raised text on my MessageBox buttons occasionally. These are buttons with longer-than-average text length. How can I rectify this? |
| Answer: | This is a Clarion bug when the font color is implemented. The best is to make the font color on the window, COLOR:None, or set the colors on all the buttons of the MessageBox control template to COLOR:None. |
| 5.6 | I have a legacy application which GPFs if I use the Capesoft MessageBox with Features class. |
| Answer: | You need to add the _ABCDllMode_=>0 define to your project's defines. |
| 5.7 | Is there a way to default the button icons for the standard buttons instead of sending them in each call to the message procedure? |
| Answer: | Yes there is, check out Method 2 of the Display Icons on Features section. |
| 5.8 | |
| Answer: |
You can edit the window's properties just like any other windows.
Go into the window editor window (of your MessageBox window) and set the
window's font. The prompt and buttons take on the font that you specify
for the window. In the same way you can edit any of the properties of
any of the controls. You should not set the operating properties though
(like hide and enable). Positional properties are also all set at runtime,
so any positional properties set in the window editor will be overridden
at runtime.
|
| 5.9 | My Message window displays the minimize, restore, and close buttons in the caption bar. How do I get rid of these? |
| Answer: |
Go to your ds_Message window (the window that is used for the MessageBox) and set the following options: 1. In the Window Formatter, right click and select Properties - change to the Extra tab and clear the Icon field (this will get rid of the Minimize button). 2. Same place - uncheck the 'System menu' checkbox (this will get rid of the close button). 3. Same place - uncheck the 'Maximize Box' checkbox (this will get rid of the restore button). If the buttons are still present after this, then you probably have a 3rdparty tool that is setting them. You could have Mike Hansen’s SuperStuff Select default icon for the entire app, in which case you'll need to contact BoxSoft in order to find the remedy to disable the icon placement on the Message wiindow. |
| 5.10 | I want to remove MessageBox from my application. How do I do this? |
| Answer: |
1. Open your application in the Clarion IDE.
2. In your Global Extension Template list, delete the MessageBox global Extension template. 3. Return to the application tree and delete the 3 MessageBox windows from the procedures list. These will now appear as TODO procedures. 4. Export your app to txa and open the exported txa in a Text editor. 5. Find the TODO procedures (which should appear as follows) and remove them (i.e. delete this whole block of code). [MODULE] 6. Save this TXA file. 7.Create a new application and import this txa. You can then rename this app to the original application name. 8. Set the _NoCSMesBox_=>1 project define in your Project defines (if this is a MultiDLL application, you will need to do this in all the applications that had the MessageBox template added)
9. If you have handcoded references to the MessageBox
object, you can enclose these in an omit statement using the above
project define (rather than removing or commenting them out, in case you
want to add MessageBox back in to the application). omit('***',_NoCSMesBox_=1) |
| 5.11 | My app seems to hang when a Message() appears. What's wrong? |
| Answer: |
Check and see if the procedure has the "save and restore window
position" feature turned on. (I'm guessing it has). Turn it
off....
To do this: Open your application and double click on the cs_Message
window procedure to bring up the Procedure properties window. You will see
a INI File Settings group - clear the Save and restore window location
checkbox. If it's not there, then click the Windows Behaviour button. The
INI settings group will be there. |
| 5.12 | One specific Message() call GPFs my app when using MessageBox. |
| Answer: | If you call a message() from a source procedure that is called directly from a frame, and prior to the message() call a new MDI child thread is started, then your application will GPF. Unfortunately this is a Clarion oddity, so the best is to either move the message() into the window that is called or into the frame. |
| 5.13 | Is it possible to dynamically change the font information for any given message? |
| Answer: | The Message window is a procedure in your application, so you can easily write code in to handle this. What you can do is in your derived MessageBox object (in the global objects) - you can add a few properties to the ThisMessageBox properties (other properties) and then set them immediately before message() call (as you would the other features properties). In your ds_Message procedure, you can set the font of the window based on these properties after the window opens (in the ThisWindow.Init method). |
| 5.14 | How do I change the size of the buttons on the MessageBox window? |
| Answer: | Self.buttonheight and self.buttonwidth are the 2 properties that you're looking for. In your derived SetControlProperties method - set those there (before the parent call), that should do the trick. |
| 5.15 | I want more space on either side of the text on the MessageBox window - it looks too cramped. |
| Answer: |
You can quite easily change this by altering the equates in the
MessageBox.inc file. Open this file in a text editor and search for
GLO:StringXPos. You can set this value to the desired amount. Note: this file is replaced with each release of MessageBox, so you'll need to make a backup of this file before installing an update of MessageBox, and then re-implement your changes each time. |

![]()
Compile
Errors
| 1 | In a multi-dll application, do I run the utility only on the data (base) DLL only and add the global extension to it and the other DLLs, or do I run the utility on all of the APPs? |
| Answer: | You just run the Template utility in the data DLL. You need to add the global template to all the EXEs though (and the DLLs - which will use the MessageBox class). You must set up the Multi-DLL project options on the global extension template in each of the DLLs (where the global template is added) and EXEs correctly. |
| 2 | When I add MessageBox to an app, add the required procedures, and then delete them (extension call and procs), it leaves the procs as to-dos. How do I get rid of them? |
| Answer: | This is a bug in Clarion that affects procedures
which are called from global extensions. Basically the extension can be
deleted, but it refuses to remove the "to-dos". there are 2 work-arounds; 1) Make the procedures simple empty procedures based on the "Source" template. This will leave them there, but they're empty so don't take up any space in your eventual program. OR 2) Export the app to a TXA. Edit the TXA (look for the offending procedure names). Then make a new app and import the TXA... |
| 3 | I have been using MessageBox for sometime, but since my last download I'm getting a compile error: Unknown identifier: ?HALINK |
| Answer: | The latest version requires that you delete your MessageBox control template populated on the MessageBox window. There is an extra control in the template which does not get automatically added to the existing control template on the window. |
| 4 | I'm trying to use the MessageLog tps file (instead of the ASCII log file), but I get compile errors (like elements in the log file not found, etc.). |
| Answer: | 1. Check that you have entered the log file
details correctly on the 'LogFile' tab on the MessageBox global extension
template. 2. Check that you have the 'Generate all file declarations' checkbox checked. You will find this on the File Control tab on the Global Properties window. |
| 5 | I started getting the Unknown Identifier: FROMPROCEDURENAME Error when compiling. |
| Answer: | The FROMPROCEDURENAME is used to maintain the GlobalErrors class procedure name. This is setup in your extension template on your message() window in your application. Uncheck the 'Maintain the procedure name in the ErrorClass' or ensure that the Class name is the same. |
| 6 | Since upgrading, I'm getting a lot of Syntax Errors on MessageBox class properties. |
| Answer: | In MessageBox
version 2.00, MessageBox became completely threadsafe. In order to do this,
we needed to split the messageBox classes into 2 objects: 1 to contain the
Global Settings that you set once for your entire application, and one
threaded class to contain the properties for the message() on the thread on
which it is called. Change all reference to the global properties as follows (when reading the property): MyLogMessagesVariable = ThisMessageBox.GetSetting('LogMessages') And where setting global properties (settings): ThisMessageBox.SetSetting('LogMessages',MyLogMessagesVariable) Change all reference to threaded properties (or properties for the next instance of the messagebox): ThisMessageBox.once.NotAgain = 1 !add the .once in to the property reference. The StaticFeatures property has been deprecated. You need to either use the threaded property (to activate a feature in the next instance of the message window) - or set the global property (which is the default if the threaded property is -1). Note: The GetSetting method now returns a string, so: if ThisMessageBox.GetSetting('MessagesUsed') !This statement will always be true end You need to change this statement to: if ThisMessageBox.GetSetting('MessagesUsed') > 0 !This statement will only be performed if the MessagesUsed is > 0 end |
![]()
What
the users are saying about MessageBox
I have built a ?1m business around Clarion, and have over 300 sites waiting for an upgrade that I was (until now) unable to give them. Now ... Messagebox has made the single most RADICAL difference to stability of anything I have tried, all in about 30 mins, all for about $39. I can categorically state it works!
I'd been trying to track down a access denied error for months and within 1 week of implementing message box was able to finally track this down and squash the bug. Today is the first day we've run in a production environment without this nasty bug. To me the money was well spent.
![]()
Source
Code Policy
We have chosen to ship Capesoft MessageBox as source code, rather than as a compiled
DLL. This makes it much easier for you to modify, but it also makes it much
easier for you to pirate. We ask you to please consider the effort involved
in writing this product, before you chose to hand it on to any other developers.
If you received this program illegally (i.e. if you didn't pay for it, or you didn't buy it from CapeSoft, ClarionShop, or one of their respective dealers) then we ask you to contact us so that we can remedy this situation. Without the revenue generated from products such as this it is impossible for us to create new products.
This next bit is optional - and is included for the benefit of programmers wishing to inspect, or alter, the Capesoft MessageBox object.
Capesoft MessageBox was written with the aid of Object Writer - a freeware template available from http://www.capesoft.com/accessories/owsp.htm . You will require this template if you wish to open the included MesBox.App file. The MesBox.App file has been written in Clarion 5. If you work with the MesBox App then make sure the Object Writer Global extension is set to point to your Clarion 5 installation. Please Note : Generating the MesBox App will overwrite your existing MessageBox.Clw and MessageBox.Inc files (in your \Clarion5\LibSrc directory).
We welcome any suggestions from users regarding new features that might be added to Capesoft MessageBox.
Copyright
and License
This product, and all the files contained therein, is copyrighted © 2008
by CapeSoft Software (Pty) Ltd. You are not allowed to copy any of the files contained
in this product, including but not limited to: Application files (APP), Template
(TPL) files, Library (LIB) files, Source files (CLW), Include files (INC) and
documentation (HTM) files.CapeSoft Software (Pty) Ltd, employees of CapeSoft Software, and Dealers of CapeSoft Software products, explicitly accept no liability for any loss or damages which occur from using this package. Use of this package constitutes agreement with this license. This package is used entirely at your own risk.
What
You Need to Distribute to your Users
You don't need to distribute anything else besides what you would normally distribute
(without Capesoft MessageBox) as all the objects will be compiled into your EXE
or DLL. You will have to distribute the tps.dll file (c55tpsx.dll, c55tps.dll,
c5tpsx.dll, c5tps.dll, c4tpsx.dll or c4tps.dll) if you use the Message Logging
function, if you're not distributing it already. Where
can you get it?
The full working version of Capesoft MessageBox is available at $59 from:| CapeSoft Sales | |||
| Web | |||
| Telephone |
+27 21 715 4000
|
||
| Fax |
+27 21 715 2535
|
||
| Post |
PO Box 511, Plumstead, 7801, South Africa
|
||
| Buy Online | |||
| Web | |||
| CapeSoft Support | |||
| Telephone |
+27 21 715 4000
|
||
| Fax |
+27 21 715 2535
|
||
| Post |
PO Box 511, Plumstead, 7801, South Africa
|
||
![]()