 beta
betawww.capesoft.com
| Using the Proxy Example as a Debugging Tool | ||
 |
||
Version
 beta
betawww.capesoft.com |
||


In Thiswindow.TakeWindowevent there is a lot of embed code dealing with various window events that occur during the application's lifetime:
Clear button
The data displays (and their associated variables) are cleared. The log file will remain unaffected.
Listen button
Saves settings to the initialization file by calling the SaveData routine. Establishes the listening port by calling Open() with an empty string as the server name, and the port that was specified in the Port text entry is used as the port number. It also disables the Listen button and enables the Disconnect button. The log file is updated with an appropriate message.
Disconnect button
Closes all client connections. See the description of the CloseAll() procedure in the NetTalk documentation for more information. It also closes the server, re-enables the Listen button and disables the Disconnect button. Resets the timer by calling the ResetTimer routine (because we updated the status bar), and updates the data displays (Fromserver and ToServer) with the text "[User Disconnected]"
WinOnTopFlag check box
When checked it calls WinOnTop() to make the window stay on top of all other windows. When unchecked, it reverses the process by calling WinNotOnTop() to reset the behavior to normal.
OpenWindowThe MyClients.ConnectionClosed method is called whenever a connection was closed by the server. The closed connection's details will now be in the ourQueue buffer.
It checks whether the WinOnTopFlag is set (by the loading of the data in the INI file), and then calls WinOnTop() if necessary.
Timer
Clears the status display. This is useful to keep the status display relatively up to date, as old messages are cleared regularly (every eight seconds to be exact).
This is what happened: the user pressed the "Listen" button (as indicated by the "[User Connected]" line. Some time after that the email client opened a connection to the server, to check for new messages. The server then replied (again, the data is enclosed in brackets) with a "ready-to-go" string.
[User Connected]
[-------------------- New client #2 connection --------------------]
Server -> Client ID:2: {+OK VPOP3 Server Ready <8e86.f0.29c27c7a>
}
Server <- Client ID:2: {USER Mike
}
Server -> Client ID:2: {+OK User Accepted, PASSword required
}
Server <- Client ID:2: {PASS MikeHasAGreatPassword
}
Server -> Client ID:2: {+OK Mike has 0 message(s) (0 octets)
}
Server <- Client ID:2: {STAT
}
Server -> Client ID:2: {+OK 0 0
}
Server <- Client ID:2: {QUIT
}
Server -> Client ID:2: {+OK VPOP3 Server Closing Connection
}
[Server Closed Connection]
[Closing connection from client ID = 2]
The client connects. The server responds with a status message. The client then proceeds to request a specific news group, an then receives the data.
[-------------------- New client ID:2 connection --------------------]
Server -> Client ID:2: {200 news.softvelocity.com DNEWS Version 5.4g5, S0, posting OK
}
Server <- Client ID:2: {MODE READER
}
Server -> Client ID:2: {200 DNews is in reader mode - posting ok.
}
Server <- Client ID:2: {GROUP comp.lang.clarion
}
Server -> Client ID:2: {211 33467 19444 53047 comp.lang.clarion selected
}
Server <- Client ID:2: {XOVER 52750-53047
}
Server -> Client ID:2: {224 data follows
}
Server -> Client ID:2: {52750 Re: How to program Clarion "Kelvin Chua" <NOkelvinSPAM@accpro.com.sg> Tue, 6 Nov 2001 22:46:13 +0800 <3be7f87c@news.softvelocity.com> <3be5538c@news.softvelocity.com> <3be70ccd@news.softvelocity.com>
.
.
.
52763 Re: Clarion - Alternatives? arnor@icetips.com (Arnor Baldvinsson) Tue, 06 Nov 2001 16:01:23 GMT <3be808a3.8021036@news.softvelocity.com> <3be0e7cb.0@news1.mweb.co.za> <3be15be7@news.softvelocity.com> <3be3d3ac.88375426@192.168.15.1> <3be55ecc@news.softvelocity.com> <3be78e82.64784436@192.168.15.1> <3be7fe72@news.softvelocity.com> 1666 28 Xref: news.softvelocity.com comp.lang.clarion:52763
52764 }
You can just double-click on the program file (which is named proxy.exe). There are no required command line switches.2. Configure the proxy:
The proxy must be set up to listen to a specific port, and the proxy server settings must be set up.3. Start up Internet Explorer as usual.
To set up the proxy settings: Type the proxy name into the Server text entry field provided for this purpose. Also specify a port on the server to use (A port number of 80 is usually used). A good place to get these details might be from Internet Explorer's Connections tab (as seen below)
In my case I have to click on the LAN Settings button to reach the correct settings.
Then, just copy the proxy server address and port settings to the personal proxy (in this case EARTH and 80 respectively).
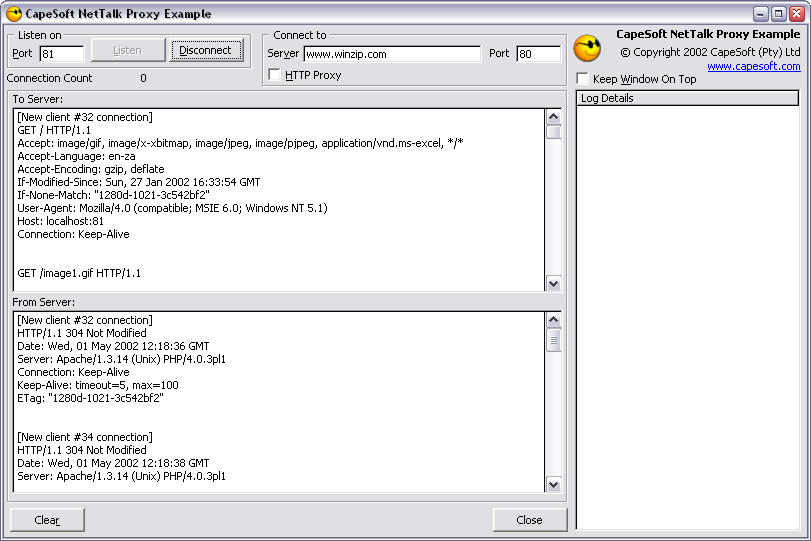
To set up the listening port: In the top left corner there is a space for the port number. Decide on a number and type it in here. See the Miscellaneous section for information about port number conventions. Then click the Listen button to start the listening process.
Minimize the proxy for now.
We have to set up Internet Explorer to use our proxy program we just started. If Internet Explorer is not configured, it uses its default server, thereby completely bypassing our proxy.5. See the proxy in action
Open up the Connections tab on the Internet Options dialog box (accessible via the Tools menu). If you are on a local area network, you need to click the LAN Settings button. Make a note of these settings. When you are finished with the proxy, you need to restore them to their original values.
Replace the specified server address with the word localhost. Also replace the port number with the same number you configured the personal proxy to listen to. Make sure it is exactly the same, otherwise your browser will not be able to "see" the Internet, and your proxy will be sitting there idle as well.
Now click OK to close the dialog box.
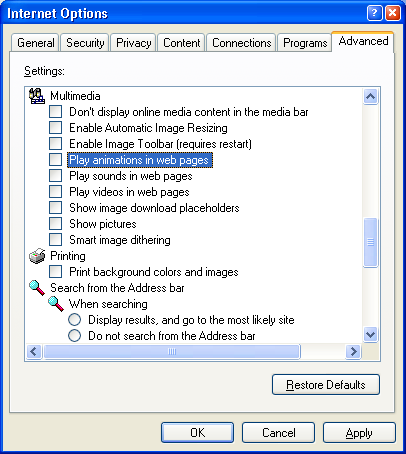
Disable graphics: Before you use the proxy, you may want to disable graphics as this interferes with the data displays on the proxy.
Go to the Advanced Settings tab on the Internet Options dialog box.
Scroll down to the Multimedia heading. Make a note of the settings in this section (for when you need to restore these settings later when you have completed the exercises). Clear the tick marks next to the settings starting with "Play", and uncheck the "Show pictures" setting. Then click OK.
Remember to reset these to their original values when you have finished exploring the personal proxy.
Your browser has now been set up correctly.
Request a web site (anything, e.g. www.capesoft.com), and watch as the proxy springs into action, logging all activities.
Double-click the proxy's program file (proxy.exe). Note that you should open two instances of the proxy, for reasons that will be made clear later.2. Configure the proxy
We need to set up the port the proxy should listen on, the server the proxy passes the mail commands on to, and the port on that server we are going to talk to.3. Start Outlook Express
Because a mail client usually uses two different ports (one for incoming mail [usually 110], and one for outgoing [usually 25]), we needed to start two instances (one for each port).
You can choose any two (different) port numbers to use, as long as Outlook Express is configured to use these same ports. Having said that, it usually makes more sense to stick to the defaults, to avoid clashes with other protocols, such as HTTP.
In Outlook Express's Internet Accounts dialog box (accessible via Tools->Accounts...), select the email profile that you usually use (probably the one marked "(default)"), and click on the Properties button.
The Mail Properties dialog box will now pop up. Select the Advanced tab.
Note the two numbers (shown next to "Outgoing mail (SMTP)", and "Incoming mail (POP3)" respectively); configure each instance of the proxy to use one of these numbers. Do this by typing them into the Listen On Port boxes (in the top left corner) of the proxies.
Now for the server name: switch to the Servers tab in the Mail Properties dialog box. Copy the server name in the Incoming Mail text box into the proxy's Server text box (Important: this should be the same proxy that you set to listen on the incoming mail port). Do the same with the Outgoing Mail server name (type this one into the other proxy).
The last thing that needs to be set is the port on the mail server the proxy should connect to. This must be the same as the port numbers set in Outlook Express, so you can just copy the number in the Listen On Port text entry to the Port text entry next to the Server setting (this would be port 25 in the image below).
Do this for both proxies.
Now just press the Listen button, and minimize the proxies. They have now been set up correctly.
Go to the Servers tab in the Mail Properties dialog box (accessible via Tools->Accounts...). Make a note of the server names (or IP addresses, whichever applies in your case). Now change both server names to the word localhost (e.g. in the image below, the IP addresses [192.168.2.23] should be changed to localhost). If you configured the proxies to listen on non-default port numbers, you need to set the port numbers on the Advanced tab to the numbers you have chosen. Close the dialog box.5. See the proxy in action
Go check for new emails, or send some of your own, to see the proxy in action. For an interpretation of the log files that are generated, see here.
Remember to restore your server names (in the Mail Properties dialog box), or you wil be unable to send and receive mail when the proxy is not running.
Double-click the program file named proxy.exe. No command line switches are required.2. Configure the proxy
Set the proxy to listen on port 119 (this is usually the news port). Also set the server name to news.softvelocity.com. We are going to use the SoftVelocity news server for our example. The port setting next to the server name should be 119 as well.3. Start the NetTalk demo application
When all that has been set, you can press the Listen button to start the listening process.
Double-click on the executable (named netdemo.exe). This can usually be found in your Clarion\3rdParty\examples\nettalk\Demo folder4. Start the demo's newsreader
If there is no executable file, you need to compile the NetTalk demo first. See the NetTalk documentation for instructions on how to do this.
Click on the Get News icon to start the reader.5. Configure the newsreader
In the News Server text box type localhost. This will make the newsreader use the proxy instead of connecting directly to the news server.6. Start reading!
The rest of the settings should remain unchanged. Set the Port setting to 119.
To start with, press the List Groups button to get a listing of groups on the server. This may take a little while if you have a slow Internet connection.
You can then select a newsgroup to download. Do this by double-clicking the name of a group in the Newsgroups browse. This will fill in the Newsgroup field below the browse. Press the download button. This will retrieve all messages in your selected newsgroup.
When the download is complete, you can use the other tabs to see various aspects of the first message. Use the "<< Back" and "Next >>" buttons to navigate the messages.
Switch to the proxy from time to time, and observe the behind-the-scenes action. This can be quite fascinating.
| Protocol | Port |
|---|---|
| Web access (i.e. Internet) | 80 |
| SMTP (email) | 25 |
| POP/POP3 (email) | 110 |
| News | 119 |