Keen to get started? Or just don't like wading through
all the documentation? This section is just for you - the basics on how to
get xFiles working as quickly and simply as possible.
Things you need to know to load XML
XML Files come in all shapes and sizes, but reading
them into a Clarion structure can usually be done with a single line of
code. In additional the File can be either stored on disk, or already be
in RAM as a string. Importing from either of these is trivial.
Creating the xml object in your procedure.
You can use the xFiles extension template to add
an XFiles object to your procedure. Or you can hand-code the object
declaration in the data section of your procedure. It'll look
something like this;
xml xFileXML
Matching the field names to the XML.
The secret to the simplicity of the Load is that
the NAME (or External Name attribute) of the fields you are loading
matches the xml tags in the xml file. For example, if you have xml
that looks like this:
<xml>
<server>www.capesoft.com</server>
<port>80</port>
</xml>
then your group should have the same field names:
Settings Group
Server String(80)
Port Long
End
xFiles simply matches up the names and the tags, and copies the data
across for you.
In some cases the xml tags have names that are not legal Clarion field
names. Or you may just want to change the tag name to match your field
name. In this case set the External Name to match the tag name. For
example:
<xml>
<web-server>www.capesoft.com</web-server>
<web-port>80</web-port>
</xml>
then in your group set the external names:
Whatever Group
Server String(80),Name('web-server')
Port Long,Name('web-port')
End
Attributes
XML allows attributes to be assigned to a tag. For
example;
<xml>
<server protocol="http">www.capesoft.com</server>
<port>80</port>
</xml>
This is equivalent to;
<xml>
<server>www.capesoft.com</server>
<protocol>http</protocol>
<port>80</port>
</xml>
xFiles parses incoming attributes exactly as if they were tags.
So the group for the above would be
Whatever Group
Protocol String(10)
Server String(80),Name('web-server')
Port Long,Name('web-port')
End
TIP: The order of the fields in
the group is not important, except in the case where multiple fields
have the
same external name.
TIP: For more on Creating XML that
contains attributes, see
here.
XML containing structures inside
Xml can contain a structure inside a structure.
For example;
<xml>
<server>www.capesoft.com</server>
<protocol>http</protocol>
<port>80</port>
<logging>
<local>1</local>
<summary>1</summary>
</logging>
</xml>
This can be matched in clarion by placing a group inside your group.
Whatever Group
Protocol String(10)
Server String(80)
Port Long
Logging Group
Local Long
Summary Long
End
End
XML containing multiple records
In multi-record XML xFiles needs to know the FileBoundary and the RecordBoundary.
These properties tell xFiles what part of the xml file to parse, and
most importantly when a record is complete. For example in the
following xml
<?xml version="1.0" encoding="US-ASCII"?>
<table>
<item>
<name>Bruce</name>
<age>29</age>
</item>
<item>
<name>Bob</name>
<age>40</age>
</item>
</table>
The file boundary is <table>
(since all the records fall between <table>
and </table>) and the record
boundary is <item> (since the data
we are interested in, the name and age, falls between <item>
and </item>)
We can store this xml file in a Queue, which would look something like
this;
NamesQueue Queue
name String(20)
age Long
End
TIP: The first step is looking
at the XML file in question and deciding on the most appropriate
structure to load it into. A Group is best if the xml contains a
"single record" and is typically used for program settings and things
like that. If the structure contains a repeating structure (in other
words, multiple records) then a Queue or File is more appropriate. Of
course an In-Memory file can be used as a File rather than using a
Queue.
TIP: Although a valid XML file always
has a single FileBoundary, that wraps the XML from top to bottom, not
all systems generate XML that conforms to this standard. So xFiles
allows the FileBoundary to be blank. If it is blank, then xFiles
parses the file as if there is no file boundary. In the case of a
Group, it is possible to set the RecordBoundary blank, and still have
a valid XML file. For example;
<?xml version="1.0" encoding="US-ASCII"?>
<data>
<server>www.capesoft.com</server>
<port>80</port>
</data>
In this case the FileBoundary should be set to blank and the
RecordBoundary should be set to
data.
XML with Attributes
An alternative approach to XML is the use of
attributes. This is just another way of storing information. xFiles
treats attributes on the record boundary exactly as if they were
separate fields. For example;
<record firstname="bruce" lastname="brown">
<dob>1/1/2000</dob>
</record>
is processed as if it was;
<record>
<firstname>bruce</firstname>
<lastname>brown</lastname>
<dob>1/1/2000</dob>
</record>
Lastly, there is a special case where the xml you are parsing looks
like this;
<product>1</product>
<product>2</product>
<product>3</product>
In this case there is a list of products, where each <product>
tag symbolizes both a complete record, and the field name. Or, to
describe it another way, in this xml the File boundary AND the Record
Boundary are both missing. In this situation you call the .Load method
as normal, and you must include both the file, and record boundaries
in the call, as blank strings.
Tag Case
XML is unfortunately case sensitive. This adds a
layer of complexity to it since Clarion is a case-insensitive
language. Fortunately this complexity is not difficult to manage. This
primary mechanism is the use of the TagCase
property. This can be set to one of XF:CaseLower,
XF:CaseUpper, XF:CaseAsIs
or XF:CaseAny.
In most cases, for a .Load XF:CaseAny is
an appropriate option.
For a .Save it gets more complex because the case is usually
determined by the program you are talking to. You can force all the
tags to be lower, or upper, case using XF:CaseLower
and XF:CaseUpper respectively. If the
tags have mixed case then your structure will need External Names on
all the components, and use XF:CaseAsIs.
Being explicit about the case before a load or save is recommended.
Loading an XML File from the disk into a
Clarion Structure
Once you have determined the data structure you will
be using, if it is a Queue or a File, you also need to determine the
File Boundary and Record Boundary. Once you know that then importing the
XML file is a single line of code.
xml.Load(Structure,XmlFileName,[FileBoundary],[RecordBoundary])
The last 2 parameters are optional in the case of a Group, but
it's always better to include them if you know what they are.
For example;
xml.start()
xml.TagCase = XF:CaseAny
xml.Load(NamesQueue,'c:\temp\names.xml','table','item')
or
xml.start()
xml.TagCase = XF:CaseAny
xml.Load(Settings,'.\settings.xml')
Loading an XML File from a string into
a Clarion Structure
This is just as easy as loading it from a file. The
syntax of the load method changes slightly to accommodate the name, and
length, of the string instead of the file name.
xml.Load(Structure,String,Length,[FileBoundary],[RecordBoundary])
For example;
xml.Load(Settings,SomeString,len(clip(SomeString)))
or
xml.Load(NamesQueue,net.packet.bindata,net.packet.bindatalen,'table',item')
Tip: Because the String parameter is
passed as a pointer, you can't put a constant in here, you must use a
variable. In other words the following will fail to compile;
xml.Load(Settings,'<server>www.capesoft.com</server>',100)
Loading XML from the Web into a Clarion
Structure
When two programs want to communicate across the web
they often pass their information formatted as XML. Web Services are
nothing more than servers that answer "Questions" using XML. This XML is
usually wrapped in a SOAP envelope, but not always. A SOAP envelope is
nothing more than some extra XML stuff included in the packet.
In short, you do not need to be at all worried about Web Services, or
SOAP. It's all just XML, and xFiles can handle it just like any other
XML. However it arrives, it will be available to you as a string, and
you can parse this string into a Clarion structure just as described in
the section above.
Tip: Interacting with a Web Service
typically consists of 2 parts. A Request, and a Response. This section
deals with handling the Response. For more information on forming the
Request, see the section
Creating SOAP
requests.
If, for example, you have used a NetTalk WebClient object to fetch the
XML from the server, then you would add a single line of code into the
.PageReceived method to parse the incoming reply
into a Group, Queue or File. For example, the
Convert example
does it with this line;
xml.load(resultGroup,self.thispage.getvalueptr(),self.thispage.length(),'','ChangeLengthUnitResponse')
If that page was an RSS feed, then the following line would copy the
feed into a Queue.
xml.load(RssQueue,self.thispage.getvalueptr(),self.thispage.length(),'channel','item')
The Queue declaration would look something like this;
RssQueue QUEUE,PRE(rss)
Title STRING(255)
Link STRING(255)
Description STRING(1024)
END
Loading into a structure with a pointer
There are times when you are not able to dictate the
maximum size of the incoming xml field. For example say you had an XML
structure that looked like this;
<group>
<id>1</id>
<image>xxx</image>
</group>
Usually this would match a clarion group structure like this;
axg Group
id Long
image String(255)
End
In the above group the maximum size of the string is arbitrarily set as
255 characters. The XML may contain a longer image, but only the first
255 characters would be in the group. Of course something like an image
may be very large, so it's difficult and undesirable to place an upper
limit on the size it can be. The solution to this is to make the field
in the group a pointer. In this case;
axg Group
id Long
image &String
End
The key here is that right before xFiles places the data into the string
it needs to get sufficient memory from the OS. To do this means you need
to add a bit of embed code into the AssignField method.
There are two different methods called AssignField
- the one to embed code into is the one that takes two LONG
parameters. The code goes before the parent call. For example;
if lower(self.CurrentTag) = 'image'
axg.image &= new string(DataEndPos - DataStartPos + 1)
self.CurrentField &= axg.image
end
As you can see DataEndPos and DataStartPos
determine the length of the data you are wanting to save, and CurrentField is reset to the newly gotten
memory.
Note that this memory has been added to your structure, and you are
responsible to DISPOSE it when it is no longer needed.
Specifically you MUST manually dispose the field before the procedure
ends or your program will leak memory.
This is especially true if you are using a pointer in a Queue. You must
DISPOSE the field (axg.image in this case) for each record in the queue
before the queue record is deleted or the queue is FREEed.
Groups and Queues allow for pointers, Files do not.
Loading into a structure with a
StringTheory pointer
This is related to the case above, but in this
situation you want to load the string-of-undetermined-length into a
StringTheory object instead of a string pointer. In this case the group
declaration looks like this;
xmlGroup group
id Long
image &StringTheory
end
And the code in AssignField looks like this;
if lower(self.CurrentTag) = 'image'
xmlgroup.Image &= new(StringTheory)
xmlgroup.Image.SetValue(self.BinData [DataStartPos : DataEndPos])
return ReturnValue
end
It is important that this comes before the parent call, and in this case
there's a RETURN before the parent call.
One difference to this approach to the &String mentioned above, is
that the contents of the StringTheory object will be exactly the
contents of the XML. No decoding of CDATA, nor ampersand decoding,
nothing like that occurs. If you need to do any decoding etc then you
can use StringTheory methods to do that after the call to SetValue.
Loading Parent and Child records
at the same time
Although XML is a specification for explaining the
content of a text file, it does not dictate the structural nature of the
text file. For example the following three xml files contain the same
information, but the structure of the xml file is different. And it
should be noted that these are only three of many possible
configurations.
Layout 1
In this layout the line items are included in the
xml file, but are not inside the Invoice tag. Each LineItem
explicitly includes a link to the Invoice that it belongs to.
<invoice>
<number>4</number>
<customer>Fred</customer>
</invoice>
<lineitem>
<invoice>4</invoice>
<product>xFiles</product>
</lineitem>
<lineitem>
<invoice>4</invoice>
<product>NetTalk</product>
</lineitem>
Layout 2
In this layout the line items are inside the
Invoice tag, however they still explicitly link to the Invoice in
question.
<invoice>
<number>4</number>
<customer>Fred</customer>
<lineitem>
<invoice>4</invoice>
<product>xFiles</product>
</lineitem>
<lineitem>
<invoice>4</invoice>
<product>NetTalk</product>
</lineitem>
</invoice>
In simple situations the Layout 1 case and the Layout 2 case, can
easily be handled using a two pass approach. Import the file twice,
once for the invoices, and once for the line items. Once the two
imports are completed all the necessary records for both tables will
have been imported. However there may be cases where the more
complicated method, which is required for Layout 3, has some
advantages.
Layout 3
In the third layout the line items are inside the
invoice, but there is no explicit link. Rather the position of the
line item, in relation to the invoice, determines which record the
line items belong to.
<invoices>
<invoice>
<number>4</number>
<customer>Fred</customer>
<lineitems>
<lineitem>
<product>xFiles</product>
</lineitem>
<lineitem>
<product>NetTalk</product>
</lineitem>
</lineitems>
</invoice>
</invoices>
For layout three it is necessary to parse the child records as the
parent record is being parsed because otherwise there is no way to
link child records to their parent. xFiles includes an example, called
inv.app, which is in your \examples\xfiles\ParentChild
folder. It is recommended that you take a moment to look at this
example to see the following explanation in action.
The basic strategy for doing a multi-level import is to create 2, or
more, xFiles objects. Each object is responsible for one target
structure. So in the layout above there is one Xfiles object for the
Invoice table (xml1), and one for the LineItems table (xml2). As xml1
reaches a lineitems tag, it calls xml2
with that part of the xml file. Using this strategy there's no limit
to the number of levels of children in the original xml file.
In this situation the child items are not "bounded" by a tag - there
are just multiple items in the invoice tag.
For a list which is not bounded see Layout 4 below.
InvoiceQueue Queue
Number Long
Customer String(20)
End
LineItemsQueue Queue
InvoiceNumber Long
Product String(100)
End
Notice in the above declaration an extra field (InvoiceNumber)
is added to the LineItemsQueue to link
back to the parent invoice.
The Load statement is pretty standard;
xml1.start()
xml1.TagCase = xf:caseLower
xml1.load(InvoiceQueue,'invoices.xml','invoices','invoice')
But in the
xml1.AssignField PROCEDURE (String pString)
method add some code before the parent call.
Hint: there are two
AssignField methods, with different parameters, so make sure
you install in the correct one.
If self.currentTag = 'lineitems'
Clear(LineItemsQueue)
xml2.start()
xml2.FreeQueueBeforeLoad = false
xml2.tagcase = xf:caseLower
xml2.load(self,LineItemsQueue,pString,'lineitems','lineitem')
Return
End
The very important thing to notice
here is that it's a second xml object (xml2)
which is being called here. The self parameter passes the xml1 object
to xml2.
Additionally code is needed for the SetFieldPointer
method. Since lineitems is not
actually a field in InvoiceQueue, it is
necessary to indicate to the class that we plan to process this tag.
This is done in the SetFieldPointer method.
xml1.SetFieldPointer PROCEDURE (String pTag)
ReturnValue Long
CODE
If pTag = 'lineitems'
self.CurrentTag = pTag
Return 0
End
Lastly, we need to set that extra InvoiceNumber
field which was added to the child queue. This is done in the
InsertFileRecord method (if you are
importing into a Table) or the AddQueueRecord if
you are adding to a queue (as we are in this example.)
Very Important: Since it is the xml2 object which is
importing the line items, this code needs to go into the
xml2.AddQueueRecord method.
xml2.AddQueueRecord PROCEDURE (Long pFirst=0)
CODE
LineItemsQueue.InvoiceNumber = InvoiceQueue.Number
Layout 4
Layout 4 is a slight adjustment on Layout 3, which
necessitates some small adjustments to the code.
First the structure, note that in this case there is no wrapper (<lineitems>) around the list of items.
<invoice>
<number>4</number>
<customer>Fred</customer>
<lineitem>
<product>xFiles</product>
</lineitem>
<lineitem>
<product>NetTalk</product>
</lineitem>
</invoice>
The code becomes
xml1.AssignField PROCEDURE (String pString)
CODE
If self.currentTag = 'lineitem'
Clear(LineItemsQueue) ! clears the queue buffer.
xml2.start()
xml2.FreeQueueBeforeLoad = false
xml2.tagcase = xf:caseLower
xml2.load(self,LineItems,pString,'','lineitem')
Return
End
The code in SetFieldPointer method, and
the InsertFileRecord, or
AddQueueRecord remains the same as for Layout 3 - except the
tag name in SetFieldPointer changes from
'lineitems' to 'lineitem'.
Programming Tip
The technique will multiple classes, as described
above in Layout 3 and Layout 4 can be used to parse XML of any depth.
Simply add more xml objects as required. It is recommended that
objects not be re-used for multiple (different) sections of the XML.
Rather create as many XML objects as you need. Trying to reuse objects
serves no purpose, and makes the embedded code more complicated.
Adjusting incoming data records before
they are saved
When importing into a table or queue, you may want
to add your own code to massage the record just before it is added.
Fortunately two methods exist to make this easy to do.
Consider the case where you have a table that contains a number of
fields which match fields in an XML file. Loading the XML into the table
is straight-forward. But let us assume there are also two extra fields,
say ImportDate and ImportTime which need to be primed when the incoming
records are added.
To do this add embed code to the InsertFileRecord method, before the
parent call. For example;
xml.InsertFileRecord PROCEDURE ()
CODE
cus:ImportDate = today()
cus:ImportTime = clock()
PARENT.InsertFileRecord ()
The call to InsertFileRecord does the file driver ADD command, so the
ERRORCODE can be tested immediately after the PARENT call if you need to
handle the error.
A similar approach is used for a Queue, except the method in question is
called AddQueueRecord.
Formatting or Deformating incoming XML
fields
It is possible that an incoming XML field will need
to be reformatted as it is being imported. For example the incoming xml
may contain a date in yyyy/mm/dd format that needs to be converted to
Clarion LONG format for use in a group, queue or table.
The correct place to put this code is in the AssignField method. Note
that here are two AssignField methods - you need to embed in the one
prototyped as
xFileXML.AssignField Procedure (String pString)
You can add code before the parent call which assigns the incoming pString parameter into the appropriate field.
The field currently being dealt with is in the
CurrentTag property. For example;
xFileXML.AssignField Procedure (String pString)
code
case lower(self.CurrentTag)
of 'date'
self.CurrentField = deformat(pString,@d10)
return
end
parent.AssignField(pString)
Loading an HTML Table into a Queue
Often data is received as HTML, in an HTML
<table>
structure. There are two approaches you can use to move this data into a
Queue using xFiles.
Consider the following xml;
<table class="tableList tight w100">
<tr>
<th>First Name </th>
<th>Inititals </th>
<th>Last Name </th>
</tr>
<tr>
<td class="left">Ryan</td>
<td class="left"> </td>
<td class="left">Abbott</td>
</tr>
</table>
With StringTheory
If you have StringTheory then this is the easiest
approach. It works by using StringTheory to clean up the HTML before
passing it to xFiles.
xml xFileXML
str StringTheory
htmlQueue QUEUE
col1 String(255)
col2 String(255)
col3 String(255)
End
CODE
str.LoadFile('whatever.xml')
str.remove('<td','>',false,true) xml.start()
xml.TagCase = XF:CaseAny
xml.MatchByNumber = true
xml.Load(htmlQueue,str.GetValuePtr(), str.Length(),'table','tr')
In the above .Load, all the rows <tr> are moved into the queue.
This includes <th> and <td> fields.
Without StringTheory
If you don't have StringTheory, or you want to
extract the <th> and <td> fields separately, then the code
looks like this;
xml xFileXML
htmlQueue1 QUEUE
col1 String(255),name('th')
col2 String(255),name('th')
col3 String(255),name('th')
End
htmlQueue2 QUEUE
col1 String(255),name('td')
col2 String(255),name('td')
col3 String(255),name('td')
End
CODE
xml.start()
xml.Load(htmlQueue1,'paul.xml','table','tr')
xml.start()
xml.Load(htmlQueue2,'paul.xml','table','tr')
Note that the htmlQueue2 will still contain rows in the queue for the
<th> rows, but they will be blank. In the same way HtmlQueue1
will contain rows for each <td> row, but they will be blank as
well.
xFileXML
Quick Start Guide - Creating an XML File or String
Keen to get started? Or just don't like wading
through all the documentation? This section is just for you - the basics
on how to get xFiles working as quickly and simply as possible.
In the same way that you can load an XML file into a Clarion structure,
you can also create XML files very quickly and easily.
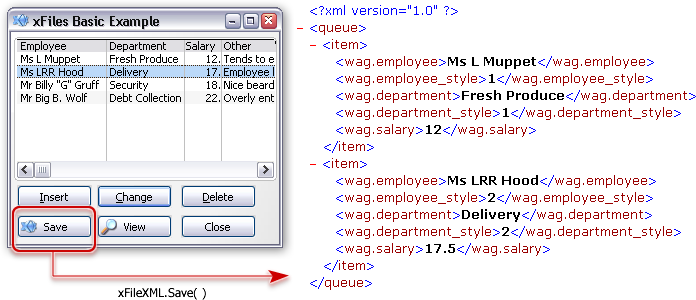
Saving a Clarion Structure to an XML file
on the Disk
xml.Save(Structure,XmlFileName,[FileBoundary],[RecordBoundary])
The last 2 parameters are optional but it's always better to include
them if you know what they are. Note that if you include one you will
need to include both. In the case of a Group, the FileBoundary can be
a blank string. For example;
xml.Save(NamesQueue,'c:\temp\names.xml','table','item')
or
xml.Save(Settings,'.\settings.xml')
You can use a Group, Queue, View or File as the structure holding the
data being saved. The method returns 0 if successful, non-zero
otherwise. If not successful the errorcode will be in the .Error
property, and a description of the error will be in the
.ErrorStr property.
Saving a Clarion structure to an XML
string in Memory
xml.Save(Structure,[FileBoundary],[RecordBoundary])
This is the same as saving the xml to a File, except that the
XmlFileName parameter is not used. After the call to save, the xml
data will be in the property .xmlData.
The length of this string is in .XmlDataLen.
For example;
xml.save('NamesQueue')
Blob[0 : xml.XmlDataLen-1] = xml.XmlData
Arrays
Given a simple Clarion array field;
Name string(20),dim(3)
There are a couple of ways this array can be rendered in XML.
The first approach, and the default approach, is to uniquely identify
each tag in the XML with the array index number. So the above becomes;
<name__1>Charles</name__1>
<name__2>Henry</name__2>
<name__3>William</name__3>
This allows each entry in the array to be uniquely identified, and the
position of the item in the array is also preserved.
A property,
AddArrayIndexToTag, can be
set to
false to change this behavior. If
this property is set to
false then the
array is rendered as;
<name>Charles</name>
<name>Henry</name>
<name>William</name>
While the items will appear in the order in which they exist in the
array, blank items may be suppressed (depending on the three
Blank
properties) which would mean that the position in the XML no longer
completely matches the position in the array.
Properties which can be set before a
call to Save
There are a number of properties which you can set
just before doing a save. These properties affect the way the Xml
looks.
| Property |
Effect |
| DontReplaceColons |
By default colons in the field name are replaced with a
period. If you wish to suppress this behavior then set this
property to 1. |
| DontUTF8Decode |
If set then incoming strings are not decoded from utf-8 to
ANSI form. |
| DontUTF8Encode |
If set then outgoing strings are not encoded into utf-8
form. It is assumed that strings are already in utf-8 form (if
the output encoding is set as utf-8) |
| DemoMode |
If this is not zero, then the data in the source data
structure will be replaced with the DemoModeValue property
when the data is written out. If the output structure is a
Queue, File or View then DemoMode contains the number of rows
to write.
This allows you to create sample output XML, without needing
actual demo data in the structure. |
| DemoModeValue |
The value to use for all fields and attributes when DemoMode
is > 0. |
| Meta |
Allows custom meta headers to be added to the xml. This
property is added to the top of the xml file, before the root
boundary.For example;
xml.meta = '<?mso-application
progid="Excel.Sheet"?>' |
| OmitXMLHeader |
The XML header (usually <?xml
version="1.0">) is not added to the top of the
file. |
| _pFileBoundary |
Typically passed as a parameter of the call to .Save.
This sets the boundary for the outside of the file.
<?xml version="1.0">
<file>
<record>
</record>
</file> |
| _pFileBoundaryAttribute |
Can be set to allow an attribute string to be included as
part of the file boundary.
<?xml version="1.0">
<file albert="fat">
<record>
</record>
</file> |
| _pRecordBoundary |
Typically passed as a parameter of the call to .Save.
This sets the boundary for each record inside the file.
<?xml version="1.0">
<file>
<item>
</item>
</file> |
| RecordBoundaryAttribute |
A fixed attribute string for the record boundary. This
attribute will be applied to all records, and should not
change between records.
<?xml version="1.0">
<file>
<item albert="fat">
</item>
</file> |
| RemovePrefix |
Default is 1. If set, the prefix is not used when matching
fields to tags. |
| RootBoundary |
An additional XML boundary around the whole file.
<?xml version="1.0">
<root>
<file>
<record>
</record>
</file>
</root> |
| RootBoundaryAttribute |
A string of attributes for the Root Boundary.
<?xml version="1.0">
<root albert="fat">
<file>
<record>
</record>
</file>
</root> |
| RSSVersion |
If you are creating an RSS file, set this property to the
RSS version you are using. For example 2.0
<?xml version="1.0"
encoding="ISO-8859-1"?>
<rss version="2.0">
If the RssVersion propert is set, the _pFileBoundary
is automatically set to <channel> |
| SaveEncoding |
The encoding scheme to use for the XML file. Examples are
'utf-8', 'ISO-8859-1' and 'windows-1252'.
<?xml version="1.0"
encoding="utf-8">
See also the .UseCharSet
method, which sets an appropriate charset based on a Clarion CHARSET:something equate. |
| SaveBlobsAsCData |
Default is 1. Blob fields will be encoded as [CDATA] in the
XML file. This is necessary for blobs containing binary
characters. (ie Non ASCII characters) |
| SaveMemosAsCData |
Default is 1. Memo fields will be encoded as [CDATA] in the
XML file. This is necessary for memos containing binary
characters. (ie Non ASCII characters) |
| SaveRecords |
Default is 0, meaning no limit. If set then only this many
records will be copied from the source structure to the XML.
This value is checked after the call to ValidateRecord so
records excluded by ValidateRecord are not included in the
output, and do not count against the SaveRecords limit. |
| SkipRecords |
Default is 0, meaning no records are skipped. If set then
this number of valid records will be skipped before records
are copied from the source structure to the output. This value
is checked after the call to ValidateRecord so records
excluded by ValidateRecord are not included in the output, and
do not count against the SkipRecords limit. Used with the
SaveRecords property this property allows for "pages" of data
to be exported. |
| SaveStringsAsCData |
Default is 0. If set all String fields will be encoded as
[CDATA] in the XML file. This is necessary for strings
containing binary characters. (ie Non ASCII characters). You
can set this property for individual fields. (See Properties
which can be set in SaveTweakFieldSettings) |
| StandAlone |
Allows you to set the StandAlone property in the xml header.
Can be set to 'yes' or 'no'.
<?xml version="1.0"
standalone="yes"> |
| SoapBodyBoundary |
The name of the SOAP Body boundary. The default is soap:Body.
Only used if .SOAPEnvelope
property is set to 1.
<?xml version="1.0">
<soap:Envelope>
<soap:Body>
<file>
<record>
</record>
</file>
</soap:Body>
</soap:Envelope> |
| SOAPEnvelope |
Set this to 1 to include the SOAP envelope boundary (and
Soap Body boundary) around the file. |
| SOAPEnvelopeBoundary |
The name of the SOAP Envelope boundary. The default is soap:Envelope. Only used if .SOAPEnvelope
property is set to 1.
<?xml version="1.0">
<soap:Envelope>
<soap:Body>
<file>
<record>
</record>
</file>
</soap:Body>
</soap:Envelope> |
| SOAPEnvelopeBoundaryAttribute |
An attribute for the soap:Envelope boundary. The default is
xmlns:xsi="http://www.w3.org/2001/XMLSchema-instance"
xmlns:xsd="http://www.w3.org/2001/XMLSchema"
xmlns:soap="http://schemas.xmlsoap.org/soap/envelope/"
<?xml version="1.0">
<soap:Envelope
xmlns:xsi="http://www.w3.org/2001/XMLSchema-instance"
xmlns:xsd="http://www.w3.org/2001/XMLSchema"
xmlns:soap="http://schemas.xmlsoap.org/soap/envelope/">
<soap:Body>
<file>
<record>
</record>
</file>
</soap:Body>
</soap:Envelope> |
| xslt |
If the XML has an associated XSLT file, then you can set
that here. This will result in a header being added to the xml
file. For example;
xml.xslt = 'somexml.xslt'
results in
<?xml-stylesheet type="text/xsl"
href="somexml.xslt" ?>'
See also XSLT. |
| ZipUseZip |
Only valid for saving to an XML file on disk. If set, the
XML file on disk will be compressed, using the ZIP compression
scheme. |
Properties which can be set in
SaveTweakFieldSettings
These properties are an array, where the array
index is the field number of each field in the Group, Queue, File or
View record. Setting these properties allows you to modify behavior
for individual fields in the record.
| Property |
Effect |
| ColumnDisabled[x] |
If this is set to 1 then the field is not exported to the
XML file. If the field is inside a group, then you should
adjust the _sGroupLen[x] property
as well. |
| _Dimension[x] |
If this field is an array, then this contains the size of
the array. Note that multi-dimensional arrays are always
stored as single dimensioned arrays internally. Bob,dim(5,5)
is the same as Bob,dim(25). |
| _sFieldName[x] |
The name of the field (In other words the <tag> name).
If you change this be sure to change the _sFieldNameLen[x]
property as well. |
| _sFieldNameLen[x] |
The length of the _sFieldName[x]
property. |
| _sFieldNameIsAttribute[x] |
If set to 1 then the field will be added as an attribute to
the record boundary. If set to a negative number then this
field will be assigned to the that field as an attribute. In
other words if less than zero it contains the value of the
field it is attached to, multiplied by -1.
You should not be setting this property directly, see the SetAsAttribute method for setting
fields as attributes. |
| _sFieldNameAttribute[x] |
The attribute which will be added to the _FieldName tag. If
you change this be sure to change the
_sFieldNameAttributeLen[x] property as well. For example, if
you wish to add the attribute save="yes" to the field number 3
(called, say, filename) then you'd set
_sFieldNameAttribute[3] = 'save="yes"'
_sFieldNameAttributeLen[3] =
len(clip(_sFieldNameAttribute[3]))
and the result would be
<filename save="yes>
whatever
</filename> |
| _sFieldNameAttributeLen[x] |
|
| SaveAsBase64[x] |
Force this field to be saved as Base64. (Not currently
used). |
| SaveAsCData[x] |
Force this field to be encoded as [CDATA]. Useful for string
fields that contain non-Ascii characters. |
| _sGroupLen[x] |
If this field is a group, this contains the number of fields
inside the group. If you disable fields inside a group, you
should adjust this property as well. |
| _Over[x] |
If this field is Over another field, then the parent field
number is here. |
Methods which can be used during a
Save
These methods allow you to embed code that affects
the Save as it is happening.
| Method |
Effect |
AddAtListStart,
AddAtRecordStart,
AddAtRecordEnd,
AddAtListEnd |
Called as the class iterates through the View, Queue or
File. |
| AddText |
Allows you to inject text into the output. Typically called
from AddAtListStart, AddAtListEnd, AddAtRecordStart,
AddAtRecordEnd methods. |
| SetAsAttribute |
Sets the field either as an attribute of the record, or the
attribute of another field. See SetAsAttribute for more
information. |
| SaveCurrentFieldToXML |
This method is called for each field as the XML string is
created. The third parameter is the field name. This provides
you an opportunity to alter the value in the field before it
is saved to XML. See also Formatting
a field before it is saved to XML . |
| SaveTweakFieldSettings |
Allows you to set field related properties before the save
commences. See also Properties
Which can be Set in SaveTweakFieldSettings. |
| SaveTweakSettings |
Allows you to override properties explicitly set in the Init
method. |
| ValidateRecord |
This method is called for each record while looping through
the Queue, File or View. You can add your own filter code to
this method. Return one of
XF:OutOfRange : Terminates the
loop immediately
XF:Filtered : Cycles to the next
record without saving this one to the XML file.
XF:Ok : Record is saved to
the XML. |
xFiles Templates
The Global xFiles Extension Template
In order to use xFiles, you need to add the Global
Extension Template.
- Click on the Global button, and Choose "Extensions", then press
the "insert" button.
- Choose the "ActivatexFiles - Activate Capesoft's xFiles" from
the 'Class xFiles - CapeSoft xFiles - Version x.xx" section.
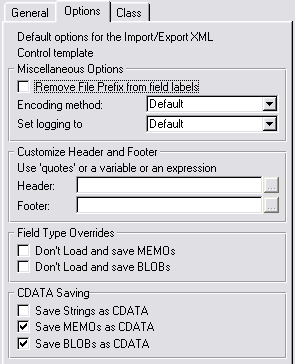
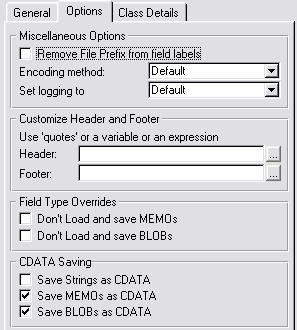
- Remove File Prefix from field Labels -
removes the file prefix from fields labels that are entered into
the XML file. Note: these settings must match on import and export
(if using a different instance of this control template to do the
other import/export)
- Replace colon in field name with a dot
- if checked, all colons in field names are replaced with a dot in
the XML tags (a colon is an invalid character in an XML tag)
- Encoding method - allows you to
select whether to use iso-8859-1, utf-8 or windows-1252. The
default method is iso-8859-1, but you can force it to one of the
others if you prefer.
- Set Logging to - allows you to force
debug logging on or off - otherwise you can use the compile time
settings that are in the classes (normally off).
- Customize Header and Footer - allows
you to enter a customizable Header and or Footer (for things like
RSS Feeds, etc).
- Field Type Overrides - if you don't
want to save MEMOs and/or BLOBs into your XML file, then you can
disable this with these checkboxes.
- CDATA Saving - you can encase your
data in CDATA tags - you can select which field type you would
like to do this for using these checkboxes
Generic
xFiles Template (to use an xFiles object)
xFiles provides a template to make it simple to
add an object to a procedure. To use the template:
- Right click on the procedure you wish to add an object to and
Choose "extensions", then press the "insert" button.
- Choose "IncludexFilesObject - Use an xFiles object" from the
'Class xFiles - CapeSoft xFiles - Version x.xx" section.
- In the "This Object Name" field enter "xmlWriter".
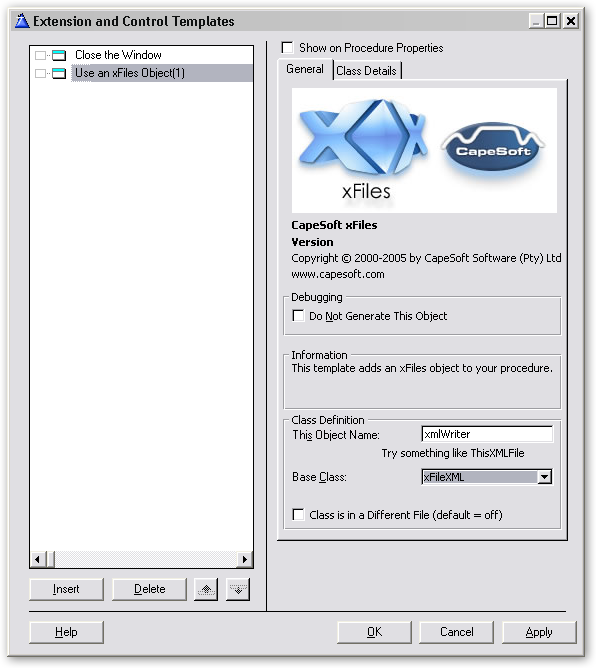
The class details tab allows properties
to be added to the class and methods to be added, overloaded or
customised and provides access to the method and data embeds for the
object.
Export
to/Import from XML Control Template
You can populate this control template onto a
window, and export a file/queue/group to a file from a button on the
window.

You can setup the following options in
the control template:
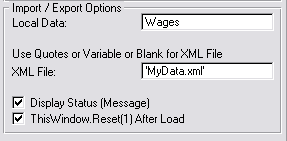
- Local Data - the data source (typically this
would be the name of the file to export - or the queue or group)
- XML File - the file to export the data to.
You can use quotes or a variable name.
- Display Status - shows a message after
exporting or importing the file.
- ThisWindow.Reset(1) - resets the window after
loading the file, forcing your browses and fields to be refreshed.
- Remove File Prefix from field Labels
- removes the file prefix from fields labels that are entered into
the XML file. Note: these settings must match on import and export
(if using a different instance of this control template to do the
other import/export)
- Encoding method - allows you to
select whether to use iso-8859-1, utf-8 or windows-1252. The
default method is iso-8859-1, but you can force it to one of the
others if you prefer.
- Set Logging to - allows you to force
debug logging on or off - otherwise you can use the compile time
settings that are in the classes (normally off).
- Customize Header and Footer - allows
you to enter a customizable Header and or Footer (for things like
RSS Feeds, etc).
- Field Type Overrides - if you don't
want to save MEMOs and/or BLOBs into your XML file, then you can
disable this with these checkboxes.
- CDATA Saving - you can encase your
data in CDATA tags - you can select which field type you would
like to do this for using these checkboxes
Some Practical Applications
Creating RSS Feed Files
- Create a window in your application and add the xFiles Global
template (if you have not done so already) and the xFiles local
extension template. You can leave the default template settings as
they are.
- Your RSSFeedQueue should be of the following example structure:
- Item QUEUE,PRE()
Title STRING(252)
Description STRING(1024)
Link STRING(252)
ExtraFieldsInHere FieldTypes
END
Your queue must be labeled 'Item' and have the 'Title',
'Description' and 'Link' fields present. You can include
additional fields for extra information as well (which will be
ignored by the RSS aggregator).
- In the ThisWindow.Init() method, set the following properties:
ThisXMLFile.CustomSectionAfterFileBoundary =
'<title>My RSS Feed</title><13,10>'|
&' <description>My
Description</description><13,10>'|
&'
<link>www.mywebsite.com</link><13,10>'|
&' <
language>en-US</language><13,10>'|
&'
<webMaster>webmaster@mydomain.com</webMaster><13,10>'
ThisXMLFile.RSSVersion = '2.0'
ThisXMLFile.load(RSSFeedQueue,'RSSFeedfile.xml')
- Add the necessary RSS feed items to the queue (you'll want to
add them to the front of the queue so that newest items are at the
'top of the pile'):
- Item.Title = 'My New Item'
Item.Description ='My new RSS feed description'
Item.Link = 'www.mywebsite.com\MyNewItem.htm'
Add(Item,1)
- Add a button to the window (Create RSS Feed) and in the accept
event save the file:
ThisXMLFile.save(RSSFeedQueue,'RSSFeedfile.xml')
This will create the file locally, and you'll need to
upload it (which you will require an FTP process - ideally like
NetTalk's SendFTP).
Storing Global
Settings in an XML file
Many people are used to storing global settings in
INI files, or perhaps a registry. There' s a much easier way using
xFiles to store global settings. Because xFiles stores (and retrieves)
a generic group structure, you can add variables without worrying
about updating your store variable procedure. The only thing you need
to be aware of is that variables stored (and retrieved) must be within
a group structure. For example:
GlobalSettings group, pre(GLOSET) WebSite string(252)
EmailAddress string(252)
end
FTPPostWindowThread long In our code, we simply call the save (and load) command for
storing (and retrieving) the global settings we require preserved:
ThisXMLFile.save(GlobalSettings,'GlobalSettingsFile.xml')
and
ThisXMLFile.load(GlobalSettings,'GlobalSettingsFile.xml')
Creating SOAP requests
SOAP Servers are programs out on the network that
you can interact with. Each program is different, but a protocol,
SOAP, exists which makes it possible for different programs to
communicate with each other.
SOAP packets are usually passed between programs using TCP/IP
connections, and wrapped with a HTTP header. A tool like
NetTalk
makes this really easy to do. However inside the packet the request is
formatted using XML, and thus XFiles can be very useful in this
regard.
A complete description of SOAP is beyond the scope of this document,
however you do not usually need to be a SOAP expert in order to make
simple SOAP servers and clients.
You will find some working examples in
\Clarion\3rdParty\Examples\SOAPClient. These examples use NetTalk to
run, but you can convert them to use other networking tools if you
wish.
A SOAP envelope is automatically wrapped around your regular XML if
you set the
.SOAPEnvelope property to 1.
A typical SOAP request looks like this;
<?xml version="1.0" encoding="utf-8"?>
<soap:Envelope
xmlns:xsi="http://www.w3.org/2001/XMLSchema-instance"
xmlns:xsd="http://www.w3.org/2001/XMLSchema"
xmlns:soap="http://schemas.xmlsoap.org/soap/envelope/">
<soap:Body>
<ChangeLengthUnit xmlns="http://www.webserviceX.NET/">
<LengthValue>5</LengthValue>
<FromLengthUnit>Centimeters</FromLengthUnit>
<ToLengthUnit>Inches</ToLengthUnit>
</ChangeLengthUnit>
</soap:Body>
</soap:Envelope>
However different soap servers require different specific tags.
To support this xFiles allows you to set the specific text for each
part of the packet. Here is the request again, but this time the
optional parts have been replaced with the name of the property you
can set.
<?xml version="1.0"
encoding="SaveEncoding"?>
<SOAPEnvelopeBoundary SOAPEnvelopeBoundaryAttribute>
SOAPHeader
<SOAPBodyBoundary>
<_pFileBoundary p_FileBoundaryAttribute>
<pRecordBoundary RecordBoundaryAttribute>
<LengthValue>5</LengthValue>
<FromLengthUnit>Centimeters</FromLengthUnit>
<ToLengthUnit>Inches</ToLengthUnit>
</_pRecordBoundary>
</_PFileBoundary>
</SOAPBodyBoundary>
</SOAPEnvelopeBoundary>
The above properties can all be set in the
.SaveTweakSettings
method. Note that the
_pFileBoundary tag
is optional, and should be set to nothing if it is not required.
Other properties you need to set are
.SOAPEnvelope(set to 1 to wrap the XML in a Soap Envelope)
and
.TagCase (usually you need to set
this to
XF:CaseAsIs - more on that in a
moment.)
For example, the code to create the packet above looks like this
xml.SOAPEnvelope = 1
xml.SaveEncoding = 'utf-8'
Xml._pFileBoundary = ''
Xml._pRecordBoundary = 'ChangeLengthUnit'
Xml.RecordBoundaryAttribute = 'xmlns="http://www.webserviceX.NET/"'
Xml.TagCase = XF:CaseAsIs
xml.SOAPEnvelopeBoundaryAttribute = |
'xmlns:xsi="http://www.w3.org/2001/XMLSchema-instance"' & |
'
xmlns:xsd="http://www.w3.org/2001/XMLSchema"' &|
'
xmlns:soap="http://schemas.xmlsoap.org/soap/envelope/"'
xml.SOAPEnvelopeBoundary = 'soap:Envelope'
xml.SOAPBodyBoundary = 'soap:Body'
xml.SOAPHeader = '<soap:Header/>'
For the actual XML in the middle, a simple group is all that is
required.
RequestGroup GROUP,PRE(Request)
LengthValue DECIMAL(9,3),NAME('LengthValue')
FromLengthUnit STRING(32),NAME('fromLengthUnit')
ToLengthUnit STRING(32),NAME('toLengthUnit')
END
(Take notice of the Name attribute, more on that in a minute.)
After setting all the values in the group to their desired state, you
can then create the PostString (ready for the NetTalk side of things)
using 2 simple lines of code.
xml.Save(RequestGroup)
PostString = xml.xmldata
The call to Save converts the group into XML, and stores the result in
the
.XmlData property. Because the
.SOAPEnvelope property (and all the other
properties) have been set appropriately in
.SaveTweakSettings,
the text that is in
.XmlData is the
complete SOAP request.
It is worth mentioning a slight complication alluded to earlier which
needs to be taken into account. Most SOAP servers are picky, and
require the tag names to be case sensitive. In other words
<LengthValue>5</LengthValue>
is not the same as
<lengthvalue>5</lengthvalue>
which is not the same as
<lengthValue>5</lengthValue>
The most common mistake when speaking to a SOAP server is getting
these tag names not-quite-right, and hence the server returns an
error. xFiles supports a variety of possible tag cases (when creating
the XML) and these are set using the
.TagCase
property as we saw above. Possible values for .TagCase are
XF:CaseLower,
XF:CaseUpper,
XF:CaseAny
and
XF:CaseAsIs. The default is
XF:CaseAny,
which means that xml files being loaded are Case Insensitive. For a
Save this implies that the case of the External Name will be used (if
it exists) and the tag is Upper Case if there is no external name.
If your SOAP server requires upper, or lower case tags, then you don't
need to worry about the External Name for each field, just set the
.TagCase property to the appropriate value and
continue. If however the server requires a mixed case (as this example
does) then you need to set the Name for each item in your group. Be
very careful with the case - in this example the LengthValue tag
started with a capital letter, but the fromLengthUnit tag did not.
But wait, there's more. Every so often you come across a SOAP packet
that has 2 (or possibly more) parts. Something like this;
<?xml version="1.0" encoding="utf-8"?>
<
soap:Envelope
xmlns:xsi="http://www.w3.org/2001/XMLSchema-instance"
xmlns:xsd="http://www.w3.org/2001/XMLSchema"
xmlns:soap="http://schemas.xmlsoap.org/soap/envelope/">
<soap:Header>
<AuthHeader
xmlns="urn:schemas-cardinal-com:2006:04:alaris:gateway:alarisgateway">
<ClientIdentifier>guid</ClientIdentifier>
</AuthHeader>
</soap:Header>
<soap:Body>
<QueryPatientId
xmlns="urn:schemas-cardinal-com:2006:04:alaris:gateway:alarisgateway">
<deviceId>string</deviceId>
</QueryPatientId>
</soap:Body>
</soap:Envelope>
Now this SOAP Packet contains 2 parts, a Header part and a Footer
part. Which effectively means the SOAP packet contains 2 structures
(in this case 2 groups). The key to understanding how to create this
packet rests on two items;
a) See this primarily as a Multi-Part xml file, not as a SOAP packet
b) follow the directions below "
Storing
Multiple Things in the same XML file"
Aside: A small number of servers require an empty header in order to
process the packet correctly. The SOAPHeader property has been
included so that you can inject specific text (for example
<soapenv:Header/>)
between the SOAP Envelope and the SOAP Body. This property is not
formatted in any way, if you use it you will need to ensure it is
valid xml.
For completeness sake, here is the code that creates the above packet.
However you will need to read the
section
below before this code will make sense.
Structures
AuthHeader GROUP,PRE()
ClientIdentifier STRING(255),NAME('ClientIdentifier')
END
QueryPatientId GROUP,PRE()
deviceId STRING(255),NAME('deviceId')
END
Code
xml.SaveEncoding = 'utf-8'
xml.TagCase = XF:CaseAsIs
xml.RootBoundary = 'soap:Envelope'
xml.RootBoundaryAttribute = |
'xmlns:xsi="http://www.w3.org/2001/XMLSchema-instance"' &|
' xmlns:xsd="http://www.w3.org/2001/XMLSchema"'
&|
'
xmlns:soap="http://schemas.xmlsoap.org/soap/envelope/"'
xml.DontCloseTags = 1
Xml.RecordBoundaryAttribute =
'xmlns="urn:schemas-cardinal-com:2006:04:alaris:gateway:alarisgateway"'
xml.save(AuthHeader,'soap:Header','AuthHeader')
xml.append = 1
xml.DontCloseTags = 0
xml.Save(QueryPatientId,'soap:Body','QueryPatientId' )
As you can see the above commands are Saving the structures to a
string, not a file, and as will all strings the result is in
xml.xmldata.
Using a View to create a
filtered, sorted, XML file
Exporting a whole data table, including all
records and all fields to an xml file is easy. Simply use the .Save
method. For example
xFileXML.Save(Customers,'customers.xml')
If however you only want to export a subset of the fields, or
records, or if you want to specify the sort order for the export, then
the above command is too limited. In this case what you need to do is
export the xml using a VIEW as the data source, rather than a file.
The Dict example, which you'll find in the
\clarion\3rdparty\examples\xfiles\dict folder has an example of
creating a view, and then using it to create the xml file. For example
xml xFileXml
ThisView View(Wages)
Project(wag:Employee)
End
code
xml.Save(ThisView,'employees.xml')
The important thing to remember about views is that you get to
decide which fields are included, and which are excluded. In addition
you decide what the FILTER and ORDER properties for the view are.
Last, but not least, it's useful to remember that all Browses and
Reports in your application are based on Views. Thus it is possible to
export the contents of a Browse, or Report, to XML but using this
xFiles function, and making use of the views constructed for you by
these templates.
Formatting a field before it is
saved to XML
Data in the database is often stored in a "raw"
format. Sometimes this data needs to be formatted before it can be
saved. For example, dates in a Clarion file are typically stored as a
number (days since December 28, 1800), whereas in xml it would be
ideal to have this formatted into a human-readable date format.
The correct place to embed code to format the string is in the .SaveCurrentFieldToXML method. There are two
instances of this method, so you should use the one which has p_name
as one of the parameters. Inside this method add some code to
test the field name, and call the .FormatCurrentField
method with the picture. For example, in the demo application, the
following lines are used;
xmlFile.SaveCurrentFieldToXML PROCEDURE (Long
p_x,Long p_DimCounter,String p_name)
CODE
if p_name = 'WAG.SALARY'
self.FormatCurrentField('@p$<<<<<<<<#.##p')
end
! Parent Call
PARENT.SaveCurrentFieldToXML (p_x,p_DimCounter,p_name)
The .FormatCurrentField method
takes a standard Clarion picture as a parameter. In some cases you
will want to format the output string completely differently to what
is available via a standard clarion picture. This is also possible,
but requires slightly more code;
text string(20)
xmlFile.SaveCurrentFieldToXML PROCEDURE (Long
p_x,Long p_DimCounter,String p_name)
CODE
if p_name = 'WAG.SALARY'
text = 'CASH:' &
format(self.currentField,@p<<<<#.##p)
self.currentfield &= text
end
! Parent Call
PARENT.SaveCurrentFieldToXML (p_x,p_DimCounter,p_name)
First create a variable to hold the result (in this case called TEXT).
Then set text, and importantly assign self.CurrentField
to point to Text.
Tip: The p_name parameter
is the tag name in the xml, not the field name in the table.
Changing the Name of a
Field in Outgoing XML
When exporting XML from a structure the External
Name of each field is used as the <Tag> name in the XML. For
example
xQueue Queue
field1 string(255),Name('Total')
End
results in XML like this;
<Total>whatever</Total>
Ideally the external Name attribute of the field contains the correct
value for the tag.
There are times however when you need to override this, and this is
done by embedding code into the ExtractNames
method, AFTER the PARENT call.
Example;
xml.ExtractNames PROCEDURE ()
CODE
PARENT.ExtractNames ()
self._sFieldName[1] = 'Totalizer'
self._sFieldNameLen[1] = len(clip(self._sFieldName[1]))
Note that it's very important to set both the text of the field name,
but also the length property for the fieldname.
Note also that the field number is critical here - the [1] in brackets
specifies the field number which is being set.
Including a Binary file in
outgoing XML
If you want to include a file (like say a PDF or
Image file) in an XML structure you are creating then the process is
fairly straightforward.
Files are not usually included as pure binary, because the null
character ( chr(0) ) is not allowed in XML. Therefore the file has to
be encoded first, and the most common encoding is Base64.
You will need a procedure to load the file and Base64 encode this. The
following example uses StringTheory, but any code will do.
In your outgoing structure add a field which will identify the file in
the XML. For example;
whatever Group,pre(wht)
name string(20)
image string(1)
End
The type of the field isn't important (but is usually a String) and
the length can be just 1. As with the earlier section the
SaveCurrentFieldToXML method is used to inject the Base64 encoded
string into the XML.
str StringTheory
xmlFile.SaveCurrentFieldToXML PROCEDURE (Long
p_x,Long p_DimCounter,String p_name)
CODE
if p_name = 'WHT.IMAGE'
str.LoadFile('somefile.pdf')
str.Base64Encode()
self.currentfield &= str.GetValuePtr()
end
! Parent Call
PARENT.SaveCurrentFieldToXML (p_x,p_DimCounter,p_name)
In this case str is a StringTheory
object, which does the work of loading the file and Base64 encoding
it, but you can replace this bit with other functions if you have
them.
Handling Structures with Pointers
This section deals with pointers during a Save.
For dealing with pointers during a load see
Loading
into a structure with a Pointer.
Queue and Group structures can contain "Pointers". These are special
variables that point to another variable of some type.
For example, in this structure, the Image field is a pointer to a
string;
whatever Group,pre(wht)
name string(20)
image &string
End
(If you have a pointer to a queue, then read the next section as
well.)
If you do a normal SAVE on this group, then the pointer-value (ie a
number) will be saved (as binary) into the xml file, for the image
field, and not the string that image is pointing to. This is clearly
not useful. To tell xFiles that you want to save the
contents-pointed-to, and not the value of the actual variable itself,
you again turn to the
SaveCurrentFieldToXML method.
xmlFile.SaveCurrentFieldToXML PROCEDURE (Long
p_x,Long p_DimCounter,String p_name)
CODE
If lower(p_name) = 'wht:image'
self.currentfield &= wht:image
End
Tip: The
p_name parameter
is the tag name in the xml, not the field name in the table.
Storing a Queue Inside a
Group
A good example of this can be found in the
\examples\xfiles\Q in Group\QinG.app.
Note that this technique is not available in versions of Clarion prior
to Clarion 6.
Consider the following desired xml;
<invoice>
<data>
<customer>Fred</customer>
<date>9 September 1970</date>
<lineitem>
<product>Bed</product>
</lineitem>
<lineitem>
<product>Chair</product>
</lineitem>
</data>
</invoice>
In this case the file boundary is Invoice, and the record boundary is
Data. However inside the data section are some group fields (customer,
date) and a repeated queue (lineitem).
The Clarion structures to create this look something like this;
InvoiceGroup GROUP,PRE()
Customer LONG
Date LONG
LineItemsQ &QUEUE
Total LONG
END
LineItems QUEUE,PRE()
Product LONG
Price LONG
END
Note that in Clarion the Queue is declared outside the group, and a
pointer to the queue is contained inside the group.
One thing to note is that InvoiceGroup.LineItemsQ is set to LineItems.
InvoiceGroup.Customer = 'Fred'
InvoiceGroup.LineItemsQ &= LineItems
(and so on)
Saving the InvoiceGroup structure is fairly straight-forward. It
begins as normal with a Save command;
xml.save(InvoiceGroup,'test.xml','invoice','data')
As we saw in the previous section, the method for handling a pointer
occurs in the
SaveCurrentFieldToXML method.
However in the earlier section the pointer was to a string, which is a
simple type. In this case the pointer is to a queue, which is a
complex type. So in this case the approach is to use a second xFileXML
object, and take the results of that object and place it in the parent
at this point. Consider the following code;
xml.SaveCurrentFieldToXML PROCEDURE (Long
p_x,Long p_DimCounter,String p_name)
CODE
if lower(p_name) = 'lineitemsq'
xmlQ._indent = self._indent
xmlQ.OmitXMLHeader = 1
xmlQ.save(InvoiceGroup.LineItemsQ,'','lineitem')
self._NoEncodeDecode = 1
self._sFieldNameLen[p_x] = 0
self.currentfield &= xmlQ.xmldata end
PARENT.SaveCurrentFieldToXML (p_x,p_DimCounter,p_name)
if lower(p_name) = 'lineitemsq'
xml._NoEncodeDecode = 0
end
In the above, the first thing to notice is the use of a second xmlFile
object called
xmlQ. Read the code
carefully to see where
xmlQ is used, as
distinct from xml. Note also that this is in the
SaveCurrentFieldToXML
method of the xml object, not the xmlQ object.
[1] note the use of the file and record
boundaries here. By leaving the file boundary blank there is no tag
around all the line items in the result. In some cases you would want
a tag, and so adding in a file boundary here would be desirable.
Storing multiple things in the
same XML file.
Up to now all the examples have shown a single
entity (Group, Queue, File or View) being stored in an XML file.
However it is possible to store multiple entities in the same file or
string.
In order to place multiple entities in the same xml file the following
basic steps occur;
- Get the class ready, by setting the Root-Node (the wrapper
around the whole thing) and telling the class not to automatically
close the root node.
xml.start()
xml.RootBoundary = 'whatever'
xml.DontCloseTags = 1
- Save the first entity as normal
xml.Save(ReportFormat
,Loc:XmlName,'Document','Record')
xml.Save(ReportFormat ,'Document','Record')
- Set the append flag so the following items are appended
xml.append = 1
- Add as many entities to the file as you like, using the normal
techniques. Although the boundaries do not have to be unique you
may chose to make them unique so they can be loaded separately
later on.
xml.Save(rrDefnFieldsLocalView,Loc:XmlName,'DefnFieldsLocal','Record')
xml.Save(rrDefnFieldsGlobalView,Loc:XmlName,'DefnFieldsGlobal','Record')
- Finally before sending the final entity, tell the object to
close the root tag.
xml.DontCloseTags = 0
xml.Save(rrDefnBandControlsView,Loc:XmlName,'DefnBandControls','Record')
xml.append = 0
NOTE: This approach cannot be used if a
zipped xml file is being made using the built-in zipping classes.
Saving Fields as Attributes
Simple XML can be thought of as
<tag>data</tag>.
Despite multiple fields, and increasing levels of
fields-within-fields, it follows that relatively simple pattern.
XML however does have another trick up its sleeve. These are called
Attributes. The syntax looks something like this;
<tag attributeName="value"
anotherAttributeName="value">data</tag>
xFiles reads these attributes in as data, interpreting the attribute
names into field names. From a reading-xml point of view, xFiles (and
hence your program) doesn't care if the incoming data was an
attribute, or inside a tag. For more information you can read basic
introduction to attributes
here.
Creating XML with attributes is slightly more complex than just
creating basic XML. There is no "setting" which can be applied to a
native Clarion data structure which makes it an attribute, so an extra
method call (which you need to add) is required to make it so.
The following Clarion structure
Animals Queue,pre()
Type String(20)
Species String(20)
End
needs to be saved as xml, with Type as an attribute, like in this
example;
<animals>
<species type="mammal">Elephant</species>
<species type="reptile">Cobra</species>
</animals>
To do this we need to use a xFileXML object, but with some code
embedded into the
.SaveTweakFieldSettings
method.
The Save call would look like this;
xml.Save(animals,'c:\temp\whatever.xml','animals','')
and the other code goes into the SaveTweakFieldSettings, like this;
xmlFile.SaveTweakFieldSettings PROCEDURE ()
CODE
self.SetAsAttribute('type','species')
! Parent Call
PARENT.SaveTweakFieldSettings ()
The first parameter is the field to set as an attribute. The second
determines which field it is an attribute of. If this second parameter
is omitted the the attribute is assigned to the record identifier. (In
our example above there is no record identifier, so that would be
meaningless in this case.)
Getting the names of the attributes correct is probably the hardest
part, because they needs to match the output exactly. In other words
it is case sensitive, and should include a prefix if the output tag
has a prefix. The easiest approach is to create the XML file with all
normal tags, then use that as a reference to get the specific tag
name.
Oh that all XML was that simple, but of course it's not. XML allows
for the same tag name to be used multiple times in the same xml file,
but in different places in the structure. Consider the following XML;
<animals>
<species type="mammal">Elephant</species>
<environment type="land">Grasslands</environment>
<species type="fish">Shark</species>
<environment type="sea">Shallow</environment>
</animals>
This would translate to a Clarion structure like this;
Animals Queue,pre()
Type String(20),name('type')
Species String(20)
Type2 string(20),name('type')
Environment string(20)
End
In this case because the two tags have the same name there needs to be
another parameter to determine which tag you have in mind.
self.SetAsAttribute('type','species',1)
self.SetAsAttribute('type','environment',2)
In the above example the third parameter is distinguishing between the
first instance, and the second instance of TYPE in the record.
Note that MEMOs and BLOBS cannot be set as attributes.
An alternative is to use the field number in place of the name, but
this approach can lead to bugs if the field order in the original
structure changes.
Adding Custom Text into the XML file
An
AddText
method exists, which allows you to directly inject text into
the XML stream as the XML is being created. The method takes a single
parameter, which is the text to add.
The text will be added as-is, with no formatting, xml-encoding,
unicode translating or anything of that nature. So the text you are
adding should be appropriate for the position to be sure that
everything is encoded as it should be.
There are four methods which are particularly useful for adding text.
AddAtListStart,
AddAtListEnd,
AddAtRecordStart and
AddAtRecordEnd.
For example in the
AddAtListStart method;
self.AddText('<date>' &
format(today(),@d10) & '</date><time>' &
format(clock(),@t4) & '</time>')
xCell Class
Introduction
Spreadsheet programs have the ability to load and
save spreadsheets in a specific XML format. The xCell class in xFiles
can create an XML file of this structure, which in turn can be opened
by Microsoft Office, Apache Open Office, or Libre Office.
To create a document you:
- Declare an object
- Create a worksheet
- (Optionally) Create Styles
- (Optionally) Apply Styles to Columns
- (Optionally) Apply Styles to Rows
- Add Data into Cells
- Save the XML to a file.
The XML file needs to contain a number of different parts of
information which in turn are collated together to make the final XML
file.
There are a number of methods that can be used to create and delete
worksheets, manage styles, and set cell contents. Unlike the xFilesXML
class this class does not just simply take a specific structure and
turn it into XML. You will need to write the various loops you require
yourself.
Declare an Object
The first step is to create an appropriate object.
In this example the object will be called ExcelExport:
ExcelExport xCell
Reuse
An object can be reused multiple times. To restore
the object to its initial state use the Start method. For Example;
ExcelExport.Start()
Encoding
Encoding is a little complicated. Basically you
need to match the encoding of your data with the encoding in the XML
output. There are two properties which come into play;
ExcelExport.SaveEncoding . This defaults to ISO-8859-1. If you are
using characters not in the ISO-8859-1 set then you probably will want
to set this to utf-8.
If the encoding is set to utf-8, then the data may need to be
converted to utf-8. This is done by default (using a property
DontUTF8Encode which defaults to false) however if your data is
already in utf-8 form then this needs to be true.
These two properties best help you move the data from it's existing
form into the XML. Here is the matrix;
| Your Data Is |
Set SaveEncoding to |
SetDontUtfEncode to |
| Already Utf-8 |
'utf-8' |
true |
| Plain ASCII |
leave as default |
leave as default |
| Uses Extended characters, not part of ASCII |
'utf-8' |
false |
Unusually, these properties need to be set
BEFORE
the call to the Start method. They are not reset by the Start
method.
For example;
ExcelExport.SaveEncoding = 'utf-8'
ExcelExport.DontUtf8Encode = true
ExcelExport.Start()
WorkSheets
You need to create a worksheet onto which the data
will go. You can have as many worksheets as you like, but they should
be added in the order (from left to right) that you want them to
appear in the document.
ExcelExport.SetWorkSheet('Some Sheet Name')
The length of the name is limited to 31 characters. If the name is
longer then that then a warning will be generated when Excel opens the
spreadsheet, and the name will be truncated. The
RenameWorkSheet method can be used if you wish to rename the
worksheet after it has been created.
ExcelExport.RenameWorkSheet('Some Old Name','Some
New Name')
When you are ready to work with a specific sheet you specify it using
the WithWorkSheet method. The same name
that was used when the sheet was created is now used to identify the
sheet. If a sheet of that name is not found, then one will be created
with that name.
ExcelExport.WithWorkSheet('Some Sheet Name')
There is also a method to select the sheet by number
ExcelExport.WithWorkSheetNumber(1)
Bear in mind that if worksheets are deleted then the WorkSheet number
of a specific sheet can change. Worksheets are numbered with
sequential positive integers, so if worksheet 2 of 3 is deleted, then
worksheet 3 becomes worksheet 2. If a worksheet with that number does
not exist then the method returns a non-zero number. If the worksheet
is found then the method returns 0.
Worksheets can be deleted using the DeleteWorkSheet
method. This method takes a name, as set by SetWorkSheet.
If the worksheet is not found then nothing is deleted. Regardless of
success or failure the first worksheet will be selected for subsequent
calls, so an immediate call to WithWorkSheet is
usually desired. When a worksheet is deleted then all the row and
column data associated with the worksheet is deleted. Styles are not
associated with one sheet, so deleting a sheet does not clear any of
the styles.
ExcelExport.DeleteWorkSheet('Some Sheet Name')
You can also delete all worksheets in a single call by calling
ExcelExport.FreeWorkSheets()
Printing
You can control the desired (maximum) with and
height of the report output for the work sheet using the
SetSheetPrintFit
method. This takes the width and height (in pages) of the
(maximum) printed output you desire. (If the spreadsheet will fit on
fewer pages anyway, then it will just be on fewer pages.)
ExcelExport.SetSheetPrintFit(2,2)
If you wish to set the width and height separately then you can use
SetSheetPrintFitWidth and
SetSheetPrintFitHeight.
these take one parameter, being the width and height respectively.
The orientation of the page can be set using the
SetPageOrientation
method. This takes a single parameter, a string starting
with 'L' (or '1') for landscape or a string starting with 'P' for
portrait mode. If the parameter is anything else then the mode is set
to Portrait. The equates
xf:Landscape and
xf:Portrait can also be used here.
ExcelExport.SetPageOrientation(xf:Landscape)
You can also set headers and footers for the printed output. The
SetSheetHeader method takes 4 parameters; 3
strings and a real.
The strings represent text that can be left, center, and right
justified in the header. The fourth (optional) parameter sets the
margin (in inches) between the edge of the page and the header text.
Each string can contain a number of Tokens, which will be filled in by
Excel at runtime.
| Token |
Description |
| &P |
Page Number |
| &N |
Number of Pages |
| &D |
Date |
| &T |
Time |
| &Z |
File Path |
| &F |
File Name |
For example
ExcelExport.SetSheetHeader('&D
&T','Customer Report','&P / &N',0.5)
This puts 3 strings on the top of each page, a half inch from the top
of the paper.
An alternate form of the
SetSheetHeader
method exists, which takes an optional single string and an optional
margin parameter. You can use three additional tokens in this string;
| Token |
Description |
| &L |
Justify following text to the Left |
| &C |
Justify Following text in the Center |
| &R |
Justify Following Text to the Right |
For example
ExcelExport.SetSheetHeader('&L&D &T')
ExcelExport.SetSheetHeader(,0.4)
The SetSheetHeaderMargin method allows you to set the margin field
without affecting the text.
ExcelExport.SetSheetHeaderMargin(0.5)
SetSheetFooter methods exist, which are
named and behave exactly as their
SetSheetHeader
counterparts.
The header and footer margins only apply to the header and footer
respectively. These are independent of the page margins. The data
cells only use the page margins when determining their position.
Therefore if margins are not set correctly, it is possible for the
cell data to overprint the header and footer data.
You can set the page margins using the method
SetSheetPageMargin. This takes four (optional) REAL
parameters, top, bottom left and right. As before the value for these
fields are in inches. for example
ExcelExport.SetSheetPageMargin(1,1,1,1)
Styles
Styles can be created, properties for the style
can then be set as desired and styles can be applied to cells.
To create a style use the
SetStyle method.
This takes three settings, the style ID, the style name and optionally
the parent. For example;
ExcelExport.SetStyle('id','name')
If the first parameter is omitted then the next sequential style ID is
used. The ID is returned by the method. The style name is also
omittable.
Once a style has been created you can assign many different properties
to it using one of the following methods:
ExcelExport.SetStyleAlignment('id','vertical','horizontal','rotate','wraptext')
Vertical must be one of: Top, Center, Bottom, Justify, Distributed
Horizontal must be one of: Left, Center, Right, Distributed
Rotate must be a number from -90 to 90.
Wraptext must be either 0 (no) or 1 (yes).
ExcelExport.SetStyleInterior
('id','color','pattern')
Pattern is one of the following values;
Solid, Gray75, Gray50, Gray25, Gray125, Gray0625,
HorzStripe, VertStripe, ReverseDiagStripe,DiagStripe, DiagCross,
ThickDiagCross, ThinHorzStripe, ThinVertStripe,
ThinReverseDiagStripe, ThinDiagStripe, ThinHorzCross, ThinDiagCross
ExcelExport.SetStyleFont('id','fontname','family','size','color',bold,italic,'underline')
The color is done in web format (#112233). However if the color is
passed as a LONG (ie a Clarion color, without the leading #) then it
will automatically be converted into a web color for you.
Underline should be one of
'',
'single'
or
'double'. A
1
for single underline, or
2 for double
underline are also supported.
ExcelExport.SetStyleNumberFormat('id','format')
The number format matches the format string as you would set it in
Excel itself.
Utility methods
do exist to convert Clarion date and time pictures into their matching
Excel format (see below).
ExcelExport.SetStyleBorder('id','position','lineStyle','weight','color')
The color is done in web format (#112233). However if the color is
passed as a LONG (ie a Clarion color, without the leading #) then it
will automatically be converted into a web color for you.
To delete a single style you can call
ExcelExport.DeleteStyle('id')
To clear the current style settings you can call
ExcelExport.FreeStyles()
Utility methods
Utility methods exist for converting from common
Clarion data types to Excel Data types..
ExcelExport.AddDatePicture('picture')
and ExcelExport.AddTimePicture('picture')
automatically create styles, and set the number format, for a
specific Clarion date or time picture. The name of the style created
is dnnn for dates and tnnn for times where nnn
is the clarion picture number. For example;
ExcelExport.AddDatePicture('@D6')
would create a style called d6 which matches the date format of
dd/mm/yyyy
Columns
You can set properties for an entire column using
the SetColumn method.
ExcelExport.SetColumn(index,'styleId','AutoFitWidth','width')
The index is the column number (where column A = 1, B=2 and so on.)
If you set a styleId here, you must also be sure to create that style
using the
SetStyle method.
AutoFitWidth is optional. It should be set to 0 or 1. If 1 then only
numeric and date columns are auto-fit, Text columns are not auto-fit
by Excel.
Width is optional, set this to the specific column width you want.
You can remove the settings for one column using
ExcelExport.DeleteColumn(index)
or all columns using
ExcelExport.FreeColumns()
Rows
As with columns you can set properties for a whole
row.
ExcelExport.SetRow(index,'StyleID','AutoFitHeight','height')
You can remove the settings for one row using
ExcelExport.DeleteRow(index)
or all rows using
ExcelExport.FreeRows()
Cells
Obviously the point of the class is ultimately to
get data into cells. This is done using the SetCell method.
ExcelExport.SetCell(rowIndex,columnIndex,'data','styleID','formula','type','mergeacross','mergedown')
The row and column indexes indicate the cell which is being written
to. Both are incremental integers starting from 1.
All the fields after columnIndex are optional, and multiple calls can
be made to set the various properties for the same cell. In other
words you might call SetCell twice for the same cell, once to set the
data and a second time to set the style.
The data field is the value you want to appear in the cell.
The StyleID matches the id of some style you have set.
The Formula field contains any Excel formula (as you would expect to
see it in the spreadsheet.)
The Type field can be either
'Number' or
'String'. If omitted then the class looks
at the data field to determine if the cell should be a number or
string.
The MergeAcross and MergeDown fields allow you to set the extent of
this cell in the worksheet.
If you do merge a cell across multiple cells on the worksheet, then be
careful not to call SetCell for those other cells. If you do so the
spreadsheet may not load into Excel etc.
You can remove a cell using
ExcelExport.DeleteCell(rowIndex, columnIndex)
You can remove all cells for a specific row using
ExcelExport.FreeCells (rowIndex)
Date and Time Fields
Setting a cell to contain a date, or time, is a
two-fold step.
Add Styles
Firstly you create one or more styles with the date and/or time
pictures you want to use, as described in the
Utility
Methods section above.
ExcelExport.AddDatePicture('@D6')
ExcelExport.AddTimePicture('@T1')
For more complex formats (Excel supports more formats than Clarion)
and also formats that combine date and time in a single cell you
will need to use the
SetStyleNumberFormat call
when adding a style. For example;
ExcelExport.SetStyle('dt1')
ExcelExport.SetStyleNumberFormat('dt1','[$-409]m/d/yy\ h:mm\
AM/PM;@')
The format used in the
SetStyleNumberFormat call
can be quite complex. The best way to figure out the style you want
is to make a spreadsheet with a cell of the correct style, export
that to XML and inspect the XML.
The data is simply the date and time values in the same string,
separated by a
T symbol.
SetCell - Harder Method
Secondly, when adding a cell set the type to
DateTime.
ExcelExport.SetCell(row,column,'2017-12-31','d6',,'DateTime')
ExcelExport.SetCell(row,column,'1899-12-31T' & '2:05'
,'t1',,'DateTime')
As you can see from the above, the data in the
SetCell
call (the 3rd parameter) should be formatted as
@0D10-B
for dates and
@T1 or
@T4
for times. If you are setting just a time, then prefix the time with
the generic date, as in the example above.
If desired you can store a Date and Time value together in a single
column. As above this consists of setting a style for the cell, and
then adding data into the cell.
ExcelExport.SetCell(row,column,'2017-12-31T2:05'
,'dt1',,'DateTime')
Set Cell - Easier Method
This is an alternative to the "secondly" part. You still need to add
styles as per the above.
To make all this a bit easier there are 3 specialized SetCell
methods that can be used;
SetCellDate,
SetCellTime and
SetCellDateTime.
these methods follow the same prototype as
SetCell, but drop the
Type
parameter. The
Date and
Time
parameters are Clarion LONG's, so no formatting of the data
is needed.
ExcelExport.SetCellDate
(rowIndex,columnIndex,date,'styleID','formula','mergeacross','mergedown')
ExcelExport.SetCellTime
(rowIndex,columnIndex,time,'styleID','formula','mergeacross','mergedown')
ExcelExport.SetCellDateTime
(rowIndex,columnIndex,date,time,'styleID','formula','mergeacross','mergedown')
For example;
ExcelExport.SetCellDate(row,column,someDate,'d6')
ExcelExport.SetCellTime(row,column,someTime,'t1')
ExcelExport.SetCellDateTime(row,column,somedate,sometime
,'dt1')
Formulas
Formulas can be added using the syntax
ExcelExport.SetCell(rowindex, columnindex, ,
styleid, 'someformula')
Remember rowindex and columnindex are integers, not letters.
The important thing to get right though is the text which makes up
'someformula'. This is not just the same as the text you see on the
screen in the Excel Cell, Excel stores it slightly differently.
When constructing a formula you don't use the cell naming scheme as
you would in the spread sheet itself. As an example, say you had the
formula in the spreadsheet in cell E7, which was represented in the
spreadsheet as
=$E$1+$E$2
In the XML file this is represented using RyCx syntax. For example the
same formula is written as
R1C5+R2C5
(Read this as row1, column 5 plus row 2 column 5). The $ signs in the
original formula mean these cells are "fixed".
A more common way of doing formulas in a spreadsheet is by using
relative positions. So if cell F7 was set to
=E1+E2 then it's understood that the seventh row is a sum of
the first two rows of the previous column. The cell F7 is relative to
cells E1 and E2. This is written like this;
R[-6]C[-1]+R[-5]C[-1]
If it was a sum in the same column, then [0] is not included so
it becomes
R[-6]C+R[-5]C
Here's another example, this time a horizontal sum across 4 cells,
placing the answer in the fifth cell
=SUM(RC[-4]:RC[-1])
Hint: Probably the easiest way to know what the syntax of the formula
should be is to create it in a spreadsheet, then Save the spreadsheet
as an XML file, then inspect the XML file.
Saving
Up to this point the spreadsheet has been created
in memory. Once the spreadsheet is completed it can be saved to the
disk using the Save method.
ExcelExport.Save('filename')
If you wish to save it to a string, and not to a file on the disk,
then you can do
ExcelExport.Save()
At this point the xml is in the xmlData
property of the object.
Example
Putting all the above together, this creates a
simple spreadsheet containing two columns of numbers, with a total at
the bottom of each column.
ExcelExport.Start()
ExcelExport.SetWorkSheet('Example')
ExcelExport.WithWorkSheetNumber(1)
ExcelExport.SetStyle('xf','xFiles')
ExcelExport.SetStyleFont('xf','Segoe UI',' ',12,Color:Navy)
ExcelExport.SetStyle('tl','Total')
ExcelExport.SetStyleInterior('tl',Color:Maroon)
ExcelExport.SetStyleFont('tl','Segoe UI',' ',12,Color:White)
ExcelExport.SetRow(3,'tl') ! Set Total row to Total Style
ExcelExport.SetCell( 1,1,123,'xf')
ExcelExport.SetCell( 1,2,456,'xf')
ExcelExport.SetCell( 1,3,789,'xf')
ExcelExport.SetCell( 2,1,987)
ExcelExport.SetCell( 2,2,654)
ExcelExport.SetCell( 2,3,321)
ExcelExport.SetCell( 3,1, , , '=SUM(R[-2]C:R[-1]C)')
ExcelExport.SetCell( 3,2, , , '=SUM(R[-2]C:R[-1]C)')
ExcelExport.SetCell( 3,3, , , '=SUM(R[-2]C:R[-1]C)')
ExcelExport.Save('c:\temp\a.xml')
Examples
The examples are an excellent place to get started.
The JumpStart example is a quick and easy way to see how to use xFiles
with the minimum of code or effort. The xFiles Demo example is also an
good place to see a few of the basic uses of xFiles, it uses the
xFileXML and xFileBinary classes and demonstrates a few of the basic of
using xFiles classes.
| Example |
Location & Comments |
| Jumpstart |
Clarion\3rdparty\Examples\xFiles\JumpStart
The result of following the JumpStart section. The most basic
example of how to use xFiles. The app file is xfJump.app.
See JumpStart for more details. |
| Demo |
Clarion\3rdparty\Examples\xFiles\Demo
A basic example of using xFiles, this example exports a browse
(either as a Queue, or as a View) to an XML file. It also
demonstrates the usage of the xFileBinary class to load the XML
file into a string so that it can be displayed. |
| Demo FE |
Clarion\3rdparty\Examples\xFiles\Demo FE
This is a modified version of the Basic example. It
uses File Explorer to display the XML instead of loading the
string into a text control. This allows the XML to be displayed
with color syntax highlighting and interactivity. The example is
identical except for the ViewXML window which doesn't use the
xFileBinary class, it just displays the XML file using File
Explorer. See www.capesoft.com/accessories/fileexplorersp.htm
for more information on CapeSoft File Explorer. This example is
for Clarion 5.5 and above (File Explorer does not support
Clarion 5). |
| Demo Full |
Clarion\3rdparty\Examples\xFiles\Demo Full
A fuller example application, which also demonstrates
creating the XML from a queue in memory (using a string) as well
as writing to a file and loading the XML file into the browse
queue. This example will grow significantly in future releases
to demonstrate the full functionality of xFiles. |
| Dict |
Clarion\3rdparty\Examples\xFiles\Dict
An example of source procedures in an app that export a file to
xml, and a view to xml. |
| Simple Project |
Clarion\3rdparty\Examples\xFiles\Simple Project
A very simple project and CLW file. Includes the
xFiles.inc files and uses a xFileBinary object to write data to
disk. |
| Convert |
Clarion\3rdparty\Examples\xFiles\SOAPClient\Convert
A simple SOAP example that connects to a SOAP server
out on the web. |
Importing Advanced
Structures
The goal of this section is to document the
techniques used to import structures that, while legal, are in some way
obtuse. Various cunning techniques are covered here, although you may
not need to use any of them in normal XML importing operations.
Importing the whole xml data
record into a field in the destination structure
There are cases when you want to parse the
incoming xml into fields as normal, but you also want to store the
original xml for the whole record in a field. Indeed this may be the
only field in your incoming structure. To do this set the .StoreWholeRecord
property to 1, and make a field in your receiving structure with the
same name as the Record Boundary. Note that if the xml you are
importing contains a Field with this name as well, then you cannot
make use of this option, or the whole xml will overwrite the incoming
field value.
Importing from XML where there
are multiple fields with the same name
It is legal in XML to have multiple fields (or
attributes) which are siblings of each other, with the same name. For
example;
<product>
<name>Car</name>
<price type="purchase">22000</price>
<price type="lease">2000</price>
</product>
This can be imported by using a well-crafted strcture, as well as
making use of the Name attribute. The structure for the above would
be;
Product Group
name String(20)
type1 String(20),name('type')
price1 Long,name('price')
type2 String(20),name('type')
price2 Long,name('price')
End
Note that in the above structure the external names are duplicated.
This is legal.
Notice also that the order of the fields is critical. Without the
ability to match exclusively on the name, xFiles will take the order
of the fields into account.
Lastly notice that the attribute comes before
the field. so the Type comes before the Price.
Classes
This lists the Classes provided by xFiles at this
time, along with a description of the functionality provided by each
class.
| Class |
Description |
| xFileBinary |
Binary file handling - high speed reading and writing of all
file types (binary and text) with minimal coding (simply call a
single method to load the file into memory using a string or
save a file from memory to disk.) |
| xFileExplode |
Handling decompression of files compressed using the PKWare
implode/explode algorithm. Does not support compression. |
| xFileFastTimer |
High speed, accurate timers. |
| xFileLinkDLL |
Easy support for run time linking of DLLs and locating
procedures in the DLLs when loaded. |
| xFileSettings |
An easy to use replacement for GetINI and PutINI - writes to
XML files instead of INI files. |
| xFileXML |
Write any queue, group, view or file to an XML file and read
XML files directly into a queue, file or group. Click
Here to see the QuickStart guide. |
| xFileZip |
Handles compression and decompression using a ZIP algorithm. |
| xFileBase |
Internal base class, does not contain accessible functionality |
| xFileBaseCompress |
Internal base class for compression |
| xFileXML Methods |
| The XFileXML class provides the ability to easily
load XML files from disk into a group, file or queue, and save a
group, file, view or queue to disk as an XML file. Writing a
data structure to disk can be done by calling a single Save
method. Similarly, reading an XML file into a group, file or
queue is as simple as calling the Load method. |
| AddRecord |
Add a record to the object loaded by xFileXML (queues and
files only). |
| AddText |
AddText into the XML being created. Allows custom text to be
injected into the output stream at specific points... |
| Copy |
Copy data to or from the data structure being used by
xFileXML. Allows the contents of a queue to be copied into a
File being used, or data from a different queue or group to be
copied into the queue or group used by the xFileXML object. |
| Init |
Initialize an xFileXML object to use a particular queue and
data structure. |
| Load |
Load from file to the data structure. |
| Save |
Save to the XML file (or create the XML in memory). |
| Start |
Return the object to its initial state. |
| Advanced
Class Methods |
| Generic File Loading and Saving |
| SaveBinData |
Saves the binData string property to the file name specified. |
| LoadBinData |
Loads a file into the binData string property. |
| XML file modification and settings |
| CreateFooter |
Creates a string that is appended after the file data. |
| CreateHeader |
Creates the XML header that is added to the file. |
| DisableField |
Allows you to remove a field from a Table, View, Queue or
Group before saving. |
| LoadTweakSettings |
Called when the Load is about to be done to allow the object
setting to be modified before the load code is executed. |
| SaveTweakSettings |
Called when the Save is about to be done to allow the object
setting to be modified before the save code is executed. |
| SetAsAttribute |
Sets a field to be an attribute, either of the record, or of
another field. |
| UseCharSet |
Sets the .Saveencoding based on a Clarion Charset Equate. |
| Record handling and management |
AddAtListStart
AddAtRecordStart
AddAtRecordEnd
AddAtListEnd |
Called when generating lists. Acts as a point for calling
AddText. |
| GetValue |
Gets a value of a field when passed the field name (Files
only). |
| SetValue |
Sets the value of a field when passed the name and value
(Files only). |
| InsertFileRecord |
Inserts a record in the file (File only). |
| UpdateFileRecord |
Updates a record in the file (File only). |
| RecordCount |
Returns the number of records in the file or queue. |
| FreeFileData |
Deletes all records in the file. |
| FreeGroupData |
Clears the group. |
| FreeQueueData |
Deletes all queue records. |
| ValidateRecord |
Used when reading into a Queue, or File, or writing from a
Queue, File, or View. This method allows you to suppress records
by returning the value |
| ValidateUpdateRecord |
Used when reading into a Queue, or File.
This method is called when doing a LOAD directly into a Table or
Queue. Where ValidateRecord validates
the incoming values, ValidateUpdateRecord
validates the existing-record values. So, for example, if
a database record is locked, and may not be updated, then this
method allows you to override the update, and not write the new
values to disk.
Return XF:Filtered from the method
to override the update.
This method is only called for updates, not for inserts.
Filtering for inserts remains in either ValidateRecord,
or InsertFileRecord. |
| AddOldField |
If one of the fields in your Group, Flie,
Queue or View has changed, and exported XML files exist that are
still using the old field names, you can use this to tell XFiles
to import the the value into the renamed field. |
| LoadAllOldFields |
This is called when Load is called. Embed your calls to
AddOldField() here, after the parent call. |
| CleanFileName |
Called when a file is saved to ensure there are no invalid
characters in the file name. |
xFileXML Properties
| Property |
Description |
See Also |
AddArrayIndexToTag
(Long) |
If set to true (the default)
then XML tags for array values will be extended to include the
array index. See Arrays for more. |
Arrays |
AddFields
(Long) |
The number of fields to add when inserting a record into the
queue by calling the AddRecord
method. |
AddRecord method |
BinData
(&String) |
The actual internal data store for loaded files. Memory
allocation and disposal is handled by the class. When an XML
file is loaded the data is loaded into this buffer and the size
of the loaded data is stored in the BinDataLen property.
Generally this property does not need to be manipulated directly
unless the LoadBinData and SaveBinData methods are being used to
write this directly to disk (which allows generic file reading
and writing as well as customization of the data being read and
written). |
LoadBinData method
SaveBinData method
BinDataLen property |
BinDataLen
(Long) |
The size of the BinData property (in
bytes). This is set automatically when an XML file is loaded
from disk. |
BinData Property |
ColumnDisabled
(Byte, dim(XF:MaxFields)) |
This is an array map of the columns that allows a column to be
enabled(0) or disabled(1). All columns are enabled by default,
but you can disable individual columns by setting the byte in
the map for that particular column. E.g. (to disable column 4):
ThisFileXML.ColumnDisabled[4] = 1 |
|
CopyFields
(Long) |
The number of fields to copy between the two data structures
when calling the Copy method.
Allows the number of fields being used to be limited. |
Copy method |
CRLF
(cString(10))
|
A string containing the line-ending to place after each tab.
This makes the xml more readable, but at the cost of some extra
characters in the xml file. Defaults to <13,10>. |
|
DontAbbreviateEmptyTags
(Long) |
By default empty tags are saved as the compact form - for
example <abc/>. If however
the unabbreviated form needs to be saved then set this property
to true. When true
tags will be saved in the form <abc></abc>.
Note that this setting applies after the DontSaveBlank
settings above. In other words if the Blank property is
true then this property has no effect. |
|
DontAddLastFields
(Long) |
Performs the same function as DontCopyLastFields,
except for the AddRecord
method - it limits the number of fields that are added when
inserting a record into the queue. |
AddRecord method
DontCopyLastFields method |
DontCleanFileName
(Long) |
If set to 1 the CleanFileName method
will not remove invalid characters from the file name, but
simply return it as-in. This should not be used in normal
circumstances. |
|
DontCopyLastFields
(Long) |
The same as the DontLoadLastFields
property, except for copying from one queue to another using the
Copy method. |
Copy method |
DontLoadLastFields
(Long) |
Performs the same function as the LoadFields
property, however it allows the number of fields to be excluded
to be specified from the last field in the queue, rather than
specifying the number of fields to be included from the first
field in the queue. |
LoadFields property |
DontReplaceColons
(Long) |
By default xFiles replaces colons(:) with periods (.) when
writing prefixes to the file. Colons are not valid in the XML
tags except for namespaces. Set the DontReplaceColons
property to true to not
replace colons in the XML file with full stops and zero to leave
them as colons. This does not effect the operation of xFiles,
however setting DontReplaceColons to
true will result in invalid XML
that is not viewable in XML viewers and parsers. |
|
DontSaveBlanks
DontSaveBlankStrings
DontSaveBlankNumbers
DontSaveBlankGroups
(Long) |
By default all fields in the structure are added into the XML
as it is created. However XML also allows for the possibility of
omitting blank fields from the output. These properties allow
you control over what fields (if any) are excluded. The first
property (DontSaveBlanks) is the
equivalent of all the others being set. |
|
IgnoreGroupTags
(Long) |
Saving: If this property is set then Groupings of fields in
your Clarion structure is ignored. The structure is saved as if
the structure contains no groups.
Loading: If this property is set, then xml fields are imported
by name, regardless of their grouping (or lack of grouping) in
the xml. In other words the import will pay no attention to
grouping in the xml, or grouping in the Clarion structure. If
the xml however does contain groups, and inside those groups are
duplicated field names, then the import will be unable to
distinguish the fields. |
|
| IndentBy |
The number of spaces (default = 2) to indent rows by to make
the xml more readable. Set to 0 to minimize the size of the xml.
Set to 0 to suppress indenting. The default value is 2. |
|
LoadFields
(Long) |
This allows the number of fields to be loaded to be different
from the number of fields in the queue, for example the first 5
fields might contain data, and the second 5 might be for
temporary data, or the result calculations that aren't stored in
the XML file. Setting LoadFields to
5 will load the first 5 fields of the queue from the XML file,
even if there are ten fields in the queue or file. |
Load method
SaveFields property
DontLoadLastFields property |
LoadFromString
(Long) |
When this property is set the Load() method loads the XML
data in the xmlData string
instead of loading it from disk. This property does not need to
be set manually any longer as the Load() method now directly
supports passing a string containing the XML to loading into the
passed data structure. |
See Also
Load, Save,
saveToString |
| Meta |
Allows custom meta headers to be added to the xml. This
property is added to the top of the xml file, before the root
boundary. For example;
xml.meta = '<?mso-application
progid="Excel.Sheet"?>' |
|
OmitXMLHeader
(Long) |
Omits the first tag in the XML file. See CreateHeader
and CreateFooter for more
information on the header and footer tags. |
LoadFields property |
_pFileBoundary
(pString(252)) |
This is the root boundary of the xml. The xml specification
specifies that the xml document needs a boundary at the
beginning and end of the xml. |
|
_pFileBoundaryAttribute
String(XF:MaxAttributesSize) |
Added to the file boundary tag when writing an XML file. |
|
_pRecordBoundary
(pString(252)) |
This is the boundary between each record in the
queue/table/view of file being loaded. This allows the tag used
as the record boundary to be specified. |
|
| ProgressControl |
If this property is set to the Use Equate of a progress
control on the window, then the progress control will be updated
during the Load or Save
call. The progress bar is automatically unhidden on
start, and hidden when the Load or
Save is completed.
for example;
xml.ProgressControl = ?ProgressWhatever
xml.Load(.... |
|
| Records |
The number of records added to the XML in the last save. |
|
| RecordBoundaryAttribute |
Added to the record boundary tag when writing an XML file. |
|
RecordNumber
(Long) |
As each record is written to the output duing a .SAVE, the
RecordNumber is increased. This allows you to know the current
record number (in the output) as the data is being written. |
|
| SaveFields |
Specify the number of fields to save. |
|
| SaveRecords |
Default is 0, meaning no limit. If set then only this many
records will be copied from the source structure to the XML.
This value is checked after the call to ValidateRecord so
records excluded by ValidateRecord are not included in the
output, and do not count against the SaveRecords limit. |
|
| SkipRecords |
Default is 0, meaning no records are skipped. If set then
this number of valid records will be skipped before records are
copied from the source structure to the output. This value is
checked after the call to ValidateRecord so records excluded by
ValidateRecord are not included in the output, and do not count
against the SkipRecords limit. Used with the SaveRecords
property this property allows for "pages" of data to be
exported. |
|
SaveToString
(Long) |
When this property is set the Save() method saves the XML
data in the xmlData string
instead of writing it to disk. The Save() method can be passed a
blank file name if this is set, as the file name parameter is
not used. |
See Also
Save, loadFromString |
SOAPEnvelope
(Long) |
When this property is set the Save()
method wraps a SOAP envelope around the XML data. |
See Also
Creating SOAP requests
SOAPEnvelopeBoundary,
SOAPEnvelopeBoundaryAttribute,
SOAPBodyBoundary |
SOAPEnvelopeBoundary
(pString(252)) |
This property determines the text for the Soap Envelope tag,
to be used if the XML is wrapped as a SOAP request. The default
is <soap:Envelope>. Be aware that some SOAP servers may
treat this tag in a case sensitive manner. |
See Also
Creating SOAP requests
SOAPEnvelope, SOAPEnvelopeBoundaryAttribute,
SOAPBodyBoundary |
SOAPEnvelopeBoundaryAttribute
(cString(XF:MaxAttributesSize)) |
This property lets you set the attribute (if any is required)
of the Soap Envelope Boundary tag. |
See Also
Creating SOAP requests
SOAPEnvelope, SOAPEnvelopeBoundary,
SOAPBodyBoundary |
SOAPBodyBoundary
(pString(252)) |
This property determines the text for the Soap Body tag, to be
used if the XML is wrapped as a SOAP request. The default is
<soap:Body>. Be aware that some SOAP servers may treat
this tag in a case sensitive manner. |
See Also
Creating SOAP requests
SOAPEnvelope, SOAPEnvelopeBoundary,
SOAPEnvelopeBoundaryAttribute |
StoreWholeRecord
(Long) |
If this property is set to true, and a field in the structure
exists, with the same name (or external name) as the record
boundary, then the xml for the whole record will be stored "as
is" in this field. |
|
TagCase
(Long) |
The field name tags are automatically detected for you by the
xFiles class. In some XML situations the case of these tags may
be important. This property gives you control over the case
used. This property defaults to XF:CaseAny.
Other options are XF:CaseLower, XF:CaseUpper and XF:CaseAsIs.
In order to have mixed case tags, the Name property for each
field in the group/file/queue must be set. This property is only
applied to field-level tags, not header or boundary tags.
The default is XF:CaseAny, which
means that xml files being loaded are Case Insensitive. For a
Save this implies that the case of the External Name will be
used (if it exists) and the tag is Upper Case if there is no
external name. |
See Also
Creating SOAP requests |
| UpdateAsWhole |
If an incoming record updates an existing record, then assume
the incoming record overwrites _all_ the fields of the existing
record. Note this mode is not supported if the file has memo or
blob fields. |
|
| UpdateFileOnLoad |
If you don't want records to be updated when importing, then
CLEAR this property (set by default). |
|
XmlData
(&String) |
A string that is populated with the XML by the Save() method,
if saveToString is set to
1. This allows XML to be "saved" into memory rather than written
to disk directly. |
See Also
Properties: loadFromString,
saveToString
Methods: Load, Save |
XmlDataLen
(Long) |
The length (in bytes) of the xmlData
string property. The xmlData
property is used for loading and saving XML to and from memory
rather than from disk. |
See Also
Properties: loadFromString,
saveToString
Methods: Load, Save |
Xslt
(string(XF:TempHeaderStringSize)) |
The name of an XSLT Style sheet which will be referenced in
the xml header. |
|
| xFileLinkDLL Methods |
| The xFilesLinkDLL class
provides runtime DLL loading. This allows you to load a DLL when
your program is running and access functions provided by that
DLL. The DLL itself is not linked into your application at
compile to using a LIB file. This is useful when your
application depends on an external DLL, or there is
functionality that is only provided when a particular DLL is
available, or for functions that are specific to certain version
of Windows etc./td> |
| Construct |
Constructor that is called when the object is created. |
| Destruct |
DDestructor that is called when the object is destroyed. |
| LinkDLLFunction |
Loads a function from a DLL. If the DLL is not already loaded
it loads the library. |
| Init |
Initialization method, does not perform any functionality and
is provided for overriding the default behavior. |
| xFileLinkDLL
Properties |
| dontDisplayMessages |
Replaces colons with full stops when writing prefixes to the
file (on by default) |
| _DLLModules |
Specify the number of fields to load |
xFileXML Class Methods
AddRecord
AddRecord
(<any p_F1>,<any p_F2>,<any p_F3>, ...)
Description
Adds a record to the xFilesXML record queue. The method takes up to 20
ANY parameters, which allows the addition of records to a queue where
the type of a field is not known.
Parameters
| Parameter |
Description |
| any p_F1 |
Up to 20 optional parameters of the ANY type can be passed.
Each parameter populates a field in the record that is to be
added to the queue. |
See Also:
Load,
Save
AddText
AddText(String
p_text)
Description
Add text into the outgoing XML stream when doing a Save.
Parameters
| Parameter |
Description |
| p_text |
The text to add into the XML. This text is added in "as is".
All encoding etc needs to be done on the text before inserting
it in with this method. |
See Also:
AddAtListStart, AddAtRecordStart, AddAtRecordEnd, AddAtListEnd
CCopy
Copy (*Group
p_Group, byte p_Direction=0)
Copy (*Queue p_Queue, byte p_Direction=0)
Description
Copies the records from the internal xFileXML group/queue property to
the passed group/queue, or from the passed group/queue to the xFiles
group/queue. The direction parameter specifies whether the data is
copied from the parameter to the xFilesXML property or from the
property to the passed variable.
Parameters
| Parameter |
Description |
*Group p_Group or
*Queue p_Queue |
The queue or group to copy to or from (depending on the
value of the direction parameter). |
| byte p_Direction |
If p_Direction is 0 then the data is copied from the
xFilesXML object to the passed group/queue.
If p_Direction is 1 then records are copied from the passed
queue or group to the xFilesXML object. |
See Also:
Load,
Save
Init
Init (*Queue
p_Queue, string p_FileName)
Init (*Group p_Group, string p_FileName)
Init (*File p_File, string p_FileName)
Init (*View p_View, string p_FileName)
Description
Initialises the xFileXML object to the a particular data structure and
file, you can call this method at any point to change the data
structure that is read from and written to, and the XML file that is
used. If you are setting any of the class properties such as
LoadFields
and
SaveFields then Init must be
called
after setting the class properties in order
to use them.
Note: As well as passing a Queue, you can also pass a Group, File or
View to the Init method to have xFiles read and write using a group,
file, view or queue. (Views are Write-Only, not Read).
Note: You don't need to call
Init unless
you set advanced class properties like xFileXML.loadFields,
xFileXML.saveFields and xFileXML.copyFields. If you set these
properties to change which fields are saved then you need to use the
first method above and call
Init().
Otherwise you can call the Load and Save methods and pass them the
queue/group/file/view and file name without calling Init().
Parameters
| Parameter |
Description |
*Queue p_Queue or
*Group p_Group or
*File p_file or
*View p_view |
The label of the structure that the data is read from or
written to. |
| string p_FileName |
The name of file to read from and write to. |
Examples
| Example |
myQueue           queue
from                  string(80)
to                    string(80)
                  end
xmlFileName       string(260)
 CODE
 xmlFileName = 'myXmlFile.xml'
 thisFileXML.Init(myQueue, xmlFileName)
|
See Also:
Load,
Save
Load
Load (*Queue
p_Queue, string p_fileName, <string p_FileBoundary>,<string
p_RecordBoundary>)
Load (*Group p_Group, string p_fileName,
<string p_FileBoundary>,<string p_RecordBoundary>)
Load (*File p_File, string p_fileName,
<string p_FileBoundary>,<string p_RecordBoundary>)
Load (*Queue p_Group, *String p_XMLString,
Long p_XMLStringLength, <string p_FileBoundary>,<string
p_RecordBoundary>)
Load (*Group p_Group, *String p_XMLString,
Long p_XMLStringLength, <string p_FileBoundary>,<string
p_RecordBoundary>)
Load (*File p_File, *String p_XMLString,
Long p_XMLStringLength, <string p_FileBoundary>,<string
p_RecordBoundary>)
Load ()
Description
Loads an XML file into the data structure. The first parameter is the
Clarion data structure that will receive the parsed XML. Valid
structures are a Queue, File or Group.
The second parameter is the name of the file on disk, or the name of
the string which is holding the XML in memory. If the XML is in a
string, then an additional parameter, the length of the string, is
required at this point.
Following this are 2 optional parameters that allow you to specify the
File Boundary, and Record Boundary tags.
The .Load method (no parameters) ultimately loads the XML into the
specified structure. It is included here for completeness but it
should not usually be called directly.
Parameters
| Parameter |
Description |
*Queue p_Queue or
*Group p_Group or
*File p_File |
The queue, file or group that the xml data will be loaded
into. |
| string p_FileName |
The name of file to read from. |
| *String p_XMLString |
The string variable containing the whole, valid, XML data. |
| Long p_XMLStringLength |
The length of the XML string. |
| <string p_FileBoundary> |
TThe file boundary tag in the XML file. Optional. Default is
file, view, queue or group. If the p_FileBoundary parameter is
set then the p_RecordBoundary parameter must be set as well. |
| <string p_RecordBoundary> |
The Record boundary tag in the XML file. Optional. Default
is item (for File or Queue) or data (for Group). If the
p_RecordBoundary parameter is set then the p_FileBoundary
parameter must be set as well. |
Examples
| Example - Calling Load by passing the data structure and
file name. |
xml               xFileXml
myQueue           queue
from                  string(80)
to                    string(80)
                  end

xmlFileName       string(260)

  CODE
  xmlFileName = 'myXmlFile.xml'
  xml.start()
  xml.SetTagCase(sf:caseLower)
  xml.Load(myQueue, xmlFileName,'table','record')
|
See Also:
Save,
Init,
Load
Save
Save (*Queue
p_Queue, string p_fileName, <string p_FileBoundary>,<string
p_RecordBoundary>)
Save
(*File p_File, string p_fileName, <string
p_FileBoundary>,<string p_RecordBoundary>, <key
pKey>)
Save (*File
p_File, string p_fileName, <key pKey>)
Save
(*View p_View, string p_fileName, <string
p_FileBoundary>,<string p_RecordBoundary>)
Save (*Group p_Group, string p_fileName,
<string p_FileBoundary>,<string p_RecordBoundary>)
Save (*Queue p_Queue, <string
p_FileBoundary>,<string p_RecordBoundary>)
Save
(*File p_File, <string p_FileBoundary>,<string
p_RecordBoundary>, <key pKey>)
Save (*File
p_File, <key pKey>)
Save
(*View p_View, <string p_FileBoundary>,<string
p_RecordBoundary>)
Save (*Group p_Group, <string
p_FileBoundary>,<string p_RecordBoundary>)
Save ()
Description
Saves a Clarion data structure into an XML file, or string.
The first parameter is the Clarion data structure that holds the data
to be exported. Valid structures are a Queue, File, View or Group.
The second parameter is the name of the file on disk. If the XML is to
be stored in a string, in memory, then this parameter is ignored.
Following this are 2 optional parameters that allow you to specify the
File Boundary, and Record Boundary tags.
The .Save method (no parameters) ultimately saves the XML into the
file or string. It is included here for completeness but it should not
usually be called directly.
Parameters:
| Parameter |
Description |
*Queue p_Queue or
*Group p_Group or
*File p_File or
*View p_View |
The label of the queue, file, view or group that contains
the data to be saved to the XML file or string. |
| string p_FileName |
The name of the XML file to store the data in. If this file
does not exist it will be created. If this parameter is
omitted completely then the XML will be written into a string.
This string is accessible after the call to .Save in the
object's XmlData property. The length of the string is in the
XmlDataLen property. |
| <string p_FileBoundary> |
The file boundary tag in the XML file. Optional. Default is
file, view, queue or group. If the p_FileBoundary parameter is
set then the p_RecordBoundary parameter must be set as well. |
| <string p_RecordBoundary> |
The Record boundary tag in the XML file. Optional. Default
is item (for File or Queue) or data (for Group). If the
p_RecordBoundary parameter is set then the p_FileBoundary
parameter must be set as well. |
| <key pKey> |
Allows you to specify the order (by selecting a key) when
saving a table to xml. If the key is omitted, and a primary
key exists, then the primary key is used./td> |
Examples
| Example - Calling Save by passing the
data structure and file name |
xml xFileXml
myQueue queue
from string(80)
to string(80)
end
xmlFileName string(260)
CODE
xmlFileName = 'myXmlFile.xml'
xml.start()
xml.Save(myQueue, xmlFileName)
|
See Also:
Load(),
Init()
Start
Start ()
Description
Returns the object to its initial state ready for reuse.
xFileXML Advanced Methods
Generic File Loading and Saving
SaveBinData
SaveBinData
(<string fileName>)
Description
Saves the current contents of the
binData
property to disk using the either the file name passed using the
fileName parameter, or the file name set when the Init() method of the
object was called. This method along with the
LoadBinData()
provides generic reading and writing of files to and from memory. This
method does not parse the string in any way and will not load the data
into a queue, group or file. Use the Load() method to load XML files
into data structures. This method essentially exposes the generic file
handling provided by the parent
xFileBinary class,
which provides file handling (reading and writing) along with on the
fly compress/decompression etc..
When used in conjunction with the.
saveToString
property this can be used to customise the XML produced before writing
it to disk by calling SaveBinData.
Note: To create a ZIP compressed file
containing the data in the .
binData
string, set the ZipUseZip property to 1 before calling the
SaveBinData. This same technique can be use to ZIP compress and
decompress XML files on-the-fly using the
Load()
and
Save() methods.
Parameters
| Parameter |
Description |
| string fileName |
An optional parameter that specifies the name of the file to
save. This must be passed if the Init() method has not been
called to set the file name. |
Return Values
If the call fails it returns zero and the .Error and .ErrorStr
properties the class are set with the error details. You can add code
to display these errors if you need to.
Examples
| Example - Saving data from the binData string to disk |
code if
not xFileXml.binData &= null
Dispose(xFileXml.binData)
end
xFileXml.binData &= new string(myXmlSize)
xFileXml.binDataLen = myXmlSize
! Add data to the string, such as custom XML
xFileXml.binData = Clip(string1) & Clip(string2)
xFileXml.SaveBinData('myfileName.xml')
|
See Also
LoadBinData,
Save,
Load, binData, binDataLen, saveToString,
loadFromString
LoadBinData
LoadBinData
(<string fileName>)
Loads a string directly into the binData property of the class with
doing any parsing or handling of the contents of the file. When this
method is called the .binData property of the class is receives the
contents of the file (memory allocation and disposable is handled by
the class). In addition the .binDataLen property of the class is set
to the size of the file loaded (in bytes).The .binData property is a
string.
This method along with
SaveBinData()
expose generic file reading and writing using the xFileXML class. This
can be useful when used with the .saveToString and .loadFromString
properties. The data can be loaded and manipulated manually before the
Load() and
Save()
methods are called to load (or save) the data to and from memory.
Note: To load a ZIP compressed file,
set the _ZipUseZip property to 1 before calling the LoadBinData()
method. This same technique can be use to ZIP compress and decompress
XML files on-the-fly using the Load() and Save() methods.
Parameters
| Parameter |
DDescription |
| string fileName |
An optional parameter that specifies the name of the file to
load. This must be passed if the Init() method has not been
called to set the file name. |
Return Values
If the call fails it returns zero and the .Error and .ErrorStr
properties the class are set with the error details. You can add code
to display these errors if you need to.
Examples
| Example 1 - Load data from the to disk to the
xFileXML.binData string |
code xFileXml. LoadBinData('myfileName.xml')
! the .binData now contains the contents of the file |
See Also
SaveBinData, Save,Load, binData,
binDataLen, saveToString, loadFromString
XML file modification and settings
CreateHeader
CreateHeader ()
Sets the header for the XML file and adds it to the
BinData
property. This is called before data is added to the XML
file. The string created is a standard XML header such as:
'<?xml version="1.0"?><13,10>'
Note: If the
saveEncoding
property is set then this string includes the encoding for
the file. The
binData property is set to
the string created by this method and a carriage return, linefeed pair
is added to the end of the header string (ASCII 13, 10) as indicated
in the code snippet above. The
binDataLen property
is set to the length of the
binData string
property (the number of bytes in the header).
Parameters
None
Return Values
None
See Also
CreateFooter
CreateFooter
CreateFooter()
Creates the footer for the XML file. This is simply the closing tag
for the file, such as the file boundary (see the ._pFileBoundary
property). In general this method does not need to be overridden
unless a custom header has been created or additional wrapper tags
have been added.
Note: The footer is appended to the
.binData string and the .binDataLen property incremented by the number
of bytes added.
Parameters
None
Return Values
None
See Also
CreateHeader
DisableField
DisableField(structure,
Name)
Allows you to disable (ie exclude) a field from a structure prior to
calling the Save method.
Note: The DisableColumn property is set
by this call. Clearing the property before subsequent calls to Save is
recommended.
Parameters
| Parameter |
Description |
| Structure |
The name of a Table, View, Queue or Group |
| Name |
The name of the field inside the group that should be
omitted when doing a Save |
Return Values
None
See Also
CreateHeader
LoadTweakSettings
LoadTweakSettings()
A purely virtual method that allows the programmer to override the
settings before the Load() method actually loads and parses the XML
file. Use this for setting the file or record boundaries or other
settings that need to be customised to load a specific file.
Parameters
None
Return Values
None
See Also
SaveTweakSettings()
SaveTweakFieldSettings
SaveTweakFieldSettings()
A purely virtual method that allows the programmer to override the
settings before the Save() method actually creates the XML file. Use
this for setting the file or record boundaries or other settings that
need to be customized before the XML is created and saved to disk or
memory.
Parameters
None
Return Values
None
See Also
LoadTweakSettings,
SaveTweakSettings
SetAsAttribute
SetAsAttribute(String
p_Fieldname,<String p_OfName>,Long p_instance=1)
Allows the programmer to set a field as being the attribute of the
record, or of another field. Called from inside
SaveTweakFieldSettings.
Parameters
| Parameter |
DDescription |
| FieldName |
The tagname of the field to be set as an attribute. |
| OfName [optional] |
The name of the tag which this attribute is attached to. If
omitted then the attribute is attached to the record
identifier. |
| Instance [optional] |
Tag names can be duplicated in xml output. So if there are
multiple tags with the same name, then use this parameter to
differentiate between them. |
| OfInstance [optional] |
The instance number of the OfName to attach the attribute
to. (Because it is also possible to have duplicate names at
the tag level as well as the attribute level.) |
Return Values
None
See Also
Saving Fields As Attributes
UseCharset
UseCharset(Long
p_CharSet)
Sets the .SaveEncoding property based on a Clarion charset equate.
Parameters
| Parameter |
DDescription |
| long p_Charset |
A standard Clarion Charset equate |
Return Values
None
Record handling and management
GetValue
GetValue
(string p_Field, long p_dim = 0) Retrieves the value of a
field when passed the name of the field. For multi dimensional
fields (Clarion 6 only) the second parameter allows the dimension to
be retrieved to be specified. Note that the
Init()()
method must have been called to specify the data structure that the
xFilesXML object is manipulating before this method is called.
Note: This method is thread safe and
wraps access to queues in a critical section. All the methods in
xFiles are built to ensure thread safe access to data (including
global, unthreaded data)
Parameters
| Parameter |
DDescription |
| string p_Field |
A string that contains the name of the field to be
fetched. |
| long p_dim |
An optional parameter that specifies which dimension to
fetch for multi dimensioned fields. Supported in Clarion 6
only |
Return Values
The value of the field is returned as an ANY variable. If the field
is not found an empty string is returned.
See Also
SetValue()
SetValue
( string
p_Field, string p_Value, long p_dim = 0)
Sets the values of a specified field. Works for queues, groups and
files. Note that the
Init method must
have been called to specify the data structure that the xFilesXML
object is manipulating before this method is called.
Note: This method is thread safe and
wraps access to queues in a critical section. All the methods in
xFiles are built to ensure thread safe access to data (including
global, unthreaded data).
Parameters
| Parameter |
Description |
| string p_Field |
A string that contains the name of the field to be to be
set. |
| string p_Value |
A string that contains the value to set the field to |
| long p_dim |
An optional parameter that specifies which dimension to
set for multi dimensioned fields. Supported in Clarion 6
only |
Return Values
Returns zero for success and -1 if the field is note found.
See Also
GetValue
InsertFileRecord
InsertFileRecord
()
This method adds the contents of the current file buffer as a new
record in the file that is associated with xFiles. This method is
not generally used directly.
Note: The
Load(),
Save() or
Init()
method must be called before this method is used in order for the
xFilesXML object to be associated with a particular data structure.
Note: This method only supports files
and does not update any relationships.
Parameters
None
Return Values
None
See Also
UpdateFileRecord
UpdateFileRecord
UpdateFileRecord
()
This method updates the current file record with the contents of the
current file buffer. This method is not generally used directly.
Note: The
Load(),
Save() or
Init()
method must be called before this method is used in order for the
xFilesXML object to be associated with a particular data structure.
Note: This method only supports files
and does not update any relationships.
Parameters
None
Return Values
None
See Also
InsertFileRecord()
RecordCount
xFileXML.RecordCount
()
Returns the number of records in the File or Queue that is
associated with the xFiles object.
Note: The
Load(),
Save() or
Init()
method must be called before this method is used in order for the
xFilesXML object to be associated with a particular data structure.
Parameters
None
Return Values
The number of records in the Queue or File that is currently
associated with the xFilesXML object.
FreeFileData
xFileXML.FreeFileData
()
Deletes all records in the File associated with this object. All
records are removed, however no relationships are updated. This
method is not generally called directly. This method only applies if
the xFilesXML object is being used with a File.
Note: The
Load(),
Save() or
Init()
method must be called before this method is used in order for the
xFilesXML object to be associated with a particular data structure.
Parameters
None
Return Values
The number of records in the Queue or File that is currently
associated with the xFilesXML object.
FreeGroupData
FreeGroupData
()
Clears all fields in the group that is associated with the xFileXML
object. This method only applies if the xFilesXML object is being
used with a Group.
Note: The
Load(),
Save() or
Init()
method must be called before this method is used in order for the
xFilesXML object to be associated with a particular data structure.
Parameters
None
Return Values
None
FreeQueueData
FreeQueueData
()
Deletes all records in the Queue associated with this object. This
method only applies if the xFilesXML object is being used with a
Queue.
Note: The
Load(),
Save() or
Init()
method must be called before this method is used in order for the
xFilesXML object to be associated with a particular data structure.
Parameters
None
Return Values
None
AddOldField
AddOldField
(string p_OldFieldName, string p_InFilePos), long
If one of the fields in your Group, Flie, Queue or View has changed,
and exported XML files exist that are still using the old field
names, you can use this to tell XFiles to import the the value into
the renamed field. You should embed your calls to this method in the
LoadAllOldFields
procedure, after the parent call, as this gets call when Load is
called.
Parameters
| Parameter |
Description |
| string p_OldFieldName |
A string that contains the odl name of the field |
| string p_InFilePos |
The position in the file record at which this field
resides. |
A typical call to this procedure would look something like this:
MyXML.AddOldField('OldFieldName', where(OldFieldFile.Record,
OlfFieldFile.OldFieldName))
Return Values
Returns 0 if adding this old fieldname was successful. Will only
fail if there is no more space for extra fieldnames. The maximum is
XF:MaxFields.
See Also
LoadAllOldFields()
LoadAllOldFields
LoadAllOldFields
()
This is called when Load is called. Embed your calls to
AddOldField() here, after the parent call. Be sure to embed
after the parent call as the parent call clears all the old
fieldnames (used for the previous load).
Parameters
None
Return Values
None
See Also
AddOldField
CleanFileName
CleanFileName
(string p_Filename, long p_flag=0)
This is called when
Load is
called to ensure that the file name has no invalid characters. ASCII
control characters with values below 21 are replaced by spaces and
characters that are illegal in Windows file names (
*
/ \ ? < > :) are removed. Use this method to remove
all non-legal characters from a string so that it can be used in a
file name. Note that this method removes backslashes (
\ ) so it should be used on just the file name, but NOT the
path.
To use it on a Path set the flag to
XF:ALLOWBACKSLASH
this flag also implicitly allows a
: in
character 2 (for example
'c:\temp.xml').
Illegal characters are replaced with a space.
To disable this behavior set the xFileXML.
dontCleanFileName
property to
true.
Parameters
| Parameter |
Description |
| p_FileName |
The name of the file to be saved, excludes the path to the
file (unless the p_flag parameter is set to XF:ALLOWBACKSLASH
to allow backslashes and handle paths). For example 'settings.xml'. |
| p_flag |
This is a flag to override the default behavior and allow
back slashes. If this contains XF:ALLOWBACKSLASH
then backslashes are allowed. Use this to allow paths to be
checked. |
Return Values
Returns the valid file name, after illegal characters have been
removed.
xFileLinkDLL Methods -
Runtime DLL Loading
LinkDLLFunction
(string p_DLLName, string p_FunctionName, *long p_fpFunction)
This method loads a function from a DLL when passed the name of the DLL
and the name of the function to locate. If the DLL has not already been
loaded it loads the DLL. The address of the function is located and
stored in the passed p_fpFunction parameter .
Parameters
| Parameter |
Description |
| string p_DLLName |
A string containing the name of the DLL that contains the
function to load. If this library has not already been loaded
then the method will load it before locating the required
function address. |
| string p_FunctionName |
The name of the function to locate in the library. |
| *long p_fpFunction |
A long that will receive the address of the function in the
library. |
Return Values
Returns zero for success, or an error code if it fails.
Examples
See the "Runtime DLL Loading QuickStart Guide" for a full example
and how to declare and use the addresses returned.
| Example 1 - Load a function called 'unzOpen' from a DLL
called 'zip.dll'/th> |
| code ret = xLinkDLL.LinkDLLFunction ('zip.dll',
'unzOpen', fp_unzOpen) |
See Also
DontDisplayMessages
xFileLinkDLLProperty
Reference
These are some of the properties of the xFileLinkDLL
class that you might find useful to set directly.
| dontDisplayMessages |
long |
This option ensures that an error message is not displayed if
a DLL fails to load or a function cannot be located. Set this
option to 1 to not displayed error messages. You can use the
.Error and .ErrorStr properties the class are set with the error
details to display these errors if you need to. |
FAQ
Check out general product
CompilerErrors.
xFileXML
- I declare the object and call Load/Save but
nothing happens.
xFiles provides two ways to handle loading and saving of XML files:
- Without needing the Init method,
you can call Load and Save
and pass the data structure and file name directly to the load
and save methods:
xFileXML.Load(p_Queue, fileName)
xFileXML.Save(p_Queue, fileName)
- By calling Init to set the data
structure to use and the file name, then calling Load
and Save:
xFileXML.Init(p_Queue,
fileName) ! Call Init to set which data structure and
file to use
xFileXML.Load()
xFileXML.Save()
You don't need to use the second method and call Init
unless you set advanced class properties like xFileXML.LoadFields,
xFileXML.SaveFields and xFileXML._CopyFields. If you set these
properties to change which fields are saved then you need to use the
first method above and call Init.
- Is there any way to change the tag itself when
writing out an XML file from a browse?
I see that I can format or
change the contents but not the tag itself.
Yes, there is a way. In the SaveCurrentFieldToXML
method you can change the outgoing name of the field. To do
this you do something like this;
In this method
xFileXML.SaveCurrentFieldToXML PROCEDURE (Long
p_x,Long p_DimCounter,String p_name)
[aside – make sure it's this one, there are two with the name
SaveCurrentFieldToXML ]
case p_name
of 'REQUESTEDACTION'
self._sFieldName[x] = 'REQUESTTYPE'
end
This goes before the parent call.
If you were using this embed to format the contents of the field as
well, then do this before that code, and in that code check
self._sFieldName[x] instead of p_name because otherwise the first
time the p_name will be wrong.
Support
Your questions, comments and suggestions are
welcome. See our web page (
www.capesoft.com)
for new versions. You can also contact us in one of the following ways:
| CapeSoft Support |
| Email |
 |
| Telephone |
+27 87 828 0123 |
Installation
Distribution
xFiles ships as source so it is compiled into the
application and there are no additional files needed for distribution.
There are no runtime royalties for using xFiles. Also see the
License
& Copyright section for more information.
License & Copyright
This template is copyright © 2003-2025 by CapeSoft
Software. None of the included files may be distributed. Your programs
which use xFiles can be distributed without any xFiles royalties.
This product is provided as-is. CapeSoft Software and CapeSoft
Electronics (collectively trading as CapeSoft), their employees and
dealers explicitly accept no liability for any loss or damages which may
occur from using this package. Use of this package constitutes agreement
with this license. This package is used entirely at your own risk.
Use of this product implies your acceptance of this, along with the
recognition of the copyright stated above. In no way will CapeSoft ,
their employees or affiliates be liable in any way for any damages or
business losses you may incur as a direct or indirect result of using
this product.
For the full EULA see
https://capesoft.com/eula.html
Version History
Download latest version
here
Version 3.29 - 27 May 2025
Version 3.28 - 10 November 2022
- Add: Setter for SetCRLF and SetColumnDisabled for compatibility
with NetTalk 12.48
Version 3.27 - 3 October 2022
- Goal: Late versions of NetTalk 12 Server (specifically API
methods) support both xFiles 3 and xFiles 4. The goal of this build
is to add Getter and Setter methods so that NetTalk has a unified
set of template code for using either xFiles 3 or xFiles 4.
- Add: SetTagCase, SetRemovePrefix, SetPrefix, SetPrefixChars,
SetOmitXMLHeader, SetDontReplaceColons, SetIndent, SetSaveEncoding,
SetReplacementChars, SetDemoMode, SetMaxPrefixLength, GetRecords,
GetSkipRecords, SetSkipRecords methods.
Version 3.26 - 8 August 2022
- Fix: Dynamic File Driver has a bug where it returns STATUS=0 for
an Open File. Work-around added to ignore File Already Open errors
when opening a table.
Version 3.25 - 17 August 2021
- Remove: AppName property from class.
- Add Start and ErrorTrap methods to class.
- Fix: Do not ampersand decode when in CDATA
Version
3.24 - 24 May 2021
Version 3.23 (29 April 2021)
- Fix: Regression: One of the ASSERT conditions was backwards.
Version 3.22 (22 April 2021)
- Add: XF:MaxParentNameSize equate.
- Add: ASSERTS to notify when XF:MaxFieldNameSize or
XF:MaxParentNameSize are not big enough.
Version 3.21 (26 November 2020)
- Add: template generates _XFILES_ pragma
Version 3.20 (16 September
2020)
- Fix: In some places MaxPrefixLengthInXML was not respected,
leading to mismatching of tags when loading.
Version 3.19 (2 September 2020)
Version 3.18 (18 August 2020)
- Fix: Avoid problems calling FreeGroupData and FreeQueueData if
self.G or self.Q not set.
- Fix: Meta property not being set in xCell class, is saving XML to
a string.
- Fix: For xCell objects make sure meta property is set to
'<?mso-application progid="Excel.Sheet"?>'
Version 3.17 (23 March 2020)
- Fix: Badly formed XML comment could cause an index-out-of-range
error.
Version 3.16 (13 January 2020)
- Fix: Add Tab as possible whitespace character when looking for
CDATA
- Fix: Allow for whitespace inside data, between tags and CDATA
section.
Version 3.15 (9 January 2020)
Version 3.14 (4 December 2019)
- Fix: self._indent = 0 added to Start method.
- Change: Internal group separator changed from . to *.
Version 3.13 (21 August 2019)
- Add: SaveEncoding and DontUtf8Encode
properties to xCell class.
- Fix: Maximum column width allowed in Excel is 512
- Fix: Improvements to xCell Numeric method for strings with
multiple commas.
Version 3.12 (12 July 2019)
- Fix: When exporting a VIEW, if the File Record was not BINDed
_before_ setting Prop:Order then the prop:order would not be
applied.
Version 3.11 (18 February 2019)
- Add: DontSaveBlankGroups property.
Applies to DontSaveBlanks as well. (Inspired by Eric Lankreijer)
- Fix: Remapped XF:DWORD equate to Ulong not Long.
Version 3.10 (5 December 2018)
- Fix: Start method did not reset Prefix property.
Version 3.08 / 3.09 (13 September 2018 )
- Add: Clarion11 to install.
Version 3.07 (11 August 2018 )
- Change: When loading into a table, and
UpdateFileOnLoad is false, and a duplicate is encountered,
the Load no longer terminates, but proceeds to find other records
that should be loaded.
Version 3.06 (7 August 2018 )
- Fix: Saving in DemoMode got into an endless loop.
Version 3.05 (26 July 2018 )
- Fix: Saving Groups got into an endless loop.
Version 3.04 (26 July 2018 )
- Add: SaveRecords and SkipRecords
properties.
- Add: Records property.
- Removed: TruncateIfNeeded method.
- Removed: MaxNumberOfRecords property. (This property was very
strange. If you were using it contact us and we'll discuss what you
should be doing.)
Version 3.03 (4 July 2018 )
- Add: support for Underline in xCell
SetStyleFont method. Courtesy of Simon Kempster.
Version 3.02 (19 June 2018 )
- Add: support for Printing options
added to xCell class. Courtesy of Rolf von Fintel.
- Fix: CleanFileName method returns clipped name.
- Fix: Blank Styles and Types are treated as omitted in calls to
xCell.SetCell
Version 3.01 (10 April 2018 )
- Add: Label property - used in trace method, makes it easier to
debug nested objects.
- Add: self.CRLF to self.Meta property.
- Fix: Location of closing group tags could be misplaced with
heavily nested groups. (This affected xCell class as well.)
- Refactor: _GroupName field changed to _GroupFieldNumber (since
that's what it is.)
- Refactor: First parameter of DecGroups method removed. (Wasn't
being used)
- Refactor: Improved indentation for xCell class.
Version 3.00 (6 March 2018 )
- Fix: Regression: Some group tags were missing
- Fix: Regression: When AddArrayIndexToTag property was true, the
closing number was always 0.
Version 2.99 (8 February 2018 )
- Add: AddArrayIndexToTag
property.
- Add: Support for Group Arrays when saving.
- Fix: xCell START method did not clear all the properties back to
their default state.
- Refactor: SaveOneField method returns number of fields saved.
- Updated to Cape Template 4.11
Version 2.98 (13 Dec 2017 )
- Add: Meta property to xfileXML class and
xCell class.
- Add: XSLT and Meta properties cleared in Start method.
- Add: AddText method.
- Add: AddAtListStart, AddAtRecordStart, AddAtRecordEnd,
AddAtListEnd Methods.
- Add: xCell meta property defaults to <?mso-application
progid="Excel.Sheet"?>
Version 2.97 (8 Dec 2017 )
- Add: xCell class, SetCellDate. SetCellTime and SetCellDateTime
methods.
- Document: Updated section on
writing date and time values using xCell class.
Version 2.96 (7 Dec 2017 )
- Add: xCell class, SetCell method, correct case of DateTime type.
- Fix: xCell class, SetCell method, defaulted unknown types to
String.
- Document: Added section on
writing date and time values using xCell class.
Version 2.95 (5 Dec 2017 )
- Fix: SET not called when Saving a Table and the table does not
have a primary key. (Courtesy of Daniel Clemente Lopez)
Version 2.94 (26 Oct 2017 )
- Refactor: All default values moved to Start method, called
automatically by Construct.
- Fix: Closing tags did not take / into account when calculating
prefix length (regression from 2.93)
Version 2.93 (30 Aug 2017 )
- Add: MaxPrefixLengthInXML property.
This sets the cut-off length for removing prefixes, from the
incoming XML, when removePrefix is on.
The default value is 4 (which includes the separator.)
Version 2.92 (7 Aug 2017 )
- Fix: SetGroupLengths could fail if last field in the group was an
attribute.
Version 2.91 (31 July 2017 )
- Fix: SetGropLengths could fail if nested Groups, with attributes,
and fields of the same name were involved leading to bad xml.
Version 2.90 (13 June 2017 )
- Fix: Remove whitespace before and after CDATA when importing XML.
Version 2.89 (3 May 2017 )
Version 2.88 (31 January 2017 )
Version 2.86 (6 January 2017 )
- Fix: Names of Blobs and Memos used in a view was not correct when
SAVEing the View.
- Fix: When in Demo mode do not actually reference any memo or blob
as the table may be closed.
- Fix: xCell, SetRow method did not correct set the style for the
row.
Version 2.85 (12 December 2016 )
- Change: Text after a pipe in field names removed. To handle things
like
MyFile String(30) | READONLY
Version 2.84 (1 November 2016 )
- Change: xCell class : Length of Formula field extended from 50
chars to 1024 chars.
- Fix: IsBoundary tweak for dontReplaceColons.
- Fix: Tag name for Views, when File Field has external name set.
Version 2.83 (31 August 2016 )
- Fix: Updated xcell.SetColumn method to handle p_Index < 1.
Version 2.82 (5 August 2016 )
- Add: Optional Key parameter to Save(Table)
method. If omitted then the Primary key is used.
- Change: RootBoundaryAttribute, _pFileBoundaryAttribute made
larger.
- Change: GetFieldNumber and DisableField methods get an optional
case parameter.
Version 2.81 (12 May 2016 )
- Add: CheckSize method
- Fix: Appending a large xml to an existing xml could result in an
index out of range error.
Version 2.80 (18 April 2016 )
- Fix: Better boundaries of E in xcell.numeric.
Version 2.79 (17 March 2016 )
- Add: ColorWeb method to xCell class. Color parameters can now be
passed either as Clarion LONG's or Web #aabbcc format to xCell
methods that take a color.
- Improvement: xCell.SetStyleInterior
method validates Pattern parameter and sets to Solid if not valid.
- Documentaiton: Formulas for
xCell class discussed.
- Documentation: Example of xCell
methods added.
Version 2.78 (17 February 2016 )
- Add: Start method to xCell call and xFileXml class to restore the
object to it's initial state for reuse.
Version 2.77 (17 February 2016 )
Version 2.76 (5 February 2016 )
- Change: If loading a group, and the FileBoundary is set, but the
RecordBoundary is blank, then internally swaps them.
- Fix: Prevent a possible "Index out of range" if in DecGroupTag and
self.Parents is already blank.
Version 2.75 (4 February 2016 )
- Add: WrapText to StylesQueue for xCell [courtesy of Robert
Kolanko]
- Add: MergeAcross and MergeDown to CellQueue for xCell [courtesy
of Robert Kolanko]
- Fix: IsGroup method could return the wrong value if the group name
was duplicated as a no-group-name earlier in the xml.
- Fix: If FileBoundary was blank then BinDataLen could be
incorrectly lengthened
- Removed: Calls to Wait and Release (which contained no code.)
- Removed: Experimental and incomplete xFileJSON class - use jFiles
instead.
- Removed conditional compiles for C5 and C55 support.
- Replaced: Calls to OMITTED with names, not numbers.
Version 2.74 (24 November 2015)
- Improvement: When called to create a string, makes sure xmlData
property is not left pointing to null if the string is empty.
Version 2.73 (10 November 2015)
- Improvement: xCell.Numeric method made smarter so that - and +
signs limited to start of string.
Version 2.72 (9 November 2015)
- Improvement: xCell.Numeric method made smarter to invalidate
numbers with multiple chars, which are legal, but only allowed once.
+, -, . and E.
Version 2.71 (29 October 2015)
- Fix: When writing text into attributes, that text was not being
XML encoded (ie > to > etc.)
- Change: p_Type parameter to xCell.SetCell method is now case
insensitive.
Version 2.70 (3 September 2015)
- Fix: Setting the .CRLF property to
blank did not have the desired effect.
Version 2.69 (22 July 2015)
- Fix: xCell.SetCell method would set a cell type to be Number even
if it contained a space. (Excel does not like this.)
- Fix: xCell.Numeric did not ignore leading and trailing spaces.
- Fix: xCell.SetCell, if type forced to numeric then value is
LEFTed.
Version 2.68 (15 July 2015)
- Fix: Use of Zip class did not Close the file after reading it.
Version 2.67 (8 July 2015)
- Tweak: xCell class exporting numbers containing a comma are sent
to Excel as a number, not a string.
Version 2.66 (6 May 2015)
- Add: DisableField method
- Fix: Possible out-of-range error in _IsBoundary method.
Version 2.65 (30 March 2015)
- Add: DontUTF8encode and DontUTF8Decode properties.
Version 2.64 (27 March 2015)
- Fix: Removed a regression added in 2.62 which cased some exports
to Excel to generate a GPF.
Version 2.63 (26 March 2015)
- Some code added to xCell class to trap misuse of class and prevent
gpf.
Version 2.62 (24 March 2015)
- _Indent property set to 0 at start of
save. [update-- introduces a regression, this change undone
in 2.64 build]
- If _Indent drops below 0 then reset to 0.
Version 2.61 (25 February 2015)
- Clarion 10 Install
- Removed %cwversion code
Version 2.60 (30 December 2014)
- Fix: Possible Index-out-of-range
Version 2.59 (1 December 2014)
- Fix: Regression in IsGroup.
Version 2.58 (27 November 2014)
- Improvement: Profiled IsGroup method, and optimized code. (Can be
a lot faster to Load structures with lots of sub-groups)
- Improvement: Other minor optimizations.
Version 2.57 (25 November 2014)
- Fix: Bug in RemoveComments that could result in an
Index-Out-Of-Range error.
Version 2.56 (17 November 2014)
- Extended: Maximum length of data in an excel cell (CellQueueType)
extended from 50 chars to 2048 chars.
- Add: AddTimePicture and ExcelTimePicture methods to support time
columns in Excel.
Version 2.55 (11 July 2014)
- Performance Improvement: XML files with no space characters could
load slower than desired.
Version 2.54 (11 July 2014)
- Fix: xCellStyles needed to set Bold and Italic as attributes.
Version 2.53 (10 June 2014)
- Fix: When saving structures with more than 2 levels of Groups, the
closing tag did not get added correctly.
Version 2.52 (30 March 2014)
- Add: ReplacementChar property - defaults to '.' Allows you to
specify the replacement character for the colon in field names.
- Fix: Empty fields could be excluded even if property was set to 0.
Version 2.51 (20 March 2014)
- Fix: Regression: xml.Save(view) was broken.
Version 2.50 (5 March 2014)
- Added Class : xCell, and all dependent classes and structures.
- Added _sFieldRequired property. Forces field to be included, even
if it is blank and would normally be excluded.
- Added Method : SetRequired
- Fix: Structures that terminated with multiple nested groups did
not always close properly.
Version 2.43 (17 February 2014)
- Added DemoMode and DemoModeValue
property.
- Added _sGroup and s_String (internal) properties
- Refactored DecGroup method (internal use)
- Added p_close parameter to _WriteStartTag method.
- Added support for DontSaveBlankStrings to attributes
- Fix: Test IsGroup before IsString.
- Refactor: Removed various conditional compile statements for C5
and C55 support.
- Fix: If in Append mode, SOAP envelope is not repeated
Version 2.42 (22 January 2014)
Version 2.41 (21 December 2013)
- Fix: Load from file method did not reset
loadFromString property when switch from a string load to
a file load. (thanks to Dave Bratovich for spotting this one.)
- Add:
DontSaveBlankStrings, DontSaveBlankNumbers,
DontSaveBlanks
properties.
- CleanFileName method is stricter on
characters allowed in file names.
- Add: TRACE method added.
- Add: xslt property for
adding an xml-stylesheet reference at the top of the xml output.
Version 2.40 (8 July 2013)
- Fix: Error : Indistinguishable new prototype: LOAD when using
xFiles procedure extension in Legacy Source procedure.
Version 2.39 (14 May 2013)
- Update: Installer detects Clarion 9
Version 2.38 (14 March 2013)
- Changed to Ver4 object/template management system. IMPORTANT
READ
THIS.
- Add: support for Multi-Proj in C8
- Fix: Allowed SOAPBodyBoundary and SOAPEnvelopeBoundary attributes
to be used independently of each other.
Version 2.37 (11 January 2013)
- Fix: The first attribute could be created with the trailing "
omitted.
Version 2.36 (24 November 2012)
Version 2.35 (18 September 2012)
- Fix: When saving large tables, and there are large numbers of
encodable characters (&, <, > and so on) then a GPF was
possible.
Version 2.34 (27 August 2012)
- Fix: When saving Views to a file, MEMO fields specifically
mentioned in the view were not exported.
Version 2.33 (26 June 2012)
- Fix: If a group, contained an Array, then the closing tag of the
group would be located incorrectly.
Version 2.32 (19 June 2012)
- Added: NotBoundary property for structures that contain a field
with the same name as the record boundary.
- Lengthened max attribute length to 4K.
Version 2.31 (5 April 2012)
- Fix: If removePrefix was set, and the incoming xml FileBoundary
had a prefix, then the FileBoundaryAttribute property was set
incorrectly.
Version 2.30 (10 February 2012)
- Added CurrentFieldLength property.
Version 2.29 (10 February 2012)
- Added RecordNumber
property.
- Added StartRecord method, matches existing EndRecord method, and
allows for overriding of record boundaries during a .SAVE.
- Added xFileJSON class (Work In Progress)
- Fix: ' and " charterers not correctly encoded when creating xml.
- Fix: if a string contained multiple characters needing encoding,
then some chars at the end of the string would not be encoded.
Version 2.28 (24 January 2012)
- CHANGE: _pRecordBoundaryAttribute
property changed name to RecordBoundaryAttribute
- Added support for Attributes
when creating XML.
- Fix: Possible GPF when used in Multi-DLL mode with BoTran.
Version 2.27 (11 October 2011)
- Fix: Calling Save on a File, with Strings set to CData did not
correctly recognize a Group as a Group.
Version 2.26 (6 Sept 2011)
- Corrected examples with missing files.
Version 2.25 (20 July 2011)
- Support for attributes quoted with a single-quote added.
Version 2.24 (28 June 2011)
- Support for ColumnDisabled property added to .Load method.
Version 2.23 (4 May 2011)
- Tweak to template to support xFile objects generated into Source
procedures in Clarion 8.
Version 2.22 (24 March 2011)
- Added .CRLF property so that alternate line endings can be used.
Default is CR/LF (ie char 13, followed by char 10). Use this in
conjunction with the IndentBy property to minimize the size of the
xml.
Version 2.21 (24 March 2011)
- Add new method, SaveCurrentFieldToXML with name parameter. Makes
custom formatting of fields easier if you have the name.
- Add new method FormatCurrentField to simplify simple formatting of
a current field.
- Added section to the docs: Formatting
a field before it is saved to XML
Version 2.20
- Added new method, UseCharSet
which sets the .SaveEncoding property based on a Clarion Charset.
- .RSSVersion string extended from 10, to 252 characters
Version 2.19
- Added support for auto closed, empty tags, when doing a 'match by
number'.
Version 2.18
- Fixed place where dontReplaceColons property was not being
respected.
- Added PROC attribute to Save method declaration
Version 2.17 (24 January 2011)
- Added XF:CaseAny equate
- Set default of TagCase property to XF:CaseAny
Version 2.16 (19 January 2011)
- Fixed regression with errant SOAP boundary appearing in non-soap
xml.
Version 2.15 (14 January 2011)
- Added support for SOAPHeader property.
Version 2.14 (1 December 2010)
- Prototype for Copy method changed to
explicitly take both source and destination structures. This avoids
possible thread problem with global, unthreaded, objects.
- .TagCase property can be set to XF:CaseAsIs
for Loading. If set, then all structure external names need to be
set specifically.
Version 2.13 (27 November 2010)
- SOAPEnvelopeBoundaryAttribute lengthened from 252 to 1024
characters.
Version 2.12 (15 November 2010)
- fixed regression in string length of encoded strings when
converting & to &
Version 2.11 (26 September 2010)
- Fixed bug with encoding of &, < and > in xml that wasn't
encoded any other way.
Version 2.10 (24 August 2010)
- Fixed regression with records being filtered in ValidateRecord
Version 2.09 (4 August 2010)
- Added .PrefixChar property (defaults to :)
Version 2.08 (23 July 2010)
- Add EndRecord method - allows you to embed strings, when saving,
right before the end of a record.
- AddString method - allows you to inject a custom string into the
xml stream when saving.
Version 2.07 (12 July 2010)
- Fix possible GPF when saving large fields (> 1 MB).
- Optimized encoding of &, < and > characters.
Version 2.06 (18 May 2010)
- Fix GPF in AssignField. If CurrentFieldNumber was 0 , then it was
using that to check the GroupLen array.
Version 2.05 (2 April 2010)
- ParseAttr method saves, and restores currentTag property.
- Autoclosing a tag while in a record refined.
Version 2.04 (March 2010)
- CurrentTag property set when parsing attributes on a .Load
- added support for <record attr="whatever" /><record
attr="something" /> styled xml
- added autoCloseTags property for loading invalid xml.
Version 2.03 (1 March 2010)
- Updated Demo app, modernising calls in embeds to .Load and .Save
- Fixed bug where closing tag might be truncated if indent was
<> 0 at that point.
Version 2.02 (17 February 2010)
- Added IndentBy property. Set to 2 by default. Set to 0 to suppress
all indenting, before the call to .Save.
Version 2.00 (5 January 2010)
- Fixed another problem with groups in a VIEW
Version 1.99 (11 December 2009)
- Fixed problem detecting GROUPs in Views with a JOIN
- Fixed problem where SetFieldPointer method could enter infinite
loop
- Fixed problem where IgnoreGroups property was on.
Version 1.98
- Added support for structures that contain a field with the same
name as the record.
- Added support for multiple fields, with the same name, in the same
structure.
- Added new section to the docs called Importing
Advanced Structures.
- Added StoreWholeRecord property.
- Fixed: Bug closing group structures where last field in group was
disabled, or an Over.
Version 1.97
- fixed bug where xml with no encoding specified was assumed to be
utf. This affected extended character sets that were encoded, but
used a scheme other than utf-8.
Version 1.96
- fixed bug where attribute started a new line
- fixed bug when loading memos and blobs
- tweaked code in decode method for Clarion 5.5 and earlier support.
- Change to Copy method to allow for the case where the file is
closed.
- fixed bug in complex structure save where text was appended.
Version 1.95
- Added support for one complex structure inside another. For
example a queue of Queues, a queue of Files and so on. See QinQ
example for hints on the way to do it.
Version 1.94 (20 August 2009)
- Fixed regression with dimensions being over-detected.
Version 1.93 (13 August 2009)
- Added automatic detection of dimensioned fields to Groups and
Queues for Load and Save. Only C6 and higher can detect
automatically, C5 and C5.5 need to set _Dimension[FieldNumber]
specifically in SaveTweakFieldSettngs.
Version 1.92 (28 July 2009)
- added support for " and ' encoded characters.
- added support for group structures that contain attributes, but no
data, and end with the abbreviated close tag.
- extended example added in version 1.91to handle cnumber field.
Version 1.91 (21 July 2009)
- Added support for xml where the record boundary contains data. See
ParentChild example, Example2 procedure.
Version 1.90 (15 July 2009)
- Fixed regression with CurrentTag property missing.
- Corrected ParentChild example which was missing the example xml
file.
Version 1.89 (13 July 2009)
- Fixed bug where SendToString property was not explicitly being set
to 0 when .Save method (to file) was called.
- Added UpdateAsWhole property for updating incoming records. Note
that if the file has memos then this mode is not supported.
Version 1.88 (18 May 2009)
- Fixed bug where updating records that contain arrays - save Buffer
size was calculated incorrectly.
Version 1.87 (6 May 2009)
- Better support for arrays in Queues and arrays in Groups. However
note that you need to manually set
xml._Dimension[fieldnumber] = xxx
before calling Load or Save.
xxx is the size of the dimensioned field (i.e. the number of
elements in the array).
Version 1.86 (17 April 2009)
- Added support for decoding xml that has no File boundary AND no
Record boundary. In this case each tag triggers a save to the File,
or Queue.
- New example, "ParentChild" included to show how child records
inside a parent xml can be parsed using a second xFiles object.
Version 1.85 (4 April 2009)
- AssignField method (used when loading) now takes decoded string
rather than encoded boundaries into BinData. This allows for much
easier control over altering (formatting / deformatting etc)
incoming values before they are assigned to the Group, Queue or
Field field.
Version 1.84 (23 March 2009)
- fixed bug where number of fields in group was inaccurate if group
contained fields with no label.
- fixed bug where groups-in-groups could fail where group tags were
case sensitive.
- Calling ._close after an error resulted in the error code being
cleared.
Version 1.83 (12 March 2009)
- Fixed regression where multiple root boundary tags were included
in multi-part xml docs.
Version 1.82 (10 March 2009)
- Fixed possible memory lead when saving xml into a string.
- Fixed possible "hang" where an error occurs during a load, leaving
the CriticalSection in an unreleased state
- Corrected problem with SOAP header being omitted if OmitXMLHeader
was set when calling Save. (Thanks to Sebastian Arribas.)
- Added AddQueueRecord method. (Virtual method called before a
record is added to the Queue)
Version 1.81 (26 February 2009)
- Extended Append to support
Xml-To-Strings.
Version 1.80 (19 February 2009)
Version 1.78 Beta (10 November 2008)
- Clarion 7 compatible install.
- Class - don't write the record boundary if there is none.
- Template - change to the tpw (fix Methods list to '' when finished
generating the list).
Version 1.77 Beta (23 September 2008)
- Fixed extra space at the end of RootBoundary and SOAPBoundary
tags.
- More template updates to prevent dropped objects.
- Import/Export Control template updated to support Clarion 5.
- Table, and Row boundaries added to the Import/Export Control
template.
Version 1.76 Beta (12 September 2008)
- Documented limitations for Clarion 5, and
Clarion 5.5
- Improved support for Clarion 5 File-To-XML
- Added small FileDump example.
- Template change to try and avoid orphaned methods.
Version 1.75 Beta (10 July 2008)
- fixed bug in FileBinary.Init method that could truncate file
names. (Thanks to Benjamin Krajmalnik)
- improved support for groups, where the Clarion group is a superset
of the XML group, of the xml file being loaded.
Version 1.74 Beta (19 June 2008)
- Added template option to both global and local templates;
"Update File on Import if record already exists".
- fixed bug with importing records if records already exist.
- improved error information when errors occur while loading an XML
file.
- improved speed when importing records, and the records exist, and
the file has no memos or blobs.
Version 1.73 Beta (16 June 2008)
- fixed possible GPF when loading/saving XML from a string (not a
file).
- improved the RemovePrefix support a lot. Specifically if the
.RemoveProperty is set then prefixes in the XML are now ignored,
INCLUDING prefixes in the FileBoundary and RecordBoundary. In
additional prefixes in the .RecordBoundary and .FileBoundary
properties are also removed.
Version 1.72 Beta (12 June 2008)
- fixed regression: DontCleanFileName property was in the wrong
class.
Version 1.71 Beta (11 June 2008)
- fixed bug which hindered loading of CDATA strings > 1024
characters
- improved group support when saving and loading File, View and
Queue structures
- explicitly cleared various properties on load & save, making
multiple use of the same object better.
- handles .\ and ..\ in path better when writing in append mode.wc
o:\cl
- Added new property IgnoreGroupTags.
Set this before saving to NOT write out the group tags around
grouped fields.
Set this before loading to allow ungrouped XML fields to be loaded
into a structure - even if they are grouped in your clarion layout.
If the XML fields are grouped then the fields will still load,
however there may be complications if you have duplicate field names
in the xml.
Version 1.70 Beta (19 May 2008)
- Fix: Allowed more characters as legal in CleanFileName method
- Fix: Handled case in Load where record boundary is a subset of a
field label.
Version 1.69 Beta (13 May 2008)
- support for auto-closed tags in RSS feed
- Added support for loading xml files that
contain comment
Version 1.68 Beta (2 April 2008)
- Added support for nested groups for both load and save.
- added "standalone" property which can be se to "yes" or "no" as
desired. For example;
<?xml version="1.0" standalone="yes">
- Fixed regression in XML Settings class. FileBoundary and
RecordBoundary attributes now set correctly.
- Fixed over-zealous error reporting in _close method. Closing an
already closed file no longer results in an error.
- New Jump-Start section added to the docs - Creating
an XML File or String
Version 1.67 Beta (14 March 2008)
- Fixed regression with Load methods not using default FileBoundary
and RecordBoundary properties.
VERY IMPORTANT NOTE: These properties
are now no longer set to default values by the INIT method. If you
are using the (obsolete) Load mechanism of
xml.Init()
xml.Load()
Then you will need to set these two properties before the call to
.Load. (Before or after .Init is fine.) EG
self._pRecordBoundary = 'item' ! or 'data'
self._pFileBoundary = 'queue' ! or 'file', or 'view', or 'group'
As an alternative use the new forms of .Load
and .Save.
- Added extra Save methods to support setting the FileBoundary and
RecordBoundary in the Save command.
Version 1.66 Beta ( 14 March 2008)
Version 1.65 Beta (29 Feb 2008)
- Added two new procedures, AddOldField
and LoadAllOldFields.
This allows you to change a table, view, group or queue field name
and still import and XML file using the old field name.
- Some more minor bug fixes.
Version 1.64 Beta (20 Feb 2008)
- Changed: Remove all Stop() message for API failures. These are
handled by ErrorTrap (and logged if logging is enabled) and the
application should choose the desired behaviour when an error
occurs. NOTE: Error and ErrorStr properties are set when an error
occurs. ErrorTrap is obsolete.
- Added: Additional file handling for opening files that are not
already open when the Load(), Save() and Copy() methods are used.
The file maintains it's state (if a closed file is opened it is
closed when the method is complete).
- Added: Additional features specific to CapeSoft Email Server in
Service mode. This release is required for the source code version
of Capesoft Email Server 3.83 and later.
Version 1.63 Beta (15 Feb 2008)
- Fix: Supports <tag/> syntax as well as <tag /> syntax.
- Add: Any attributes in the Record Boundary are now parsed into
fields as if they were separate tags. For example
<record firstname="bruce" lastname="brown">
<dob>1/1/2000</dob>
</record>
Is processed as if it was
<record>
<firstname>bruce</firstname>
<lastname>brown</lastname>
<dob>1/1/2000</dob>
</record>
- General: cleaned code to remove out-of-date comments, and old,
commented-out code.
Version 1.62 Beta (5 November 2007)
- If RootBoundary set during Load, then root boundary attributes
loaded into RootBoundaryAttribute property.
Version 1.61 Beta (26 October 2007)
- Add: Ability to store multiple things (Groups, Queues, Files,
Views) in a single XML file. See Storing
multiple things in the same XML file for more details.
- Add: Files which are part of the View are automatically Bound.
- Fix:A GPF could occur if using the .Save(View) method, and the
table could not be opened.
- Fix: Dict example was missing Wages.Tps file.
- Fix: Saving a View would fail if the view had a prop:filter
- Fix: Tag names for blobs & memos were not clipped
- Fix: If the "simple" form of the view was coded (i.e. with no
projected fields) then xFiles would GPF if the file structure
contained over fields.
- Fix: Loading file boundary attribute was broken if attribute did
not exist.
Version 1.60 Beta (13 September 2007)
- Added ability so save VIEWS to an XML file, or string.
- Added .ValidateRecord method to allow client-side filtering of
records being saved, or loaded.
- Added ability to ignore attributes on a record boundary. (Similar
to the feature done for 1.51 for the file boundary.
- Setting _pFileBoundary property to blank suppresses the file
boundary tag in both Load and Save methods.
- Added SoapEnvelopeBoundary and SoapBodyBoundary properties that
allow you to set specific tags when creating a soap packet. They
default to soap:Envelope and soap:Body
respectively.
- Added .TagCase property. This defaults to XF:CaseLower. Other
options are XF:CaseUpper and XF:CaseAsIs. In order to have mixed
case tags, the Name property for each field in the group/file/queue
must be set.
- Added a section to docs, Creating
SOAP Requests.
- Added a section to docs, Using
a View to create a filtered, sorted, XML file.
- Added a new example (Examples\SOAPClient\Convert) courtesy of
Larry Sand (www.ClarionFreeImage.com)
- Added new example (Examples\Dict) that show minimalist source
procedures saving a file, or view, to XML.
- Change: SoapEnvelopeText property (added in version1.52) has
changed name to SoapEnvelopeBoundaryAttribute to make naming more
standard.
- Fix: If .Load method opens the file, then it closes the file as
well. If file is closed, and .Save is called, then file is opened,
and closed. If .Save is called in View mode then all necessary files
and view itself, if not already open, will be opened and closed.
- Internal: Calls to .SaveTweakSettings, and .LoadTweakSettings
moved higher in .Save and .Load methods respectively.
Version 1.52 Beta (7 September 2007)
- Added new Save methods to save a group to a string, and Queue to a
string. .Save(Group) and .Save(Queue) respectively. XML String is in
.xmlData property after the call is made.
- Added .SoapEnvelope property and .SoapEnvelopeText property. If
.SoapEnveloper = 1 then a SOAP envelope will be wrapped around the
XML.
Version 1.51 Beta (31 August 2007)
- Added support for additional attributes in the file boundary tag.
For example if an XML file is modified in Excel the Schema is added
to the tag that acts as the file boundary:
<file xmlns:xsi="http://www.w3.org/2001/XMLSchema-instance">
Which is now supported. Additional attributes will be ignored, and
overwritten when the file is saved, however the file will now load
as expected.
- Template - added description into extension template header for
ease of identification of which instance of xFiles each extension
is.
- Template - fix for legacy class generation (includes xfiles01.tpw
1.54)
Version 1.50 Beta (25 July 2007)
- Documented the xFileLinkDLL class
- New Quick Start guide for dynamic DLL loading using xFileLinkDLL
- Support for loading XML based on field number rather than field
name (allows an XML file to be loaded where the field names don't
match those of the data structure being loaded). Also support
starting from any field in the XML.
- Updated the documentation, fixed incorrect links, added numerous
new links, fixed references where xFilesXML was simply referred to
as "xFiles", update the Contents to assist with navigation and added
additional links to the JumpStart/Quickstart guides in the
documentation.
- New xFileXML.Load() method to load
directly from memory by passing the data structure and string that
contains the XML to load. Using this method means that the LoadFromString
property does not need to be set and the xFileXML.xmlData does not
need to be populated manually.
Version 1.40 Beta (07 July 2007)
- Extensive new document for the xFileXML class, a large number of
new methods and properties have been documented and the existing
documentation expanded on.
- Support for storing multiple data structures in a single XML file.
- Support for reading data from an XML file that contains more than
the data structure currently being read.
- Support for writing multiple data structures and custom XML to a
single file.
- Added support for Multi-Proj
Version 1.30 Beta (29 June 2007)
- Fixed a bug that could cause problems loading groups (the data
would not be loaded from the XML file, unless Save had previously
been called).
- Updated documentation for the xFileXML class to include additional
class methods, this update is currently a work in progress and the
documentation will be further updated shortly (for all classes).
- Added xFileXML.SaveBinData()
and xFileXML.LoadBinData()
methods to allow files to be loaded and saved directly to the
binData property of the class without doing any parsing. This can be
used to save multiple groups, files and queues to a single XML file
by using the .saveToString property to create the XML in memory,
populating it into the binData property and the using SaveBinData()
to write it to disk. The standard Load()
method handles loading data from XML files that contains multiple
data structures (see below)
- Added support for reading an XML file that contains multiple
groups, files and queues.
Version 1.23 Beta (1 May 2007)
- New example. Uses the xFileTimer object to delay 1ms between
tasks.
Version 1.22 Beta (15 February 2007)
- Code to handle nested groups and queues uses the IsGroup()
function, which is not available in version of Clarion prior to C6.
In 1.20 Beta this results in a compiled error when using C55. This
code has now been wrapped in a conditional compile for C6 only.
- Added support for nested groups, queues and records in groups,
queues and records. Previously only groups were handled.
- Fixed compile errors in example applications due to missing Global
extensions.
- The Multi Dimensional example used GPFReporter, Hyperactive and
WinEvent, these have been removed.
Version 1.20 Beta (06 February 2007)
- Updated xFileXML.Copy() function to allow queues to be copied to
files and files to be copied to queue.
- Fixed xFileXML.Copy() function when used with Files - an option
was used that was not supported by some driver types (such as the
IMDD), all functions are now very generic and should support all
file drivers.
- Added handling to prevent issues when
xFileXML.RemoveDuplicatesAfterSort was called with a file instead of
a queue.
- New handling for tables (especially IMDD tables) to support the
same features as queues.
- Numerous fixes of table handling code, fixed loading and saving
issue etc.
- Added the ability to override the main wrapping tag to so that
files and queues can be populated from an XML file regardless of
whether the wrapper tag is <queue> or <file>.
- Fixed: Sub groups and queues (group within groups/queue and queues
within queues) now output correctly. Previously the fields would be
output, but the sub group/queue itself would also be dumped as a
single "field" within the XML.
- This is now the official version used by Email Server 3.50 and
above. Previous version of xFiles are not compatible with Email
Server source code.
Version 1.10 Beta (3 August 2006)
- Fixed Global Disable (was trying it include some code in the
Export from and Import to file control template which was causing
compile errors).
- In Init - don't override settings (with defaults) that were set
prior to Init being called.
- Includes a stamped version to indicate the version of xFiles that
the application was previously compiled with.
- Warning is generated if a XMLFile is attempted to be imported to a
file, or a name for the file is not specified.
- Case insensitive parent method name checking (if the parent
method's name case was different, then the class deriver saw as two
different methods).
- Fixed GPF in export to string.
Version 1.09 Beta (19 June 2006)
- Replaces Colons with Dots (for fieldnames if required) even if the
RemovePrefix property is set (was previously either doing the one of
the other).
- Template option to specify whether (in field names) colons must be
replaced by dots or not.
- Fixed regression (from 1.08) - omitting fields (where export was
not from SendTo)
Version 1.08 Beta (19 June 2006)
- New property - ColumnDisabledStr - a string over the
ColumnDisabled byte array (makes setting or resetting these bytes
easy)
- Added a constructor method (which is called from the construct
method) - makes deriving the construct method possible.
Version 1.07 Beta (6 June 2006)
- Very Important !!: self._NoFreeBeforeLoad
has been inversely replaced by self.FreeFileBeforeLoad,
self.FreeQueueBeforeLoad and self.FreeGroupBeforeLoad. You can turn this on or
off in the template (or via handcode).
- Very Important: You need to add the
xFiles Global Extension template to your applications that use
xFiles. If you have used your own derived xFiles class, you will
need to enter that into the field provided on the Class tab of the
new xFiles Global Extension template.
- Important: self.InverseOrder
has been replaced by self.InverseAddOrder and
self.InverseTruncateOrder
- Important: self._cRecordBoundary
has been replaced by self._pRecordBoundary
- Important: self._cIndent
has been replaced by self._pIndent
- Important: self._cFieldName
has been replaced by self._pFieldName
- Important: self._cRecordBoundary
has been replaced by self._pRecordBoundary
- Important: self.GetValue()
and self.SetValue() prototypes changes -
but continue to work as before.
- Important: self._ReplaceColon()
has been replaced by self._ReplaceColonInString().
- Added: Support for Importing and Exporting Clarion Files to and
from XML (so it now handles Files, Queues & Groups). File to xml
is only supported in C55 and above. And files with multi-dimensional
fields, memos and/or blobs are only supported in C60 and above.
- Made import case insensitive for XML tags.
- Added: Dim, Blob & Memo support
- Added: self.SaveEncoding (defaults to iso-8859-1) but can also be
set to utf-8 or windows-1252
- Added: self.LoadEncoding - which tells you what the encoding of
the loaded XML file is.
- Added: CDATA support
- Added: self.SaveStringsToCData (Default off)
- Added: self.SaveMemosAsCData (Default on)
- Added: self.SaveBlobsAsCData (Default on)
- Added: self.SaveAsCData[index] (default off or on depending on
SaveStringsToCData etc. options - override this in
SaveTweakSeattings()
- Added: self.DontUseMemos (defaults off)
- Added: self.DontUseBlobs (defaults off)
- Added: CustomHeader (string) - which allows for a custom header
string to be added when creating the header
- Added: CustomSectionAfterFileBoundary (string) - which allows for
a custom section string to be added after the file boundary tag.
- Added: CustomFooter (string) - which allows for a custom footer
string to be added when creating the footer
- Added: Advanced methods - self.SaveTweakSettings() and
self.LoadTweakSettings() - which are called from Load() and Save()
after the analyzing phase before the actual reading/writing phase -
allow last minute changes to the configurations.
- Added: self.ForceDecimalEncode128 which forces all characters >
128 to be encoding as €
- Added: Control template for Exporting
and Importing Files / Queues and Groups.
- Added: self.RemovePrefix - which if set to 1 will remove the
prefix from queues, groups & files. e.g. <Pro.ProductName>
becomes just <ProductName>
- Added: self.FreeGroupData (defaults to a clear)
- Added: self.FreeQueueData (defaults to a free)
- Added: self.FreeGroupData (defaults to a loop / next / delete) -
It's better to override this method with your own ABC Relational
Delete - and xFiles may implement an update feature in future
instead of delete and insert - which can break relational
constraints.
- Added: self.RSSVersion (string) which
you can set to '2.0' for example and your file/queue will be
exported in RSS format. Best to set this before calling Save()
and/or Load() e.g. Set in Construct()
- Fixed: Critical Section support for C5 and C55 applications that
don't use NetTalk 4.\
- Fixed: interference with other templates (using the Object01.tpw
template) - new xFiles01.tpw
- Fixed: a bug where a 0 byte file could be locked after loading
with the Binary Class
- Added: SaveToString support added (previously was just doing
LoadToString)
- Note: the zip functionality (with particular note to the save xml
in zip file functionality) will be undergoing some future changes.
Version 1.05 Beta (27 February 2006)
- Fixed Wait Release problem in Zip code
- Changed Wait Release code to use NetTalk's Wait
Release object if available.
If you are not using the xFiles template, and don't have NetTalk
v4.00 or newer please add the following project define to your
application:
xFilesNoNetTalk4=>1
This is not needed if you have NetTalk v4.00 or if you are using the
xFiles Extension Template, as this is controlled automatically.
Version 1.04 Beta (10 November 2005)
- Fixed install. Use this version rather than
v1.03.
Version 1.03 Beta (8 November 2005)
- Added column suppression (for SendTo support).
See new property - ColumnDisabled
Version 1.02 Beta (13 September 2005)
- Added zlib_cs.dll and Explode.dll to the Install.
- Tweak to the template for Clarion 5 to remove
warnings.
- Removed the p_DontCloseNow parameter to the
Save() methods, and added SaveButDontClose() methods
- Fixed Destruct Freeing blocks twice
Version 1.01 Beta (08 September 2005)
- Corrections and additions to the documentation.
- Added an xFiles template to easily add the
xFiles object to a procedure (replaces Object Writer's Object User
template, and provides default settings for xFiles).
- New Save and Load methods that take the data
structure and file name and can be called without needing Init to be
called.
- Changed all example to use the new xFiles
template to populate the object.
- Cleaned up and updated the documentation, added
docs for addition class properties.
Version 1.00 Beta (31 August 2005)
- xFiles escapes captivity!
- Initial documentation etc.
- The original class name was changed from
QueueFile, all classes included renamed for consistency.