

NOTE: Clarion 9 users must visit each procedure's properties, as there is a bug in Clarion 9 (fixed in 9.1, not present in C8) that will force a compile error until this is done:

| AppName | Feature Description |
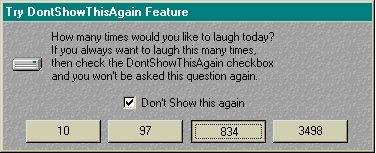
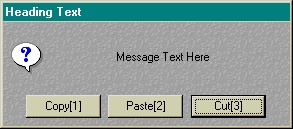
| msgbox.app | 1. Illustrates the use of Messages, Stops and Halts using the
'CapeSoft MessageBox with Features' objects. 2. It uses the example tps logging file that is shipped with CapeSoft MessageBox to log messages. 3. It uses graphics and text coloring on the message box window (Transparent Strings for the message text). 4. A Browse window to show the Log File. |
| Legacy Multi DLL | Illustrates the use of messagebox in a Multi-DLL application. Compile the rootdll.app, then the function.app, then the mainexe.app. |
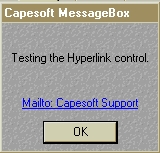
| MesBox & HyperActive | Demonstrates CapeSoft MessageBox in conjunction with HyperActive functionality. |
| Note: If you want to have more than one button on your message box and you want to use this feature, then you must have a default button!!! |


There are a couple of ways of implementing translation support.
1. The easiest (from a MessageBox point of view) is to create a translation file, and set the translation file property. You can do this in the ThisMessageBox.init method (after the parent call) in your global embeds (this is done in your data dll for multi-dll applications):
ThisMessageBox.SetGlobalSetting('TranslationFile',MyTranslationFile)
Your translation file would typically be an ini file containing translated text for each item requiring translation as follows:
[MessageBox_Buttons]
Button:OK=&Bueno
Button:Yes=&Si
Button:No=&No
Button:Abort=&Abortar
Button:Retry=&Reintente
Button:Ignore=&Desatender
Button:Cancel=&Cancelar
Button:Help=Ayudar
[MessageBox_Text]
TimeOutPrompt=Tiempo de espera:
LogTimer=Reloj automático
DontShowThisAgain=No se repite el mensaje
StopHeader=Deténgase
StopDefault=Salida?
HaltHeader=Alto
[MessageBox_Email]
Body=MessageBox routine called for
Time=Tiempo
Date= en
Heading=Título
Text=Texto
[MessageBox_Logging]
Default Header=Fecha,Tiempo,Duración,Nombre de
usuario,Botón,Título,Mensaje Texto
2. The other option (for those using a translation tool like AnyText) you will need to translate each item in the ThisMessageBox.init method:
You need to create a procedure that handles global text.
TranslateGlobalText procedure (string
pTextToTranslate), string
ThisAnyText Class(AnyText) .
code
ThisAnyText.Init(AnyTextCache,ThisGuts,AnyTextLocal,AnyTextGlobal,'Global')
! AnyText
return ThisAnyText.Translate(pTextToTranslate)
This is what your messagebox global translation will look like:
ThisMessageBox.CSLocale('Button',
TranslateGlobalText ('OK,Oui,Non,Abort,Retry,Ignore,Cancel,Help'))
ThisMessageBox.SetGlobalSetting('NotAgainText', TranslateGlobalText
('Don''t Show this again'))
ThisMessageBox.SetGlobalSetting('TimeOutPrompt', TranslateGlobalText
('Time Out: '))
ThisMessageBox.SetGlobalSetting('LogTimer', TranslateGlobalText
('Timer'))
ThisMessageBox.SetGlobalSetting('StopHeader', TranslateGlobalText
('Stop'))
ThisMessageBox.SetGlobalSetting('StopDefault', TranslateGlobalText
('Exit?'))
ThisMessageBox.SetGlobalSetting('HaltHeader', TranslateGlobalText
('Halt'))
| 1.1 | Click the 'Global' button on the Application tree window. |
| 1.2 | Click on the 'Extensions' button on the 'Global Properties' window. |
| 1.3 | Click on the 'Insert' button on the 'Extension and Control Templates' window. |
| 1.4 | Select the 'Activate_MessageBox' template from the list of
extension templates and click on the 'Select' button.  |
| 1.5 | Back at the 'Extension and Control Templates' window there
should appear the template with its details on the right. 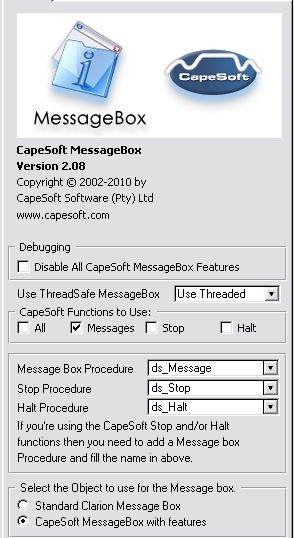 |
| 1.6 | Debugging: Check the 'Disable All CapeSoft MessageBox Code' checkbox if you don’t want to generate any CapeSoft MessageBox code. This is useful if your app doesn't compile and you want to exclude all CapeSoft MessageBox source when compiling. |
| 1.7a | Use Threadsafe MessageBox: This was implemented in version 2.08. Ideally all apps should be set to "Use Threaded", but this is not backward compatible with previous version of MessageBox, and will probably require some code changes (see FAQ4.9 for details). For new apps, pick this option, but for old apps you might like to "Use unthreaded" if you have used extensive handcoding of the MessageBox properties, and don't have the time at the moment to change your code. You should come back to this, because you'll need your apps to be threadsafe as soon as possible. |
| 1.7b | CapeSoft Functions to Use: If this is part of a Multi-DLL app, then jump to 1.26. Alternatively, select the CapeSoft MessageBox functions that you require. For example, if you would like to use just the Messaging function, then uncheck the 'All' check box and check the 'Messages' check box in the 'CapeSoft Functions to Use:' group. |
| 1.8 | Once you've selected which functions you require, the object selection will be enabled. |
| 1.9 | Procedure Selection: Select a window procedure on which the message code will be populated. Use the 'Message Box Procedure' drop list to do this. You need to do this even if you do not require the 'Messages' function as the Stop and Halt functions require this procedure. |
| 1.10 | You will need to enter a Stop procedure name if you require the Stop function (and like-wise for the Halt function). |
| 1.11 | Select the object to use: You can either choose to use the 'Standard Clarion Message' objects, or you can use the 'CapeSoft Message Box with features' objects (see CapeSoft's Messaging features). |
| 1.12 | ClarioNET support: If you have the ClarioNET global extension template added to this application, then the ClarioNET Support option will appear. Similarly for WebBuilder applications, you can enable the WebBuilder support in MessageBox. |
| 1.13 | 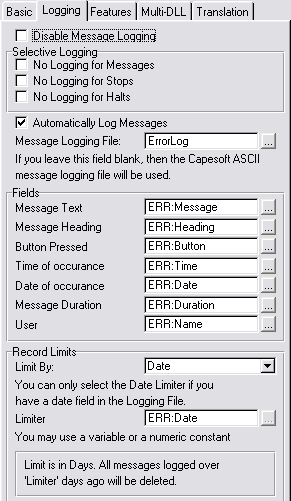 Change to the 'Logging' tab to set up the logging options. Leave the 'Disable Logging' check box unchecked (if you require Message logging) and select a file from your dictionary for the Message Logging File. (see Importing the Message Logging File to use the file shipped with MessageBox) You can also leave this blank to use the default ASCII file ('c:\MessageBox.Log'). The Automatically Log Messages checkbox makes it easy for you to turn on logging for all messages in one place. You can override specific messages (see the Features section of this doc). |
| 1.14 | Selective Logging: If you only want to log Stops and Halts, then you can check the 'No Logging for Messages' check box. Similarly for only logging Messages, check the other two check boxes, etc. |
| 1.15 | If you want to turn message logging on at program startup, then check the 'Automatically Log Messages' check-box. |
| 1.16 | Fields: You can equate some fields in your file to the CapeSoft MessageBox Fields if you require them in the entry fields supplied. These fields are optional, and are there because we find them useful. You can create extra fields if you would like to and populate them with your own info. You can use the object embed in the PrimeLog method. These fields are not available if you are using the default ASCII file. |
| 1.17 | Record Limits: You can limit the logging file if you want to. You can either limit it by Date or Count. Select either from the 'Limit By:' drop list box. If you are using the default ASCII file, then you will not be able to limit it. |
| 1.18 | If you selected to limit the file to Date, then you can select how far back you want to store records. The limiter is in days, so any messages logged more than this 'limit' ago will be deleted. If you selected to limit the file to Count, then you can select the maximum amount of messages to be stored in the log file. The messages will be logged until the limit is reached, when the oldest record will be removed every time a new message is logged to the file. You can use a variable if you like, although you must be sure to set the variable before the first message()/stop()/halt() is called. |
| 1.19 | 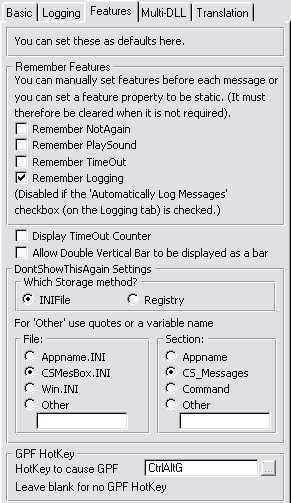 Go to the 'Features' tab if you selected to use the 'CapeSoft Message Box with features' objects then you will be able to tweak the template to suite your needs on the 'Features' tab. If you don't require logging, then you can check the 'Disable Logging' check box. This will save you the time of having to create the Logging file in your dictionary (see Creating the Logging File). All the other features will be available as and when you require them, simply by setting the respective properties. |
| 1.20 | Remember Features: You can remember Some, All or None of the feature settings by checking/ unchecking the respective check boxes. If you check the 'Remember xxx' check box, then this property becomes static and you need to manually reset the activating property when you do not require it. Alternatively, the property gets cleared after the message box is displayed. |
| 1.21 | When the TimeOut feature is used, you can display a counter to indicate the time left before the TimeOut occurs. Check the 'Display TimeOut Counter' checkbox to set this property by default. You can set this feature on at any time using the ShowTimeOut property. |
| 1.22 | You may want to display a vertical bar in your Message windows. You can use || double vertical bars and check the 'Allow Double Vertical bars to be displayed as a bar' checkbox in order to display a vertical bar. Otherwise, || will mean two line breaks in your message text. |
| 1.23 | Dont Show This Again Settings: You can choose whether you would like to store the DontShowThisAgain setting in an INIFile or the windows registry. If you selected the Registry, then you can set the Registry sub-folder (inside the HKEY_LOCAL_MACHINE\SOFTWARE) which will contain the status of the DontShowThisAgain for your messages. There is also an option to select 'Other' and enter your own Registry sub-folder in the field provided (use quotes for constants or a variable name). |
| 1.24 | If you selected an INIFile then you can set the INI file which
will contain the status of the DontShowThisAgain for your
messages. It was previously set to 'CSMesBox.ini', so existing
programs should retain this setting. Appame.ini will be the name
of your application file, or you can use the existing default or
the win.ini file. There is also an option to select 'Other' and
enter your own ini file in the field provided (use quotes for
constants or a variable name). You can set the INI Section which will contain the status of the DontShowThisAgain for your messages. It was previously set to 'CS_Messages', so existing programs should retain this setting. Application will be the name of your application file, or you can use the existing default or the command that was used to start the application (This is useful for DLLs used with different EXEs so that you can retain different settings for the different EXEs). There is also an option to select 'Other' and enter your own section name in the field provided (use quotes for constants or a variable name). If you are using a variable, then the variable must be set in (or before) the embed point, Global Embeds, CapeSoft Message Box ThisMessageBox Init 2) Before Parent Call |
| 1.25 | You can enter a HotKey to create a GPF if the Message window is open. This is particularly useful when you have a infinite loop with a stop in it, or you want to debug using GPF Reporter. |
| 1.26 | If this is a
Multi-DLL application, then check the 'This is part of a Multi-DLL
Application' check box. You'll still need to select one of the
objects on the 'Message Details' tab if this is not the data DLL.
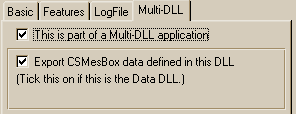 |
| 1.27 | If this is a Multi-DLL application and you want to define the CapeSoft MessageBox code in this DLL and export it to the other DLLs and EXEs (i.e. this is the data DLL), then check the 'Export CapeSoft MessageBox data defined in this DLL'. If you've checked this, then you'll need to fill in all the relevant settings (1.7 - 1.26). |
| 1.28 | If you are
going to require translation, then go to the 'Translation' tab and
check the 'Use a Translation File' check box on.  |
| 1.29 | If you would like the default language to be a language other than English, then you can enter an Initial Translation File. This should include the path() if the file is not in your windows directory. |
| 2.1 | In the application window, select your message box window procedure and click the 'Properties' button. |
| 2.2 | In the 'Procedure Properties' window, click the 'Window' button. |
| 2.3 | Click the 'Control Template' item in the 'Populate' menu. |
| 2.4 | Select the 'CSMesBox_MessageBoxControl - CapeSoft MessageBox
Controls' template, and click on the 'Select' button.  |
| 2.5 | To edit the control properties, quit and save from the window editor and click the 'Extensions' button on the Procedure Properties window. |
| 2.6 | Select the 'CapeSoft MessageBox Controls' template and change to
the 'Appearance' tab to edit the following: 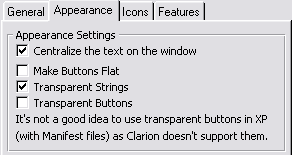 |
| 2.7 | You can check the 'Make Buttons Flat' for flat buttons on the message window. |
| 2.8 | You can check the 'Transparent Strings' to make the message text
(DontShowThisAgain checkbox, Timer notifier and the Hyperlink
string - where used) transparent. This is useful if you are
applying Wall paper to the window. You can check the 'Transparent Buttons' to make the message buttons transparent. This is useful if you are applying Wall paper to the window, although transparent buttons are not supported by manifest files in Windows XP. |
| 2.9 | You can check the 'Centralize the text on the window' check box in order to center the message text (other wise the text is left justified). |
| 2.10 | On the Icons Tab: Default Icon: You may enter a default icon for the messages that don't have icons. If you are using ClarioNET and you would like to make use of icons in your message windows, then you need to enter a default icon. This will ensure that message()s without icons have the default icon assigned to them. You cannot use an equate for a default icon when using ClarioNET and WebBuilder as the equates are not supported by ClarioNET and WebBuilder. You can enter Default icons for the buttons as well. Use the fields in the Default Button Icons group to stipulate the icons for each button equate. |
| 2.11 | On the 'Features
Tab': If you would like to maintain the status of the GlobalRequest and GlobalResponse variables (on by default), then you can check the 'Preserve GlobalResponse and GlobalRequest' checkbox on the Advanced tab. The diagram below shows the ABC ErrorClass name (in the global properties) on the left and the field where you should fill this in in the MessageBox control template on the right. The procedure name is only available in ABC applications. 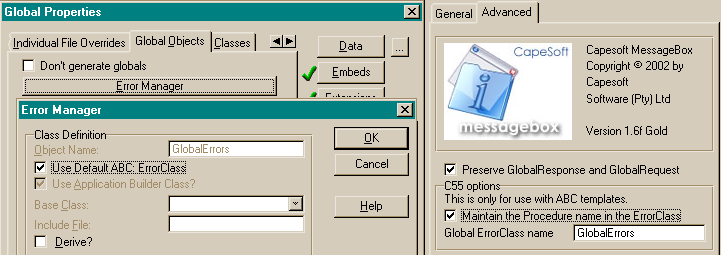 |
| 2.12 | Clarion 5.5 (and higher) users only.
If you would like to maintain the Procedure name in your
GlobalErrors class then you need to check the 'Maintain the
Procedure name in the ErrorClass' checked. Checking this checkbox
will ensure that the procedure name, from which the
message/stop/halt was called, remains the procedure name in the
ErrorClass. Alternatively, the name of your MessageBox window will
be the name that appears in the procedure name of the ErrorClass.
If you checked this checkbox then you need to enter the correct
name in the 'Global Error Class name' field. The default is
'GlobalErrors', which is what is normally used. If you have a
different name for your global ErrorClass (see on the 'Global
Objects' tab in your 'Global Properties') then you need to match
that name here. Note: Checking this will also mean that the FromProcedure property is set with the procedure that is currently active. This means that you will be able to log the procedure name from where the Message() command was called. If you would like to display the procedure and application name that called the Message() function, then you can check the relevant checkboxes. This will place the Procedure and/or application name in square brackets in the title bar. |
| 2.13 | If you would like to display the calling Application name, then check the 'Display the Application name calling the message' checkbox. This useful in a Multi-DLL application (or Multi-EXE), also so that the message is automatically identified with your application. |
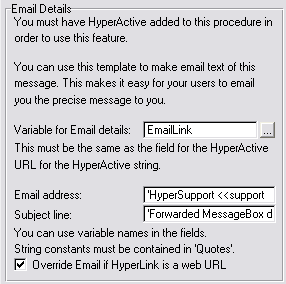
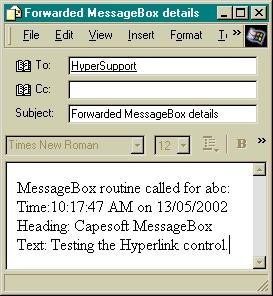
| 2.14 | HyperActive users only. If you would like to be able to mail your message as a support facility, then you can set this up on the 'Features' tab. (more details) |
| 2.15 | Click 'OK' a couple of times to return to the Application window. |
| 3.1 | In the application window, select your Stop source procedure and click the 'Properties' button. |
| 3.2 | In the 'Procedure Properties' window, click the 'Extensions' button. |
| 3.3 | Click the 'Insert' button on the 'Extension and Control Templates' window. |
| 3.4 | Select the 'CSMesBox_ActivateStop - CapeSoft Stop' template, and
click on the 'Select' button.  |
| 3.5 | Click 'OK' a couple of times to return to the Application window. |
| 4.1 | In the application window, select your Halt source procedure and click the 'Properties' button. |
| 4.2 | In the 'Procedure Properties' window, click the 'Extensions' button. |
| 4.3 | Click the 'Insert' button on the 'Extension and Control Templates' window. |
| 4.4 | Select the 'CSMesBox_ActivateHalt - CapeSoft Halt' template, and
click on the 'Select' button.  |
| 4.5 | Click 'OK' a couple of times to return to the Application window. |

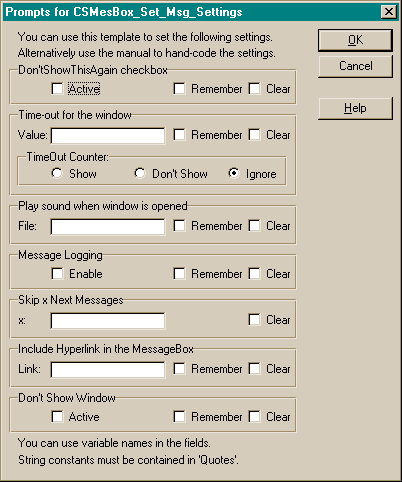
| 5.1.1. | The 'Active' check box will activate the 'DontShowThisAgain' check box feature. |
| 5.1.2. | The 'Value' field sets the length of the Timeout for the message. The time out value is in One Hundredths of a second. So for an 8 second time-out, set the value to 800. You can also enter the name of a variable. |
| 5.1.3. | The 'File:' field indicates the wavfile to be played when the next message is opened. You must use quotes for a string, alternatively you can use a variable. |
| 5.1.4. | The 'Enable' check box will enable message logging. You must not have disabled this feature in the Global Extension Template. |
| 5.1.5. | The 'x:' field entry is used to set the amount of messages that must be skipped. |
| 5.2. | The 'Remember' check box is used to set the Static attribute for the feature. The SkipNext feature is by nature a static feature, so it has no Remember check box. If you set the Static Attribute on in the global extension |
| 5.3. | 'Clear checkbox' will place code to clear both the static and the active properties. |
| 6.1. | In your application window, select the 'Template Utility' item
from the 'Application' menu in the window menu bar.  |
| 6.2. | Select the ImportCSMessageBoxABC or the ImportCSMessageBoxLegacy (depending on whether this is a legacy or ABC application) to import the 3 procedures. |
| 1.1 | In the Application Tree window, select the 'New' item from the 'Procedure' menu. |
| 1.2 | In the window that appears enter a name for your window (like MyMessageBox) and click the OK button. |
| 1.3 | In the 'Select Procedure Type' window that appears, select the 'Window - Generic Window Handler' and click the Select button. |
| 1.4 | Click the 'Window' button in the Procedure MyMessageBox Properties screen that appears. |
| 1.5 | Select the 'Window' option in the list that appears (the object will do all the fancies - so the bare minimum is all we need) and then click OK. |
| 1.6 | You don't need to do anything in the window that appears, but it is advisable that you set the Font to the Font you require. You can also add a wallpaper to the background of the window. If you add wall paper, then it is advisable that you check the 'Transparent Strings' check box on in the MessageBox Local Control Template that you will add just now. You can quit the window editor, as the template and objects will do the rest. |
| 1.6 | In the Prototype field enter the following prototype (with
parameters): (STRING MessageTxt,<STRING HeadingTxt>,<STRING IconSent>,<STRING ButtonsPar>,UNSIGNED Defaults=0,BOOL StylePar=FALSE),UNSIGNED,PROC It is essential that this prototype is correct. |
| 1.7 | In the Parameters field, enter the same string for the
parameters (leave the return definition off). For example: (STRING MessageTxt,<STRING HeadingTxt>,<STRING IconSent>,<STRING ButtonsPar>,UNSIGNED Defaults=0,BOOL StylePar=FALSE) |
| 1.8 | Check the 'Declare Globally' checkbox. |
| 1.9 | Enter a variable in the 'Return Value' field. This should be a variable of type 'UNSIGNED'. |
| 1.10 | Click the OK Button to exit the window. |
| 1.1 | If you're in the Application editor, then quit it and from the File menu, select the Open item. Select your dictionary in the file dialog box (you will probably need to change the 'Files of type' drop list to 'Dictionary (*.dct)') and click the 'Open' button. |
| 1.2 | In the dictionary editor, click the 'Import Text' from the File menu. |
| 1.3 | Select the MessageBox.txd file that is found in the clarionx\3rdparty\libsrc directory. |
| 1.1 | In the Application Tree window, select the 'New' item from the 'Procedure' menu. |
| 1.2 | In the window that appears enter a name for your window (like MyStop or MyHalt) and click the OK button. |
| 1.3 | In the 'Select Procedure Type' window that appears, select the 'Source - Source Procedure' and click the Select button. |
| 1.4.1 | In the Prototype field enter the following prototype (for the
Stop function): (<string StopText>) It is essential that this prototype is correct. |
| 1.4.2 | In the Prototype field enter the following prototype (for the
Halt function): (UNSIGNED Level=0,<STRING HaltText>) It is essential that this prototype is correct. |
| 1.5.1 | In the Parameters field (for the Stop
function), enter a parameter for each field in the prototype
(i.e. there must be 1 parameter). For example: (<string StopText>) |
| 1.5.2 | In the Parameters field (for the Halt
function), enter a parameter for each field in the prototype
(i.e. there must be 2 parameters). For example: (UNSIGNED Level=0,<STRING HaltText>) |
| 1.6 | Check the 'Declare Globally' checkbox. |
| 1.7 | Click the OK Button to exit the window. |

| 1.1 | If I get an error in my logfile, it GPFs without warning when I log a message. How do I inform my users of this? |
| Answer: | The problem is you can't use your message() function to report
the error (as it is open already). One solution is to not use the
MessageBoxHalt() function and call the halt if you encounter an
error in this instance. This will ensure that the user is given
some feedback when the program exits (after all - the program is
about to GPF in any case). Thus: If errorcode() then halt(,'There is a problem with the MessageBox file...') . !For Legacy If access:<MessageBoxFile>.Errors.SaveErrorCode then halt(,'There is a problem with the MessageBox file.') . !For ABC - Clarion5 and C55 If you are using Clarion 6 then: If access:<MessageBoxFile>.Errors.Status.V.SaveErrorCode then halt(,'There is a problem with the MessageBox file.') . !For ABC - Clarion6 You can put this code in the embed point - ThisMessageBox|InsertLog|(4) After the Parent Call and generated code. Alternatively, if you are using the LimitLogFile feature, you must put this check in the ThisMessageBox|LimitLog|(4) Before Generated Code, as the LimitLog method is called before the above embed point is reached. Note for ABC users: Unfortunately the writers of the ABC classes have deemed it beneficial (for reasons best known to them) to make the Errors class a protected property. You need to remove the PROTECTED attribute of the Errors property and the SaveErrorCode property in the ErrorClass. You can do this in the abfile.inc and the aberror.inc header files. |
| 1.2 | I am having a problem with logging. Nothing is being logged to my logfile. What could I be doing wrong? |
| Answer: | You need to check that you: 1.are in fact using your own stop - check that the 'Functions To Use' options group on the Basic tab of your MessageBox Global Template has either the 'All' Checkbox checked or the 'Stop' checkbox. 2. have selected the 'CapeSoft MessageBox with features' object on the Basic tab of your MessageBox Global Template. 3. have not disabled MessageLogging (on the Features tab of your Global MesageBox Template). 4. have either checked the 'Automatically log messages' on the Features tab of your MessageBox global Extension template your you have set the ThisMessageBox.SetGlobalSetting('LogMessages', 1) at the beginning of your program. 5. have checked the 'Remember logging' on the Features tab of your MessageBox global template. 6. have all the checkboxes cleared in the Selective logging group on the Features tab of your global template. 7. have specified your file as the logging file on the LogFile tab of your messageBox global template. if you have checked all these and are still not logging: 8. Do a scan of your source routines for ThisMessageBox.SetGlobalSetting('LogMessages', 0) to make sure that the logging is not being turned off. if you have checked this and are still not logging: 9. Place a trial stop in your code and set the ThisMessageBox.SetGlobalSetting('LogMessages', 1) immediately before this. If this is the last step and you can see the stop being logged, then your static property has not been set for logging, or has been cleared at some point. |
| 1.3 | I'm trying to use the logging feature in my Message/stop/halt functions but it GPFs when the window closes. |
| Answer: | You've probably checked the 'Disable Logging' check box in the Global Extension Template, but you're setting the logging feature flag. You need to uncheck this 'Disable Logging' check box in order to allow you to use and activate the Logging feature. |
| 1.4. | If I set my MessageLog file to Current/DataDir(Messagebox.log) I can't find it. |
| Answer: | The ASCII message file name is set in the Init method of the
MessageBox class. If you're only setting your path after the call
to the ThisMessageBox.Init, then the logfile will be placed in
whatever path your application started in. Example: GlobalErrors.Init(GlobalErrorStatus) INIMgr.Init('.\msgbox.INI', NVD_INI) ! Configure INIManager to use INI file DctInit !You need to set your datapath here !CapeSoft MessageBox init code ThisMessageBox.init(1,1) !End of CapeSoft MessageBox init code SystemParametersInfo (38, 0, lCurrentFDSetting, 0) ! Configure frame dragging |
| 1.5. | If I use the DontShowWindow feature, the user is always logged as Auto, not the user name I specify? |
| Answer: | This is part of the designed of MessageBox. The logic was that
the user couldn't select the option (because the message isn't
shown) - so the user was stamped as 'Auto'. You can override this
in the PrimeLog derived method, by changing the self.WhoPressed
property to what you require. Typically: self.WhoPressed = self.loggedIn before the parent call. |
| 1. 6. | My logfile has got corrupted, which gets into an endless loop of halt()s. |
| Answer: | You need to code a solution to remove the logfile on the second
halt: Full Pathname: CSMesBox.tps and NOT Full Pathname: CSMesBox Note: You will need to amend the code to allow for different file drivers Global embeds in Data Dll App: data: myExtension long before parent call: ! this attempts to help with the loop of a halt() relating to a ! messageboxlog file error by just wiping the thing, ! (then extended a little to try taking a copy first)... if not status(MessageBoxLogFile) open(MessageBoxLogFile, ReadWrite+DenyNone) if errorcode() loop myExtension = 1 to 998 if not exists(MessageBoxLogFile{prop:name} & '.' & format(myExtension,@n03)) break end end copy(MessageBoxLogFile{prop:name}, MessageBoxLogFile{prop:name} & '.' & format(myExtension,@n03)) remove(MessageBoxLogFile{prop:name}) else close(MessageBoxLogFile) end end |
| 1.7 | I want to set additional fields when I log to the log file. How do I do this? |
| Answer: | You can do this in the global PrimeLog embed point (before the
parent call) in your Data DLL (for multi-dll applications). |
| 2.1 | How do I add information to the log about where the message box was invoked from (i.e. the procedure that called it)? |
| Answer: | You can do this in C5.5 or later and is only available in ABC
applications. 1. In the MessageBox procedure - extensions - CapeSoft MessageBox Controls template, go to the 'Advanced' tab and check the 'Maintain the Procedure name in the Error Class'. 2. If you are using a table in your dictionary to log the messages, then make sure that you have a field in your MessageBox logfile to store the Procedure name in it (setup in the MessageBox Global Extension template - in the Logging tab) |
| 2.2 | I want to just log all/some of the Clarion Messages without displaying them. How do I do this? |
| Answer: | There's a
DontShowWindow Property property in the 'CapeSoft Message
Box with features' class, which (if set) will just log the message
without displaying it. This is easy in Clarion5.5 (and above) if you are using ABC methods: 1. Turn off Remember logging in the Messagebox Global Extension Template. 2. You need to insert the following code in the embed before the GlobalObjects | Abc Objects | Error Manager | Msg PROCEDURE | CODE | Parent Call. To get there click the Global button, and then the Embed button and find the embed point in the Embed tree. case SELF.GetErrorBufferId() of Msg:UpdateIllegal orof Msg:InsertIllegal orof Msg:DeleteIllegal !This will only disregard illegal file change messages (but will log them) ThisMessageBox.OnlyOnce.DontShowWindow = 1 end |
| 2.3 | How do I log extra details to my log file? |
| Answer: | This depends whether you are using the Default ASCII text file
or your own log file. The best place to add the code is in the
CapeSoft MessageBox | ThisMessageBox | PrimeLog | Before the
Parent Call global embed point. There is an example in the
abcASCIILogFile\useascii.app application that comes with
MessageBox that demonstrates the first instance. Using your own
log file is a bit simpler, because you simply make the equates in
the above embed points. You must remember though, that if the
DontShowWindow property is set, then some of the object properties
have not been set when the PrimeLog method is called. For Example, if you wanted to log the text of the button that was pressed you could insert the following into the above embed point: Log:ButtonPressedText = self.ButtonPressed{prop:text} |
| 2.4 | I use Secwin (or another Security template) with this app. How do I get the user name into the MessageBox user name field? |
| Answer: | It's just one line of code (for Secwin and most other Access
Control software). ThisMessageBox.SetGlobalSetting('LoggedIn',ds_CurrentName(ApplicationNumber) ) You can put this code straight after your Secwin login. Please check your Access Control software's documentation for the correct function name (if you're not using Secwin). |
| 2.5 | I only want to log messages, without logging stops as well. Can I do this? |
| Answer: | Yes, there's a checkbox where you can disable logging for stops/messages/halts in the global extension template to do this. |
| 2.6 | I only want to log system messages without logging other messages. How do I do this? |
| Answer: | This is easy in Clarion5.5 (and above) if you are using ABC
methods: 1. Turn off Remember logging in the Messagebox Global Extension Template. 2. You need to insert the following code in the embed before the GlobalObjects | Abc Objects | Error Manager | Msg PROCEDURE | CODE | Parent Call. To get there click the Global button, and then the Embed button and find the embed point in the Embed tree. ThisMessageBox.OnlyOnce.LogMessages = 1 |
| 2.7 | My users reboot the computer when a MessageBox appears. How can I log this? |
| Answer: | MessageBox logs the message at the point of exit (so that it can
track which button was pressed). You need to put the following
code in your Global Embeds: CapeSoft MessageBox | ThisMessageBox |
Open | After the Parent call:? self.OpenLog self.WhoPressed = 'Test' self.ButtonPressed = 0 self.PrimeLog if self.InsertLog() . LogPointer = pointer(Log) !You need to declare this as threaded global variable self.CloseLog and the following code in your Global Embeds: CapeSoft MessageBox | ThisMessageBox | Close | BEFORE the Parent call: self.OpenLog get(Log,LogPointer) delete(Log) self.closeLog() |
| 4.1 | I'm trying to use the Timeout, but it doesn't work. |
| Answer: | You may be using more than 1 button on your window without having a default button. You must have a default button if you're wanting to use the Timeout Feature with multiple buttons. |
| 4.2 | I want other text on my message box buttons than the standard OK/Yes/No/Abort/Retry/Ignore/Cancel/Help text. Is this possible? |
| Answer: | Yes, CapeSoft MessageBox can do all that the normal message
function can do and more. Here's an example of how you do this: Example Code: case Message('Would you like to continue or reprocess?','Question',ICON:Question,'Continue|Reprocess',1) of 1 !Continue Code (this is the default button) of 2 !Reprocess Code end 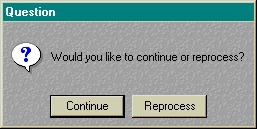 |
| 4.3 | Can I put Icons on the buttons? |
| Answer: | Yes you can. This is one of the additional features of CapeSoft MessageBox (details). |
| 4.4 | How do I use variables in my MessageBox when I want to use the 'DontShowThisAgain' feature? |
| Answer: | The easiest way is to set the NotAgainID property as follows: ThisMessageBox.OnlyOnce.NotAgain = 1 ThisMessageBox.NotAgainID = 8947773 message('We can use variables now quite easily, because the DontThisShowAgain will be identified by 8947773 and not by the message text and heading','Note') Otherwise: You will need to change the way MessageBox stores the Registry entry that shows the status of the DontShowThisAgain for that specific message. For example, you could decide that no variables should appear in the heading and first line of the text as follows: In the Global Embeds, in the embed "CapeSoft MessageBox.ThisMessageBox.PutDontShow.2) Before the Parent Call" you could put the following code: pEntry = sub(pEntry,1,instring('|',pEntry,1,1)) You will need to put the exact same line of code in the embed "CapeSoft MessageBox.ThisMessageBox.GetDontShow.2) Before the Parent Call" as well. Remember that all Messages with the NotAgain property set will use this message. Thus, you will need to ensure that the first line and heading of each different Message that you call (from different parts of the program) are unique. |
| 4.5 | I am trying to use the Hyperlinked email message, but it doesn't seem to work. I am not getting any compile errors. |
| Answer: | 1. If your HyperLink is not appearing on the MessageBox window
then you are not setting the ThisMessageBox.OnlyOnce.HyperLink
property before calling the message. If you would like the
HyperLink to appear on all messages, then use
ThisMessageBox.SetGlobalSetting('HyperLink',<YourEmailURLHere>).
You will only need to set this property once then. 2. If your hyperlink string is appearing, but is not 'HyperActive', then you have not added the control to the list of HyperActive controls (see the HyperActive Local Extension Template). 3. If the string is 'HyperActive' but it does not point to the Mail, then you have not entered the same HyperLink variable (EmailLink by default) on both the Local Message Control Template ('Features' tab) and the URL for the ?HALink control on the HyperActive Local Extension Template. |
| 4.6 | I want to change the text on a message that is generated by Clarion (or a 3rdparty DLL). Is this possible? |
| Answer: | You need to handcode the changes - but it simple to add the code. Check out the Property Changing section. |
| 4.7 | I would like to alter the parameters that are passed to the Message window (Text, buttons and the like). |
| Answer: | You can do this in the MessageBox - Alter Message Parameters
embed point. For example, if you would like to change the default
button of the confirm delete message, you could do this here with
the following code: if clip(LMBD:HeadingText) = 'Confirm Delete' and | clip(LMBD:MessageText) = 'Are you sure you want to delete the highlighted record?' and | LMBD:Buttons = Button:Yes + Button:No and | LMBD:Defaults = Button:Yes LMBD:Defaults = Button:No !Change the Default button ThisMessageBox.OnlyOnce.LogMessages = 0 !Turn logging off for just this message. end You could also include a condition to check for a specific procedure (ABC in Clarion5.5 and higher) and only perform the changes for that procedure. For Example: if clip(ThisMessageBox.FromProcedure) = 'UpdateTables' end |
| 4.9. | What must I change in my application to use the threadsafe MessageBox? |
| Answer: | There are a number of properties that have changed in 2.08. The
threadsafe message class uses a global settings class (an
unthreaded class), and a threaded class. The global settings are
those that should be set for all instances of the message()
function. The Temporary overrides are done in the threaded class.
As a result, when switching to the thread safe class, you will
need to change some of the ways you set properties in your code -
because you will get compile errors where you have handcoded calls
to the old unthreadsafe class properties. For example: ThisMessageBox.LogMessages = 1 Now becomes: ThisMessageBox.SetGlobalSetting('LogMessages',1) for application wide logging of messages or: ThisMessageBox.OnlyOnce.LogMessages = 1 to force the next message on this thread to be logged. The old staticfeatures property falls away, and is replace by the above (either Force temp property to 1 or 0, or use the SetGlobalSetting). The temp properties' inert state is -1 (initial value - and reset to that after each message). Note: Previously the LogMessages property was used as both a static and a temporary property (depending on the state of the statisfeatures property). This means that you may have had code something like this: TMPLogMessanges = ThisMessageBox.LogMessages ThisMessageBox.LogMessages = 0 message('This message won't be logged - but all others will','Note') ThisMessageBox.LogMessages = TMPLogMessanges This code will now become: ThisMessageBox.onlyOnce.LogMessages = 0 message('This message won't be logged','Note') The properties with OnlyOnce overrides (that you will need to make a decision as to whether to replace them with the SetGlobalSetting, or the temporary override) are: LogMessages, NotAgain, TimeOut, HyperLink, PlayWavFile and DontShowWindow |
| 4.10. | Why should I use the new thread-safe message class? |
| Answer: | It is possible to have multiple threads calling a messagebox at the same time (especially if you are using the DontShowWindow feature). In the old unthreadsafe messagebox class, this meant, that when logging messsages (or any of the other class properties) - could be changed by a second simultaneous instance of the message window. The new threadsafe message class has been separated into 2 classes - a global unthreaded class (for the static properties shared between all simultaneous instances of the message window) and a threaded class (containing dynamic properties needing to be consistent for the duration of the messagebox display - and independent from interference by another simultaneous message() instance from). By using the new threadsafe message class, you completely eradicate the possibility of a unstable dynamic property that could be caused by another simultaneous message() being called from a different thread. |
| 4.11. | How do I force a message to not show the window and return as if a button was clicked, based on certain text? |
| Answer: | The easiest is to derive the PreOpen method before the parent
call in the MessageBox window, and put your test code, setting the
DefaultButton and the DontShowWindow property as follows: if instring('Duplicate Key',MessageText,1,1) and instring('40',MessageText,1,1) DefaultButton = button:Ignore self.onlyonce.DontShowWindow = 1 end |
| 5.1 | I'm trying to use the LOCALE command to set the default button text, but it does not affect my message() buttons. |
| Answer: | At this stage there is no way of reading what was set by the Locale command, so we've made a method called CSLocale (ThisMessageBox.CSLocale). This method takes the same parameters as the LOCALE function, which you need to call instead. |
| 5.2 | When I issue a stop and/or message command the program closes immediately without warning. If I use the Clarion stop and/or message then it works. |
| Answer: | You probably have the procedures mixed up. In your MessageBox global extension template, check the procedures in the drop lists where the procedure names are entered. |
| 5.3 | I can't get rid of the Message, Stop and Halt TODO procedures in my application |
| Answer: | If you are wanting to delete MessageBox from your application,
then check out FAQ
5.10 This either means: 1. that you have deleted one or more of your procedures, while you are wanting MessageBox to use them. In this case you need to re-apply the Template Utility to add the Message, Stop and Halt procedures to your application. - OR - 2. that you have originally set this application to be a root DLL or stand-alone EXE, which is now part of a Multi-DLL application, but is not the root (or data) DLL. You need to: 2.1. Clear the 'This is part of a Multi-Dll application' checkbox on the Multi-DLL tab of your global MessageBox extension. 2.2. Click OK and then go back into the MessageBox template again (if you don't do this, the Procedure fields will still not be able to be edited - that's Clarion bug). 2.3. On the Basic tab, clear the Procedure fields (Message, Stop and Halt). 2.4. Go to the Multi-DLL tab and check the 'This is part of a Multi-Dll application' checkbox. 2.5. Save and Quit the Global Extensions window and the Global Properties. 2.6. If the Procedures are still To Dos, then you need to: 2.6.1. Export your application to a text file (.txa) 2.6.2. Open the txa file in a text editor. 2.6.3. Delete any references to the Message, Stop and Halt procedures. 2.6.4. Save your application under another name and import the txa to the name of your original application. |
| 5.4 | I'm using messagebox in a couple of my programs which are running locally without problems. As soon as I try to access a network the programs are crashing with a stack overflow. Am I doing something wrong? |
| Answer: | You're probably using the CSMesBox.tps file with a variable for the path. This variable must be set before the first Message() is called. |
| 5.5 | I'm getting buttons with raised text on my MessageBox buttons occasionally. These are buttons with longer-than-average text length. How can I rectify this? |
| Answer: | This is a Clarion bug when the font color is implemented. The best is to make the font color on the window, COLOR:None, or set the colors on all the buttons of the MessageBox control template to COLOR:None. |
| 5.6 | I have a legacy application which GPFs if I use the CapeSoft MessageBox with Features class. |
| Answer: | You need to add the _ABCDllMode_=>0 define to your project's defines. |
| 5.7 | Is there a way to default the button icons for the standard buttons instead of sending them in each call to the message procedure? |
| Answer: | Yes there is, check out Method 2 of the Display Icons on Features section. |
| 5.8 | Is it possible to change the font, font size or the font type (bold, italic, etc.) of the text on the message box? |
| Answer: | You can edit the window's properties just like any other windows. Go into the window editor window (of your MessageBox window) and set the window's font. The prompt and buttons take on the font that you specify for the window. In the same way you can edit any of the properties of any of the controls. You should not set the operating properties though (like hide and enable). Positional properties are also all set at runtime, so any positional properties set in the window editor will be overridden at runtime. |
| 5.9 | My Message window displays the minimize, restore, and close buttons in the caption bar. How do I get rid of these? |
| Answer: | Go to your ds_Message window (the window that is used for the
MessageBox) and set the following options: 1. In the Window Formatter, right click and select Properties - change to the Extra tab and clear the Icon field (this will get rid of the Minimize button). 2. Same place - uncheck the 'System menu' checkbox (this will get rid of the close button). 3. Same place - uncheck the 'Maximize Box' checkbox (this will get rid of the restore button). If the buttons are still present after this, then you probably have a 3rdparty tool that is setting them. You could have Mike Hansen’s SuperStuff Select default icon for the entire app, in which case you'll need to contact BoxSoft in order to find the remedy to disable the icon placement on the Message wiindow. |
| 5.10 | I want to remove MessageBox from my application. How do I do this? |
| Answer: | 1. Open your application in the Clarion IDE. 2. In your Global Extension Template list, delete the MessageBox global Extension template. 3. Return to the application tree and delete the 3 MessageBox windows from the procedures list. These will now appear as TODO procedures. 4. Export your app to txa and open the exported txa in a Text editor. 5. Find the TODO procedures (which should appear as follows) and remove them (i.e. delete this whole block of code). [MODULE] [COMMON] FROM ABC GENERATED [PROMPTS] [PROCEDURE] NAME ds_Stop GLOBAL [COMMON] [END] [MODULE] [COMMON] FROM ABC GENERATED [PROMPTS] [PROCEDURE] NAME ds_Halt GLOBAL [COMMON] [END] [MODULE] [COMMON] FROM ABC GENERATED [PROMPTS] [PROCEDURE] NAME ds_Message GLOBAL [COMMON] [END] 6. Save this TXA file. 7.Create a new application and import this txa. You can then rename this app to the original application name. 8. Set the _NoCSMesBox_=>1 project define in your Project defines (if this is a MultiDLL application, you will need to do this in all the applications that had the MessageBox template added) 9. If you have handcoded references to the MessageBox object, you can enclose these in an omit statement using the above project define (rather than removing or commenting them out, in case you want to add MessageBox back in to the application).span class="s_string"> omit('***',_NoCSMesBox_=1) ThisMessageBox.OnlyOnce.DontShowWindow=1 *** |
| 5.11 | My app seems to hang when a Message() appears. What's wrong? |
| Answer: | Check and see if the procedure has the "save and restore window
position" feature turned on. (I'm guessing it has). Turn it
off.... To do this: Open your application and double click on the cs_Message window procedure to bring up the Procedure properties window. You will see a INI File Settings group - clear the Save and restore window location checkbox. If it's not there, then click the Windows Behaviour button. The INI settings group will be there. What's happened is that at some point someone moved the window out the way (probably off to the right of the screen) and now it's opening in this "remembered" position. Another solution is to delete the ini file that stores the positions. |
| 5.12 | One specific Message() call GPFs my app when using MessageBox. |
| Answer: | If you call a message() from a source procedure that is called directly from a frame, and prior to the message() call a new MDI child thread is started, then your application will GPF. Unfortunately this is a Clarion oddity, so the best is to either move the message() into the window that is called or into the frame. |
| 5.13 | Is it possible to dynamically change the font information for any given message? |
| Answer: | The Message window is a procedure in your application, so you can easily write code in to handle this. What you can do is in your derived MessageBox object (in the global objects) - you can add a few properties to the ThisMessageBox properties (other properties) and then set them immediately before message() call (as you would the other features properties). In your ds_Message procedure, you can set the font of the window based on these properties after the window opens (in the ThisWindow.Init method). |
| 5.14 | How do I change the size of the buttons on the MessageBox window? |
| Answer: | Self.buttonheight and self.minbuttonwidth are the 2 properties that you're looking for. In your derived SetControlProperties method - set those there (before the parent call), that should do the trick. Note: For the width, you can stipulate a wider button, than the default, otherwise the text won't fit on the button. |
| 5.15 | I want more space on either side of the text on the MessageBox window - it looks too cramped. |
| Answer: | You can quite easily change this by altering the equates in the
MessageBox.inc file. Open this file in a text editor and search
for GLO:StringXPos. You can set this value to the desired amount. Note: this file is replaced with each release of MessageBox, so you'll need to make a backup of this file before installing an update of MessageBox, and then re-implement your changes each time. |
| 5.16 | I cannot click the buttons on the messagebox. My mouse clicks have no effect. |
| Answer: | If you are using SolaceSoftware's runtime screen design tool, htne make sure that you disable it on the message window. |
| 1 | In a multi-dll application, do I run the utility only on the data (base) DLL only and add the global extension to it and the other DLLs, or do I run the utility on all of the APPs? |
| Answer: | You just run the Template utility in the data DLL. You need to add the global template to all the EXEs though (and the DLLs - which will use the MessageBox class). You must set up the Multi-DLL project options on the global extension template in each of the DLLs (where the global template is added) and EXEs correctly. |
| 2 | When I add MessageBox to an app, add the required procedures, and then delete them (extension call and procs), it leaves the procs as to-dos. How do I get rid of them? |
| Answer: | This is a bug in Clarion that affects procedures which are
called from global extensions. Basically the extension can be
deleted, but it refuses to remove the "to-dos". there are 2
work-arounds; 1) Make the procedures simple empty procedures based on the "Source" template. This will leave them there, but they're empty so don't take up any space in your eventual program. OR 2) Export the app to a TXA. Edit the TXA (look for the offending procedure names). Then make a new app and import the TXA... |
| 3 | I have been using MessageBox for sometime, but since my last download I'm getting a compile error: Unknown identifier: ?HALINK |
| Answer: | The latest version requires that you delete your MessageBox control template populated on the MessageBox window. There is an extra control in the template which does not get automatically added to the existing control template on the window. |
| 4 | I'm trying to use the MessageLog tps file (instead of the ASCII log file), but I get compile errors (like elements in the log file not found, etc.). |
| Answer: | 1. Check that you have entered the log file details correctly on
the 'LogFile' tab on the MessageBox global extension template. 2. Check that you have the 'Generate all file declarations' checkbox checked. You will find this on the File Control tab on the Global Properties window. |
| 5 | I started getting the Unknown Identifier: FROMPROCEDURENAME Error when compiling. |
| Answer: | The FROMPROCEDURENAME is used to maintain the GlobalErrors class procedure name. This is setup in your extension template on your message() window in your application. Uncheck the 'Maintain the procedure name in the ErrorClass' or ensure that the Class name is the same. |
| CapeSoft Support | |
|---|---|
| Telephone | +27 87 828 0123 |