| |
| |

|
|
Version 2.11
© 2005 by CapeSoft Software (Pty) Ltd
www.capesoft.com
Updated
Friday 03 September 2004
|
|
| |
|
|

 Introduction
I recently set about writing my first Clarion object. It took a little time to
come to grips with the new syntax and so on, but then I discovered that writing
generic objects was pretty much a step back to the bad-old-days of handcoding
everything. You have to manually create a header (.INC) file, you have to make
sure it's kept in the right place, you have to make sure it points to, and matches,
a source file - bottom line you have to do too much!
Now Clarion has the best text generation environment and language going. And
we use it everyday to generate text which gets compiled into applications. So
why don't we have a template for generating objects?
To understand a little of what this template does, it's necessary to understand
a little of how the Clarion language works when it comes to writing generic objects
that can be reused from application to application.
 The Generic
Object
The Generic
Object
The object itself consists of 2 files. One is the header file, which contains
all the class definitions, and the other is the source file where all the methods
(what we used to call procedures) are actually worked out. This header file
and source file are then copied to the Clarion source directory - typically
\clarionx\libsrc - and then used in an application. The prototypes in the header
file, and the definitions in the source file have to match exactly.
The Object
Writer Template
Sounds like a job for a template - and it is. Enter the CapeSoft Object Writer
template. Firstly it's important to understand the goal here. The idea is to
have a place where classes can be created, where the effort is spent writing
the object, not trying to manage it.
When using the ObjectWriter template the object becomes part of the
application - but with one major bonus - the code generated is still completely generic
and can easily be incorporated as-is into other applications. So now you can write an
object, and include its test program in the same application, then use the object in other
applications without the test code overhead. This approach means a couple extra hoops need
to get jumped through, but the extra effort up front is paid back when it comes to testing
the objects.
The
Object User Template
We've included a template which will help you to use the Classes that you
create (and in fact any external class). You will be able to use this template
to derive your methods and add specific properties and methods for that
instance. You will be able to use this template as a starting point to turning
your class into a product.
Some
Definitions
One point to remember is that the Clarion IDE is designed to deal with Procedures
and Functions and Modules etc. So some of the naming appears a little confused
when we start talking about Methods and Properties etc. Don't get confused though.
For example we'll use a Class "Procedure template" to create a class
and a other "Procedure templates" to define methods. Think of these
as Class and Method templates and mentally drop the word "procedure".
I'll also talk about 'Class' modules and 'Method' modules. Basically Classes
are stored in .Inc files (header files) and Methods are stored in special .Clw
files (source files).
Installation
Running the supplied installation file will install Object Writer on your
computer.
Important Note : One of the side effects
of installing OW is that the IDE will now ask you for the Module Type whenever
you add a new procedure.
Don't be worried, you always select
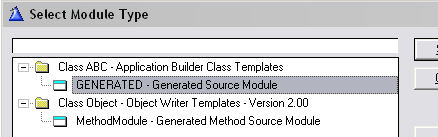
Generated Source Module except when you're making a Method. We'll get to
the Method making bit in a short while.
Jump
Start Tutorial - Writing an Object
In this tutorial we'll make a small class to return the description of an
event, and store the time and date it occured. We'll use the basic settings, for
more details, you can check out the template help section. I highly recommend
working through this tutorial - it should only take about 20 minutes, and will
take you succinctly through the concepts. You can copy the handcoded parts
directly from this document. Hand code is displayed in a green courier font to
distinguish it from instructive text.
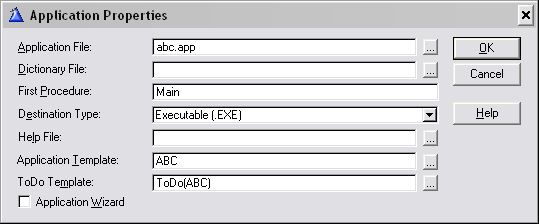
- So - start off by opening your Clarion IDE making a new application with
the following properties:
- Select GENERATED from the tree module type tree that appears:
-
Click the Global, then the Extensions button
to get to the Global Extension and Control Templates window.
-
Click the Insert button and select the following template
from the Select Extension window that appears:

-
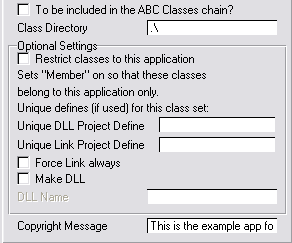
Setup the following settings (you will need to set the Class
Directory to point to the correct directory - if you don't use the clarionx\3rdparty\libsrc
directory, then you will need to edit
your redirection file to use this class in another application).
-
Click the OK button on both the Extension and Control Templates
window and the Global Properties window.
We will proceed to make the class module:
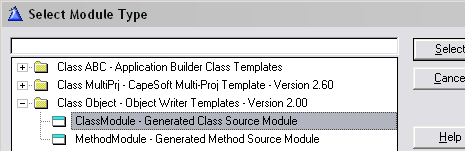
- In the Application tree window, click on the Module tab. Go to the
Application menu and choose Insert Module and from the list of available
modules select ClassModule from the Object template class.
- You'll see a module properties screen, rename the module to MyTest.Inc.
- Clear the Allow Repopulate Checkbox and click the OK button.
We will now proceed to make the method module:
- Go to the Application menu and choose Insert Module and from the list of available modules choose
MethodModule from the Object
template class.
- You'll see a module properties screen, rename the module MyTest.Clw
- Clear the Allow Repopulate Checkbox and click the OK button.
We will now add the Properties and Methods to the class:
- Highlight the MyTest.inc module in the module list tree.
- Choose New from the Procedure Menu and name the class MyTestClass
and click the OK button.
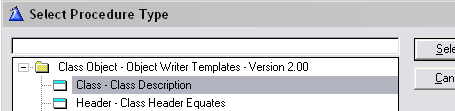
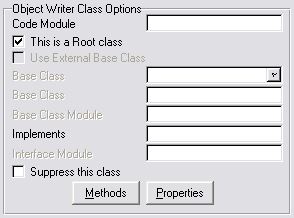
- Select the Class - Class Description procedure template from the
tree that appears.
- Enter MyTest.Inc into the Module Name field and check the
This is a root class checkbox.
- Click the Properties button and use the Insert button to
enter the following properties (which are just like data) for the class:
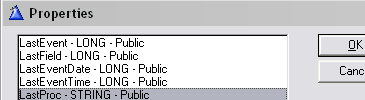
For each property, simply enter the Property Name, and select LONG
(or string) from the Property Type drop list. The other fields can remain unchanged.
The LastProc string should be a string(255).
- Click the OK button to return to the Procedure Properties
window.
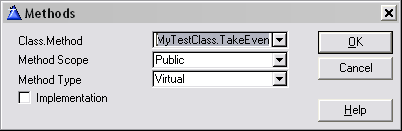
- Click the Methods button and then the Insert button to enter
the MyTestClass.TakeEvent method:
Important Note : As you add these methods
you will be asked which module they belong to (except for the first
one). This is the only place
where you choose to use the Method Module instead of the normal GENERATED
module (for the first method in the module, you will not be prompted to do
this).
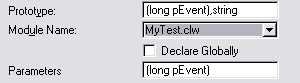
- Repeat Step 7 to add the MyTestClass.GetEventName method.
- Click the OK button to return to the Procedure Properties
window and again to return to the Application tree.
- The methods that you added on your normal application
tree appear as ToDo procedures.
Now we'll code the necessary code to make the method work.
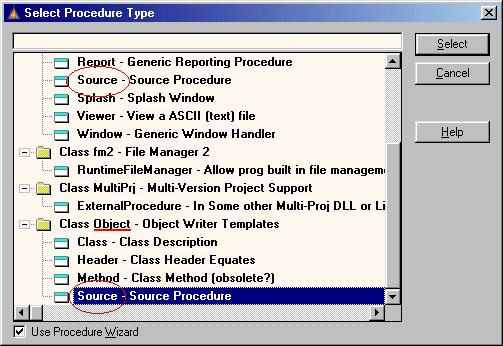
- Double-click on the MyTestClass.TakeEvent ToDo procedure and select the
Source Procedure from the Class Object - Object Writer templates:
- Enter the following settings:
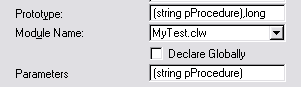
Note: it is critical that all the Methods are
assigned to the MyTest.clw module
- Click the Embeds button and click the Source button on the
Embedded Source window.
- Enter the following code into the Processed Code embed point:
if (clip(self.LastProc) = clip(pProcedure))
and |
(self.LastEvent = event()) and (self.LastField = field())
return(1) !This is the same as the last event
else
self.LastProc = pProcedure
self.LastEvent = event()
self.LastField = field()
self.LastEventTime = clock()
self.LastEventDate = today()
return(0)
end
- Exit and save, and return to the Application tree window.
- Repeat step 1 for the MyTestClass.GetEventName procedure.
- Enter the following settings:
- Click the Embeds button and click the Source button on the
Embedded Source window.
- Enter the following code into the Processed Code embed point:
case pEvent
of event:accepted
Return('Event:Accepted')
of event:NewSelection
Return('Event:NewSelection')
of event:Scrollup to event:Locate
return('Event:Scrolling')
of event:MouseDown to event:MouseMove
return('Event:MouseEvents')
of event:VBXEvent
return('Event:VBXEvent')
of event:AlertKey to event:PreAlertKey
return('Event:AlertKeyEvents')
of event:Dragging to event:ScrollDrag
return('Event:Drag&DropEvents')
of event:TabChanging
return('Event:TabChanging')
of event:Expanding
return('Event:Expanding')
of event:Contracted
return('Event:Contracted')
of event:Rejected
return('Event:Rejected')
of event:DroppingDown
return('Event:DroppingDown')
of event:DroppedDown
return('Event:DroppedDown')
of event:ScrollTrack
return('Event:ScrollTrack')
of event:ColumnResize
return('Event:ColumnResize')
of event:Selecting
return('Event:Selecting')
of event:Selected
return('Event:Selected')
of event:CloseWindow
return('Event:CloseWindow')
of event:CloseDown
return('Event:CloseDown')
of event:OpenWindow
return('Event:OpenWindow')
of event:OpenFailed
return('Event:OpenFailed')
of event:LoseFocus
return('Event:LoseFocus')
of event:GainFocus
return('Event:GainFocus')
of event:Suspend
return('Event:Suspend')
of event:Resume
return('Event:Resume')
of event:Timer
return('Event:Timer')
of event:DDErequest to event:DDEclosed
return('Event:DDEevent')
of event:Move to event:Undocked
return('Event:WindowSize&PositionEvents')
of event:BuildFile to event:BuildDone
return('Event:BuildEvents')
of event:User to event:Last
return('Event:User')
else
return('Event:Unknown')
end
- Exit and save, and return to the Application tree window.
Before compiling, switch to the Module tab and delete any empty modules that
the IDE may have created (abc002.clw, etc).
Compile your application, and you'll see your source files (MyTest.inc and
MyTest.clw) in the Clarionx\3rdparty\libsrc directory.
Getting compile errors? Check out the compile
errors section.
The application is still complete, so you need to continue with the next
tutorial in order to see the full use of the Object Writer templates.
Jumpstart
Tutorial - Using
an Object in an application
Ok, so now you've written your object, how do you use it in
another (or the same) application? Good Question! Let's keep going
with our example tutorial application abc.app. In this tutorial, we'll look
at deriving a class and adding our own code tailored for this application.
- Let's add this as a Local Object then:
1.1. Double-click on the Main ToDo procedure to get to the procedure properties window
and select the Generic window as the procedure type. Click on the Extensions button and click the
Insert button on the Extension and Control Template window. Select
the IncludeObject - Generic Object Extension to use a Local Object
extension template and click the Select button.
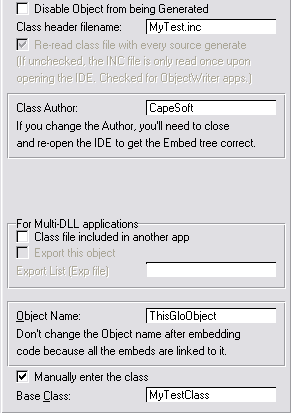
- Fill in the name of your class header file (MyClass.inc) and you can
enter an appropriate Class Author in the field provided.
Tip: A class is only read once
by the IDE (during a session). This means that the first time the class is entered, the
author will be set there. Changing the author will not have an effect (on the
embed placement) when the class has already been read.
- Select your class from the drop down
Base Class list (MyTestClass). Set the Object Name in the field
provided to a more descriptive name (ThisMyTest).
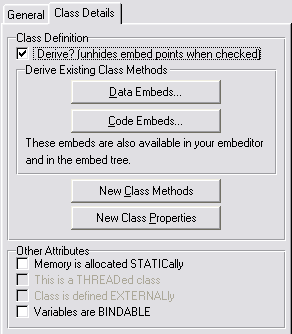
- We're going to derive this class, this basically means adding our own code
(methods and properties) to the class - while making the use of existing
coded methods and properties. Change to the Class Details tab and then check the Derive checkbox.
- Click the OK button to return to the Procedure Properties window. Add the following data to your procedure's local data:
EmbedQ QUEUE,PRE(EQ)
Event LONG
Name STRING(40)
Field LONG
Time LONG
Date LONG
END
- Open the Window editory and edit the window to look as follows:
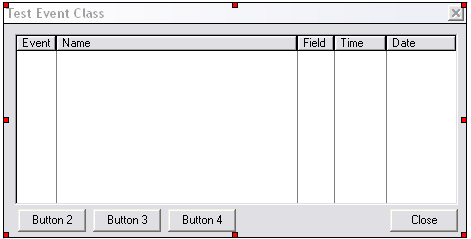
(Use the Queue from Step 5 for fields in the List Box and the Close window
template for the close button)
Quit the Window editor.
- Open the Embed tree (by clicking on the Embeds button).
Find the Local Objects | Capesoft Objects | ThisMyTest (MyTestClass)
TakeEvent | ParentCall embed point:
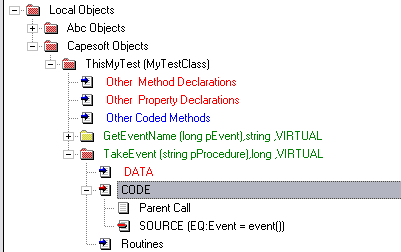
and add the following code (to populate the code to the queue):
EQ:Event = event()
EQ:Name = self.GetEventName(event())
EQ:Field = field()
EQ:Time = clock()
EQ:Date = today()
add(EmbedQ)
- Continuing in the Embed tree, find the Local Objects | Abc Objects |
WindowManager (WindowManager) | TakeEvent | Top of CYCLE/BREAK support embed
point and insert a source embed with the following code in it:
if ThisMyTest.TakeEvent('Main') .
- Save and quit back to the application tree.
- Compile and run the
application.
Turning
your class into a product
You can now write your own class using ObjectWriter (based on the approach used
in the tutorial above). Once you've made your class you can use the ObjectUser
template (ObUser.tpl) as a starting point to making your own template/class
product set.
- Open the ObjectUser template in the source editor.
- There are two extension templates to populate your class - one for local
and the other for global class population (IncludeObject and IncludeObjectGlobal).
Cut the extension template out that you will not require. (In this case,
each template starts with #Extension and ends on the line before the next
#Extension of #Group)
- You can fix (and infact hide the author) to your own name/ the name of
your company as follows:
Find all instances of the template variable %ClassAuthor and change it to
your company name.
Remove the prompt to set the company name. You can delete the following
lines from the template group:
#boxed('')
#prompt('Class Author:',@s255),%ClassAuthor,default('Capesoft')
#display('If you change the Author, you''ll need to close')
#display('and re-open the IDE to get the Embed tree correct.')
#endboxed
- You may want to move all the class details onto the Class Details tab
(i.e. the Class header filename, the Object name and the BaseClass).
- If you want to generate code into some specific derived method, you can
code this into the template as follows:
#AT(%dMethodCodeSection,%ActiveTemplate & %ActiveTemplateInstance
,'TakeEvent (string pProcedure),long ,VIRTUAL') ,priority(2500)
,DESCRIPTION('Generate Code Before the Parent Call') ,where(%NoObUser = 0)
!Place
generate code here
#ENDAT
In this case the MethodID of the above embed point is
'TakeEvent (string pProcedure),long
,VIRTUAL'. You will need to know the MethodID for the embed point
where you are wanting to embed you code. The way to do this, is to place the
following in the template (red is the code you must insert into the
template):
#AT(%dMethodCodeSection,%ActiveTemplate & %ActiveTemplateInstance,%dMethodID),priority(5000),DESCRIPTION('Parent Call'),where(%NoObUser = 0)
!%%dMethodID = %dMethodID|
#INSERT(%ParentCall)
#ENDAT
When you generate your code the next time, then you will see your
method procedures all listed in the clw that is generated (for that
procedure) and the name of the methods in there as follows:
ThisMyTest.TakeEvent PROCEDURE (string pProcedure)
ReturnValue long
CODE
!%dMethodID = TakeEvent (string pProcedure),long ,VIRTUAL|
ReturnValue = PARENT.TakeEvent (pProcedure)
Return ReturnValue
The ObjectUser template makes use of the object01.tpw to read the header file
and make the necessary embed points and declare the classes. You need to ship
this file (as is) with your template.
Some
more about the Templates
The Global Object
User Extension Template
The Local Object User
Extension Template
The Global Object
Writer Extension Template
Creating New modules in your application
Creating a new class
Turning your ToDo methods into procedures
What happens when you compile
Using the Global Object User Extension Template
The purpose of this template is to enable you to include an object easily
into your application. This template provides embed points where you can insert
code into derived methods, and allows you to easily add new methods and
properties to the class.
Adding the template
- Open your application in the Clarion IDE.
- Click on the Global button and then the Extensions button.
- Click the Insert button and select the IncludeObjectGlobal - Generic Object Extension to use a Global
Object extension template and click the Select button.
Check out the What the Template
prompts mean section below.
Using the
Local Object User Extension Template
The purpose of this template is to enable you to include an object easily
into a procedure. This template provides embed points where you can insert
code into derived methods, and allows you to easily add new methods and
properties to the class. You can easily access the Embed points directly from
the Local Extension (via an Embed button).
Adding the template
- Open your application in the Clarion IDE.
- Double-click on the procedure where you would like to add the object.
- Click on the Extensions button on the Procedure Properties window.
- Click the Insert button and select the IncludeObject - Generic Object Extension to use a
Local Object extension template and click the Select button.
What
the Template prompts mean
- If you check the Disable Object from being Generated checkbox, then
no code will be generated from the extension template.
- Fill in the name of your class header file without quotes. After this is
entered, the template will read the header file and extract the class and
method names from the header file.
- If you are working on the Class as you are compiling, then you may want to
check the Re-read class file with every source generate in order to
keep the class information upto date with the INC file (this is forced on
for Object Writer applications). Otherwise the class file will only be read
once in a session.
- You can
enter an appropriate Class Author in the field provided.
Tip: A class is only read once
by the IDE (during a session). This means that the first time the class is entered, the
author will be set there. Changing the author will not have an effect (on the
embed placement) when the class has already been read.
- You can set the following for Mutli-DLL applications. If the class is
included in another DLL, then there is no need to include the INC file
(containing the class) in this application as well. In this case, check the Class
file included in another app checkbox. If this is the Data-DLL and you
want to export the object to the other applications, then check the Export
this object and include the EXP file, so that the necessary export will be
generated.
- Set the Object Name in the field
provided to a more descriptive name.
- Select the class from the drop down
Base Class list. This list is a list of the classes contained in the
header file. If there is only one, then there will only be one in the list.
If the file you entered does not contain any classes (or is not a valid
header file) then this list will be empty. You can check the Manually
enter the class to enter the class manually. This is particularly useful
for ObjectWriter apps where the app generates the class (so the INC file has
not initially been compiled).
- Change to the Class Details tab
- Check the Derive checkbox to derive this class. This basically
means we'll be adding our own code, methods and/or properties to the
existing class - while making the use of existing coded methods and
properties.
- You can use the Embeds buttons to get to the embeds pertaining to this
class to add code to derived methods (and to new methods) (Not available in
the Global Extension template).
- The New Class Methods and Properties buttons can be used to add new
methods and properties to this class. The new methods will have embed points
placed in the object tree, which you will be able to access via the Embed
buttons, or via the normal source editor.
- You can use the checkboxes in the Other Attributes group to add
other attributes to your class. The STATIC option is only available for
local objects, while the THREADed and EXTERNAL options are only available
for Global objects.
The Global Object Writer Extension Template
To allow your application to correctly generate objects you need to add the ActivateObjects
extension template to your global extensions in your application. To do this...
- Click on Global, then on Extensions, Then on Insert
and select the following template
from the Select Extension window that appears:
- The following prompts will appear in the right hand panel of the
Extension templates screen once you've clicked on the Select button (in Step
1).
- Typically, the option 'To be INCLUDEd
in the ABC Classes chain?' would be left unchecked. In Clarion, classes
either belong to the 'ABC library' or they are independent of them. If
you're
extending one of the existing ABC classes (or something similar) then you
would check this option. But, if in doubt, try to make new classes independent
of the ABC classes. This makes it somewhat easier to manage in the long run
and it can also lessen overhead where the class is not used, particularly
in the case of multi-DLL applications.
- If the option To be INCLUDEd in the ABC Classes chain? is checked
then you will be asked for the Clarion X Libsrc Directory - this must be
the pathname to the directory where the ABC classes are installed (eg C:\ClarionX\LibSrc
).
More typically (see step 2) this option would be left unchecked, in which
case you will be asked for the Class Directory - this may either be
the directory where the ABC classes are installed, or you can use the
3rdparty classes directory (typically ClarionX\3rdparty\Libsrc) or you can establish a
separate 'home' for your own classes (eg C:\ClarionX\MyLibSrc) -
in which case you will need to change the Redirection file (ClarionX.RED)
to include this directory in the Clarion search path.
- If the option To be INCLUDEd in the ABC Classes chain? is unchecked
then you will be able to check the Restrict classes to this application
checkbox. You would select this option if the classes you are creating need
to know about the global variables in the application (data, files, etc) (in
which case the class will be restricted to this application) -
otherwise, leave this option unchecked, in which case the classes will be
generic.
-
The Unique DLL Project Define should be unique to this application (and
hence to this set of classes). This define will be used when generating a
Multi-DLL project, when you generate your class into the data DLL only and
linking your objects (based on the classes) in into DLLs (and EXEs) when you
only want the class to be included into the one DLL (instead of all the DLLs
and EXEs).
-
You may like to always link the class into the application. This is
acceptable, although if you have a multi-DLL application, there's not much
point including the header files into every application (where the class
type is used). So you have 3 options:
1. Check the Force Link Always checkbox, which will always link the
header files into the application.
2. Use a Unique Link Project Define, which will enable you to set the
define in the project defines to tell the linker when to link the class
header files and when not.
3. Manually link the file in yourself (or using a template).
-
It you would like to make this class into a DLL, then check the Make DLL
checkbox and fill in the DLL name to make.
- Use the Copyright Message field to include a copyright message
into your class at the top of the include file.
Creating
new Modules in your application.
Before you can create a class, and its methods, in your application, you need
a Class Module and a corresponding Method Module. These are the modules where
the classes and their methods will be stored. Each method will become a 'procedure'
on your app tree.
You can store more than one class in the same Class module (and hence methods
from more than one class in the same method module). In fact my recommendation
is that you store all the classes in your app together in a single module. In
other words all the Method procedures, for 1 (or more) classes, will be stored
in the same module.
Tip : Before proceeding, click on the Module tab to get yourself
into the Module perspective of the IDE. The following steps will then make more
sense since, from the Procedure tab?s perspective, the created Modules are not
visible.
To create a Class Module:
- Go to the Application menu and choose Insert Module.
- From the list of available modules choose ClassModule from the Object
template class.
- You'll see a module properties screen, rename the module to something
that describes all the classes to be grouped within it - for example TestClasses.Inc.
- Make sure Allow Repopulate is clicked OFF.
- Enter equates and special data types for the .INC file in the provided
embed point. (If this instruction doesn't make sense - don't worry! You'll
come across this facility when you need it. It's optional...)
Tip : The Embed point may not become active
straight away. If so, close the app, open it again, and you should have access
to the embed point.
- Click on Ok to save the new module in your application.
At this point we've just created the Class module. We'll add Classes to in in
a later step.
To create a Method Module:
- Go to the Application menu and choose Insert Module.
- From the list of available modules choose MethodModule from the Object
template class.
- You'll see a module properties screen, rename the module to the same as
the corresponding Class module - except that the class module has a .INC extension,
and the Method module has a .Clw extension. For example TestClasses.Clw
- Make sure Allow Repopulate is clicked OFF.
- The method module has a map embed point and a data embed point. Use these
to enter prototypes of external functions required by your object, and data
(not properties) required by your object. (Again this is an optional advanced
feature. When you need it, you'll know!)
Tip : You may not be able to access the
embed points straight away. If so, close the App and open it again.
- Click on Ok to save the new module in your application.
Now you've created the Method module. Later on methods will appear as ToDo's
and will appear in this module.
Creating
a new Class
Each class contains Properties (what we used to call data) and Methods (what we
used to call procedures). To create a new class and define it's Properties and
Methods do the following...
Tip : Before proceeding, click on the Module tab to get yourself into
the Module perspective of the IDE, then highlight the Class Module (with the .INC
extension) to which the new Class is to be added. This will automate and simplify
some of the steps below
- Make sure you have created a Class Module following the steps above.
- Choose New from the Procedure Menu. (Remember don't get confused
- we're adding a class not a procedure but Clarion doesn't know that yet)
- Give the class a name (for example TestClass1) and click on Ok.
- Select the Class - Class Description procedure template.
- Make sure the Module Name is correct - select from the list to find
the correct Class module if it isn't.
- If this class has a Base Class, i.e. a class that you're inheriting
from, then select that from the available list. Make sure you choose a genuine
Class here. If the base class is not defined in this OW application then you
can enter it as an External Base Class. In this case you need to manually
enter the name of the class, and the class module (.inc) where the external
class is defined.
- Use the new Properties button to enter all the properties for the
class. Remember Properties are just like Data.
- Use the new Methods button to enter all the Methods for the class.
These must be entered in the format Class.Method So for example if you just
created the class TestClass and it has a method Start then
you would enter TestClass.Start as a method name. If the method is
a Virtual method then select the Virtual switch for that method.
All the methods (including Virtual methods) will immediately appear on your
normal application tree as ToDo procedures. (This is best viewed from the
Procedure Tab perspective)
Important Note : As you add these
methods you will be asked which module they belong to. This is the only
place where you choose to use the Method Module instead of the normal GENERATED
module.
- Click on Ok to save the new class in your application.
- Repeat these steps to add additional classes. You can store multiple classes
together in the same module, or you can use different modules.
Turning
your ToDo procedures into Methods
You should never need to create a method using the Procedure New menu option as
they should be defined in the Methods button when you create or edit the Class.
They will appear on the application tree, attached to the Class definition as
ToDo procedures.
We also discovered that it's possible to use the
existing templates, other than the Source template, when it comes to creating
Methods. This is a real bonus because if, for example, your method has a window,
then you can use the normal Window procedure template to write the method. We
haven't gone down this road much yet though, and although it appears to work (for the
Window template anyway) you do get a compile warning (which you can ignore). We haven't
tested yet with other native ABC templates - e.g.
the Browse or Report templates.
Regardless
of which one you pick, you need to do the following...
- Make sure the Module Name is the name of the Method Module
that is related to the relevant Class module - for example TestClasses.Clw.
Depending on your CW settings, Clarion may or may not have put it in the right
place for you.
- Optionally enter a prototype and parameters as you would for any normal
procedure or function.
- Optionally enter data and code for the method in the provided embed points.
- Click on Ok to save the method.
NOTE : After changing all
your ToDo's to be methods you may end up with empty modules in your APP which
will cause the compile to fail. This is normal. Simply go to the Application
menu and select Delete Empty Modules to correct this.
What
happens when you generate and compile
When you generate your code the Source module and Header file for your object(s)
are automatically created.
If you are creating an ABC object then they are generated into your \ClarionX\Libsrc
directory - not your application directory.
If you are creating a non-ABC object then the
modules will be generated into the directory specified on the global
extension.
When you compile your application then the objects, as well as any other normal
procedure templates are compiled in the normal way, and the normal exe is created
(assuming you don't have any errors of course). In this way you can test your
object without having to leave the application. However when the object is used
in other applications, only the object source code and header files will be used
- not the rest of the application.
Advanced
: Creating Polymorphic (Overloaded) Methods
One of the features that OOP supports is having 2
(or more) methods in the same class, with the same name, but which take
different parameter lists. For example in the ABC classes the method ADDITEM is
used often more than once in the same class, but with different parameter lists.
In the IDE you can't just create these polymorphic
methods, because the IDE requires that each "Procedure" (method) has a
unique name. So I've added a little trick to overcome this limitation, and still
allow you to have polymorphic methods.
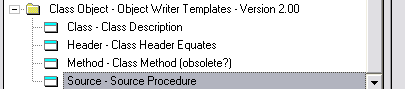
- The fist requirement is that the second (and
subsequent) methods (with the same name) use the Source Procedure
Template from the Object class, not the normal Clarion class. (See
the diagram below).
- The second requirement is that you append the name of the second (and subsequent)
methods with a unique extension. I use .1 then .2 and so on. Just like a file
extension the dot is required, and then the extension. Note
that this is extension is completely ignored everywhere else, you Never refer
to it in your code. It's purpose is Only to make the procedure name unique
to the IDE.
Advanced
: Distributing Objects as DLL's
If you make an ABC compliant class then you have to distribute it as source code
- ie a CLW and INC file. In this case the Class is perfectly useable in a Multi-DLL
project as it becomes part of ABC which is certainly Multi-DLL.
You can also distribute non-ABC classes by distributing the CLW and INC files.
In certain situations however, if you are not willing to distribute your source
code then the best method of distribution is to compile the Object as a DLL. You
still have to distribute the INC file (this allows other APP files to use your
Object) but you don't have to distribute the code in the CLW file.
In order to have this process fully automated you will need to use Object Writer
in conjunction with CapeSoft's Multi-Proj product. Check out www.capesoft.com\accessories\mprojsp.htm
for more details.
In the sections below the APP file referred to is the APP containing the source
for your Object.
1. The first step is to go to the global Object Writer extension and;
i. Tick Off the setting To be included in the ABC Classes Chain.
ii. Set the Class directory. Tip : to make the class generate in the
same directory as the APP file set this to .
iii. Set the Members on for Classes switch Off.
2. The second step requires the use of the Multi-Proj template.
i. Add the Multi-Proj global extension to the APP file, if it isn't already
there.
ii. On the General Tab is a section entitled Object Writer Apps Only.
Click On the switch Export Object Writer Classes.
iii. The DLL you are going to create can either export Just the classes themselves,
or the Classes and any other Functions you may have. If you want to export just
the Classes then click On Only Export Object Writer Classes.
3. Add Versions to your Multi-Proj Extension in the normal Multi-Proj
way.
Compile
Errors
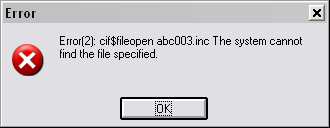
1. 
This error message means that your Method (GetEventName) is in a different
module to the class definition. Go to the procedure properties (of the
GetEventName procedure) and change the Module Name to that of the class (in the
example it is MyTest.clw).
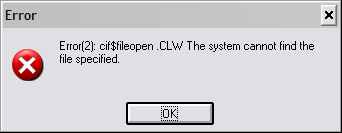
2. 
This message means that you have not deleted an empty module. In the application
tree, click on the Module tab and delete the empty module. This is caused by
adding a new method and moving the method into the class module, but omitting to
delete the method that Clarion automatically created for it.
3. 
This error probably means that you have not entered the class.method name
correctly when you created a new method. Go to your Class procedure properties
window and click on the Methods button. Make sure that you have included the
complete Class name in all the methods in the list.
4. 
This error is because the class is compiled into a directory that is not pointed
to in the RED file. You need to either edit
your redirection file (to point to where the class being compiled
into) or change the
location of where the class files are compiled into.
5. 
You can get this error when you create a new object
based on an external class, but you don't put in the base class module.
6.
Frequently
Asked Questions
When I rename a class method, Clarion creates a new method with the new name as a To Do and puts the old-named method somewhere outside the class.
When I use my object in an application I get a GPF as soon as my
Program runs.
What must I change in my Clarion.RED file to make sure that Clarion can include my object?
I want to change the colour of my object embeds - how do I do this?
I want to use a Queue as a property in my class. Is this
possible?
I
can't see the Embed buttons in the Object User Global Extension template.
Q1.
When I rename a class method, Clarion creates a new method with the new name as a To Do and puts the old-named method somewhere outside the class.
Answer: Rename it in the application tree rather than in the class and
it will be automatically changed in the Class.
Q2.
When I use my object in an application I get a GPF as soon as my
Program runs.
Answer: You may have added a Unique
Project Define to your object application (in your Object Writer Extension
template), but you have not added that Define to your Project of your
application.
ProjectDefine => 0
Q3.
What
must I change in my Clarion.RED file to make sure that Clarion can include my
object?
Answer: Open your clarionx\bin\Clarion5.RED, c55ee.RED, c55pe.red,
c60ee.red or your c60pe.red file in a text editor. The RED file is in an
INI-type format. It has sections (indicated by a string incapsulated in square
brackets - like [Common]). You need to edit/add the following lines:
[Common]
*.INC=D:\C55\3RDPARTY\Libsrc
*.CLW=D:\C55\3RDPARTY\Libsrc
to
[Common]
*.INC=D:\C55\3RDPARTY\Libsrc;MyClassPath
*.CLW=D:\C55\3RDPARTY\Libsrc;MyClassPath
where MyClassPath is the path
where your object resides.
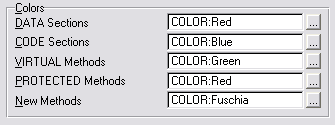
Q4.
I want to change the colour of my object embeds - how do I do this?
Answer: This is done in the Setup | Applications Options
menu on the Embed Tree Options tab:
Q5. I want to use a Queue as a property in my class. Is this
possible?
Answer: Not directly. In order to add a Queue as a property, we need
to do something a bit fancy, because you are not permitted to have a Queue as a
property, but you are permitted to have a pointer to a variable type. So we'll
declare the QueueType outside the Class definition and create a property based
on that queue type.
- Open your class application in the Clarion IDE, and double-click on the
Class (in the Procedure tree).
- Click the Embeds button and double-click the Before Class
declaration embed point.
- Add the following source code:
YourQ
Queue,type
<Queue fields>
end
- Save and exit and then click the Close button to return to the Procedure
Properties window.
- Click the Properties button again, and add a property with the following
attributes:
PropertyName = YQ
Property Type = Other
Other DataType = &YourQ
- Click OK a couple of times to return to the Procedure Properties window.
Q6.
I can't see the Embed buttons in the Object User Global Extension template.
Answer: This is a Clarion limitation. You cannot access the embeditor
(which is the route that the embed buttons take). You need to go to the Global
embeds and edit your derived source from there.
License
& Copyright
This template is copyright © 2003 by CapeSoft Software (Pty) Ltd and Stealth
Software cc. Although it is Freeware, it is not Public Domain. The OWx.Exe distribution
file may be distributed freely, however none of the individual files including
Object.Htm and Object.Tpl may be distributed individually or in an altered state.
This product is provided with absolutely no warrantee or guarantee
whatsoever. Use it entirely at your own risk. Use of this product implies your
acceptance of this, along with the recognition of copyright stated above. In
no way will CapeSoft Software (Pty) Ltd, Stealth Software cc, their employees
or affiliates be liable in any way for any damages or losses you may
incur as a direct or indirect result of using this product.
Acknowledgments
To Gus
Creces who gave us the grounding we have in object writing in Clarion.
To the Australian
and New Zealand users (March/April '98) for their enthusiasm and support.
To Morten
etc. for constantly providing us with feedback, suggestions and encouragement.
To John
Morter for some insightful suggestions, and document changes.
Support
Although this product is Freeware it is supported, and your comments and suggestions
are welcome. Check our web page (www.capesoft.com)
for new versions. You can also contact us in one of the following ways.
|
|
| |
Email |
support@capesoft.com
|
|
| Telephone |
+27 21 715 4000
|
| Fax |
+27 21 715 2535
|
| Post |
PO
Box 511, Plumstead, 7801, South Africa |
| |
|
|
Version
History
Version 2.11 - Released 3 September 2004
- ObjectWriter - fix to allow OMITs to be generated if class is ABC
compliant.
Version 2.10 - Released 1 September 2004
- ObjectWriter - fix to allow OMITs to be generated if required (even if
ONCE is used).
Version 2.09 - Released 13 July 2004
- ObjectWriter - fix to force the ONCE attribute on some of the includes
(some got left out in the 2.07 release).
- ObjectWriter - LINK attribute included and expanded - allowing you to
force linking or based on a project define.
- ObjectWriter - if using a different ABC based template chain, then this
release caters for this for the different project DLL and LINK defines.
Version 2.08 - Released 3 June 2004
- ObjectWriter - Fix to differentiate between polymorphic methods (with
numeric extensions) and derived Implemented methods.
- ObjectWriter - Allows the class to be compiled into a DLL.
Version 2.07 - Released 2 March 2004
- ObjectUser - Fix for multiple uses of the extension template (compiling in
the same base class for all instances).
- ObjectUser - Fix for Legacy local objects were generated twice in C6.
- ObjectUser - Fix for Multiple Global Objects (was getting the base class
confused).
- ObjectUser, ObjectWriter & Object01 - Sets the ONCE attribute for the include statement (for Clarion
versions that support this).
- Object01 - Add hidden embed into MethodList generation (for SelfService
use)
- ObjectWriter - added STATIC, THREADed, and OVER attribute settings to the
properties.
- ObjectWriter - added support for the !ABCIncludeFile attribute with a
setable parameter.
Version 2.05 - Released 4 December 2003
- ObjectUser - Define Class variables moved into group, which is called at
every tempate insert (bails if defined already). This is because different
versions of Clarion generate template code in different orders and #AtStart
is not always generated at the start.
- ObjectUser - %CLWFile is only defined if non-existant.
Version 2.04 - Released 28 November 2003
- ObjectUser - Force read INC file in Object writer apps with every
generate.
- ObjectUser - allow manual overriding of the class (if file has not yet
been compiled) - so name is not initially clear before the class is
generated.
- ObjectUser - Fixed Multi-Proj compatibility bug (Compiler variable not
declared)
- ObjectUser - Allow class to be declared externally, support for BINDABLE,
STATIC and THREADed classes included.
- ObjectUser - supports exported Objects.
- ObjectUser - correct Derive checkbox description.
- ObjectWriter - include a property description.
- Includes an updated Object01.tpw (Version 1.44). This has added support
for the ObjectUser enhancements.
Version 2.02 - Released 27 October 2003
- Improved install and tidied up docs and examples.
Version 2.01 - Released 21 October 2003
- Changed cape01.tpw to object01.tpw.
Version 2.00 - Released 4 September 2003
- Split the Object.tpl into two templates: Object.tpl and ObUser.tpl.
Object.tpl is the ObjectWriter template and ObUser.tpl is the object user
template.
- Fixed the Object User template so that you can use your objects in other
applications.
- Created a new generic sub-template (cape01.tpw) to read inc file and
create the embed points and generate the necessary methods required for
deriving a class.
- Rectified the inclusion of the Link and DLL equates.
- Make DLLMode generation optional.
Version 1.65
- Minor template changes to make the template more friendly
- Some document changes to make the docs more explicit
Version 1.5 / 1.55 / 1.6
- Added embed point : Module Data, before global MAP
- Added support for polymorphic methods (ie 2 or more methods with the same
name) ( see Advanced : Creating Polymorphic
Methods)
- Support for 'Embedded' classes added, via "Set Member" option
on global extension.
- Examples added to the Install
ABC : Demonstrates creating a class which is added to the ABC library.
NOTABC : A class which is not ABC compliant.
Version 1.15
- Support for external base classes added.
[End of document]
