- Server General Information
- Client General Information
- Jump Start
- Other Information
Program Features
- Register a customer online and email product activation code
- Creates Secwin Activation codes for any product
- Register customers before issuing activations codes from
your application or directly from the web using SOS
- Products activations codes can automatically be emailed to customers
or their dealers/resellers
- Product activation codes requests can automatically be assigned a
serial number
- Datasets, companies, serial numbers and products can be blacklisted, preventing any further
issues of activation codes
- Limit the number of registration codes issued to one customer by unique identifier,
by serial
number or by both unique identifier and serial number
- Runs on Windows XP and and higher operating systems
- Can be installed as a service
- Maintain and update SOS via a web user interface
- Add licensed directly on Secwin Online Server using a client Set
Registration Application *
Installation
Secwin Online Server needs to run on a
machine accessible to your customers. This usually means a machine
permanently connected to the internet.
For initial testing we recommend installing
the server on your development pc, and set the
Secwin Online Server's client to
'LocalHost'.
Once you get this going, you can either sign up for SOS server usage on
CapeSoft's server (
details here) or
install the server on a remote machine and test
with that. Remember to change the client server (IP or name) to the
remote machine's server name or IP address.
A Secwin Online Client Demo is shipped with this
install and demonstrates the development options available to register
an application through Secwin Online Server. The
client demo illustrates
the following options:
The server needs the product's Product
Name, and Seed Code (as set on your Secwin Global extension) in order
for it to return a valid activation code. Thus only your server or a
server with your product details can
serve codes for your application.
Note: Secwin Online Server features the ability to email
activations codes to customers and dealers. To test this feature in the
example shipped with SOS, please set the email server settings is in the
registration server tab, to your SMTP server's settings.
Secwin Online Server program is divided in two modules.
-
Secwin Online Web Server
This section contains all the
configurable server settings and web logs.
- Secwin Online Manager
This section contains al the
relevant options used to create and issue product
registrations, maintain product and customer information and has logs containing the
latest transaction information requested from the server and issued by
the server.
Secwin Online Web Server Options
Secwin Online Server's Manager can be access by
clicking on the icon on the left white panel of the server:
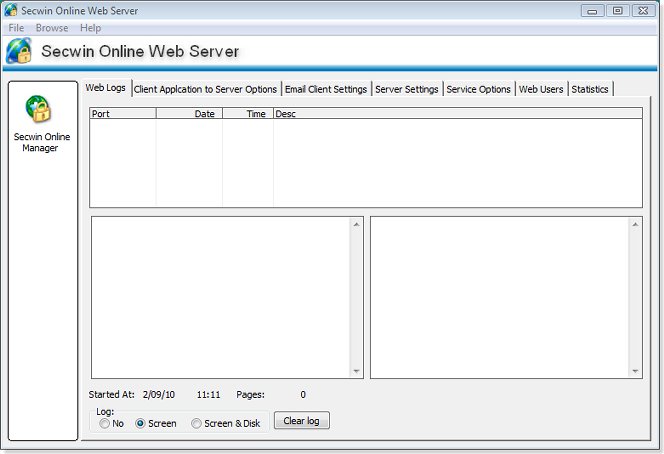
When selecting an icon, your selection will be indicated by a surrounding black square
border. Web Server Options is divided in five categories which can be configured as
follows:
Web Logs
- Web logs displays the latest post or request from a client.
Client Application to Server Options
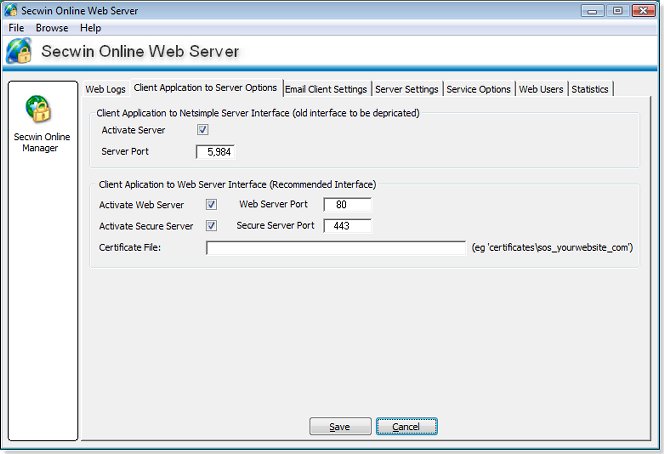
- Activate Server - Enables or shuts down the server for client
activation code requests - This interface has been replaced by the
Web Server Interface and is only available for backward
compatibility. If you are starting out new with SOS, please use the
Web Server Setting below.
- Server Port -
This is Secwin Online Server Port used to receive and issued
registrations. NOTE : Your client must be setup to use this
port. All clients using the same server must use this port number
- Activate Web Server - Enables or
shuts down the web interface for Secwin Online Server
- Web
Server Port - The port used via Internet Explorer to access the
web interface. The default is port 80, which is the default port for
internet explorer. If you want to access the web interface with the
default port you would typically type in the following address
http://127.0.0.1 on your windows explorer address bar. For any other
port you would type the address in the following format:
http://127.0.0.1:6000 where 6000 represents the port number entered
and 127.0.01 the IP address of the machine running Secwin Online
Server.
- Activate Secure Server
- Enables or shuts down the secure web interface for Secwin Online
Server
- Secure
Server Port - The port used via Internet Explorer to access the
web interface. The default is port 443, which is the default port
for internet explorer. If you want to access the web interface with
the default port you would typically type in the following address
https://127.0.0.1 on your windows explorer address bar. For any
other port you would type the address in the following format:
http://127.0.0.1:9000 where 6000 represents the port number entered
and 127.0.01 the IP address of the machine running Secwin Online
Server.
- Certificate File - Lookup the certificate file name if your
secure server requires a certificate
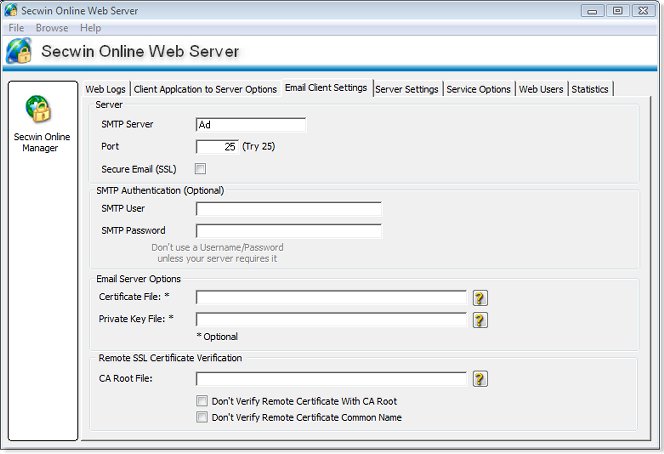
Email Client Settings
- SMTP
Server - Enter your email SMTP server address here. This will
enable you to email activation codes
- SMTP
Server Port - Enter your email SMTP server port number here
(normally 25)
- Secure Email (SSL) - Tick this if your email server uses
SSL SMTP
- SMTP
User - If your email SMTP server requires authentication, enter
your user name here
- SMTP
Password - If your email SMTP server requires authentication,
enter your user password here
- Certificate File - Lookup the certificate file name is you
SMTP email server requires a certificate
- Private Key File - Lookup the certificate file name is you
SMTP email server requires a private key certificate
- CA Root File - Lookup the certificate file name is you SMTP
email server requires a private key certificate
- Don't Verify Remote Certificate With CA Root - Override for
SSL - Less Secure
- Don't Verify Remote Certificate Common Name - Override for
SSL - Less Secure
Server Settings
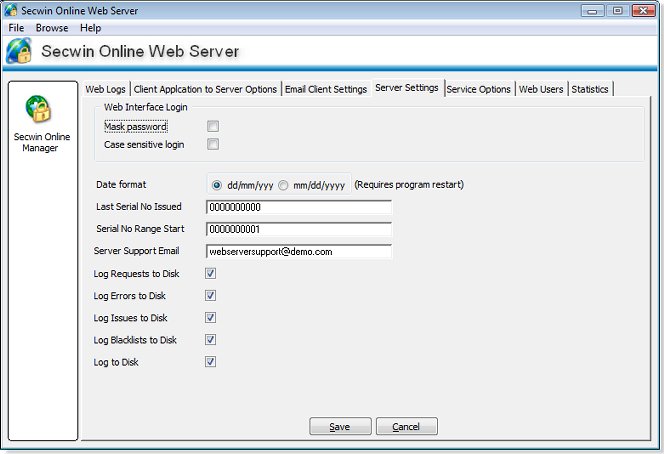
- Mask
Password - Masks the password to prevent the password to be read
on screen
- Case
sensitive login
- Sets Login and Password in the user interface to case sensitive
- Date
format - select between European and US date format for the
windows interface.
- Server
Support Email - This email address will be the default email
address displayed on all web pages with errors
- Serial Number Range Start - This is the
first serial number
issued for a registration in the number range for this server. The
next serial number will be incremented by one.
- Last
Serial No Issued - This is the last serial number
issued for a registration in the number range for this server. The
next serial number will be incremented by one.
- Log
Requests to disk - This will log all requests to file. A maximum
of 250 records are saved.
- Log
Errors to disk - This will log all requests errors to file. A
maximum of 250 records are saved.
- Log
Issues to disk - This will log all registrations issued to file.
A maximum of 250 records are saved.
- Log
Blacklists to disk - This will log all blacklisted requests to
file. A maximum of 250 records are saved.
- Log
to disk - This will enable an ascii file record to be kept of
all web requests received by the server
Service Options
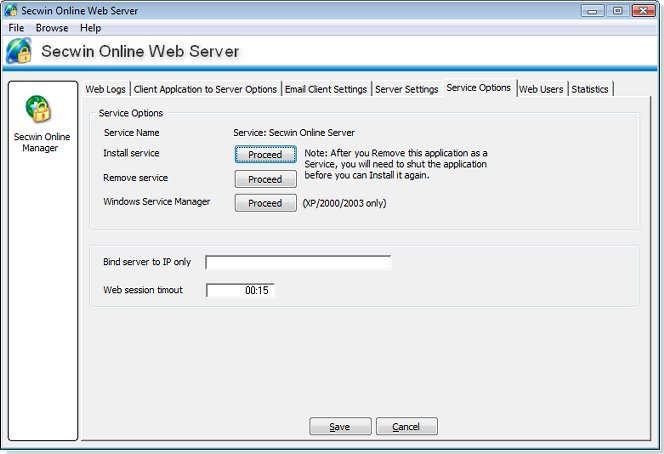
- Install - Install
Secwin Online Server as a windows service. Not available for Windows
95 and Windows 98 operating systems.
- Remove - Install
Secwin Online Server as a windows service
- Windows Service
Manager - Calls the Windows Service Manager
- Bind server to IP
allows you to specify which IP address's port will be used by the
server
- Web session timeout
allows you to set the inactivity time which must elapse before the
user's login session expires on the web interface
Web Users
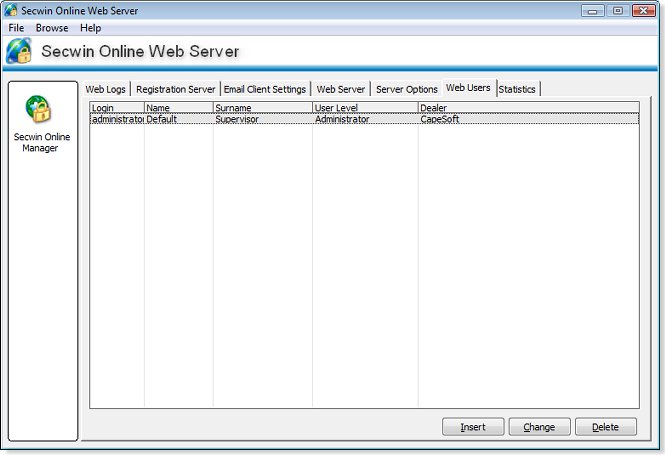
- Adding web users allows the system administrator to control who is allowed
to login into SOS's web interface.
 *
*
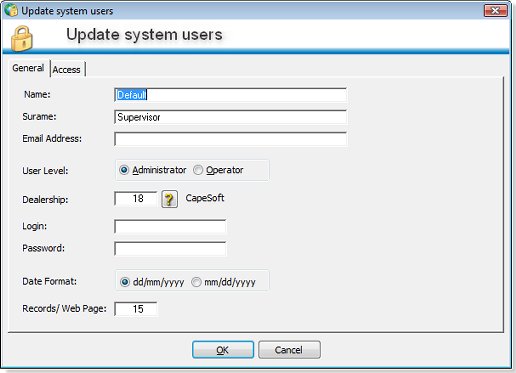
- Name and Surname
- The name and surname of the user who will have access via the web
interface.
- Email Address
- The email address of the user who will have access via the web
interface.
- User Level - Select an administrator for someone who may:
- Access, view, update and all records via the web interface
- May added and remove users
- My update server settings
- User Level - Select a user for someone who may:
- Only Access, view, update and all records via the web interface
relating the their dealership
- Dealership
- The dealer information is created by the administrator when adding
a new user, if that users dealership does not yet exist on the
server.
- Assigning the dealership to the user links all records
(registrations, products etc.) created by this user and
activations code requests for his product to this dealership.
- This implies that another user, assigned to the same dealership will
also be able to access the same information.
- Email Address
- The email address of the user who will have access via the web
interface.
- Date
format - select between European and US date format. Note that
this requires that SOS must be restarted for the date format to
change
- Records/ Web Page - Selects how many records per web page
the user will be viewing.
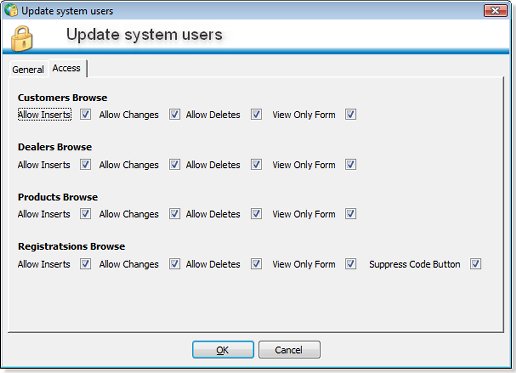
-
Access Tab - Sets access rights for users in the web
interface
Server Statistics
-
Server started on
- The date the server was started
-
Server started at
- The time the server was started
-
Total requests
received - The amount of program activation code requests
received, since the server was started
-
Total activations
issued - The amount of program activation codes issued, since
the server was started
-
Total error requests
- The amount of invalid requests received by the server
Secwin Online Server Manager
Logs
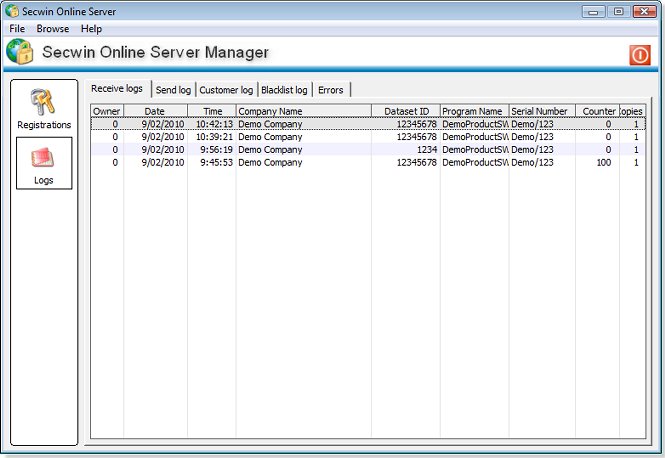
There are six logs:
- Receive Log - Lists
details of all activation code requests or customer registrations
since server has started
- Send Log - Lists all activations code requests issued since server has
started. The type of activation code issued are also described:
Temp code - Company first issue : A new activation code for a new customer
Temp code - New
product: A new product activation code for an existing customer
Code re-issued
: Expires dd/mm/yyyy : An existing activation code for this
customer and product combination exists with and expiry date later
than the product demo expiry date. This code was re-issued
Temp code - request
changed : An activation code for and existing customer and
product combination exists, but the employees, modules or counters has
changed
Black Listed : A code was requested which was black listed. The
following message was send to the client : "Code Denied"
- Customer Log - Lists
all updates made the customer's masterfile as requested by the
- Blacklist Log - Lists all
request for registration codes, which were denied because the
request met blacklisting criteria
- Errors - Lists all
invalid requests received since server has started
- Web Requests -
Lists web page requests since server has started
- Web Posts - Lists
web page posts since server has started
- Server Logs - Lists
server actions since has started or re-started
Registrations
This section allows access to maintain and create activation codes, customers
and products by selecting the applicable tab.
Customers
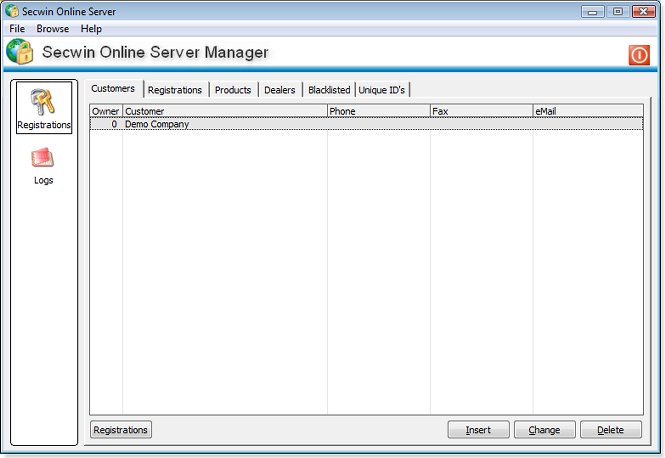
The customers database can be maintained by inserting, changing and removing
customers. Please note that the customers must be added to this database before a
product activation code can be created. The sort order by column in ascending or
descending order can be selected by a left mouse click on the applicable column
header. Selecting an update button calls the following update screen.
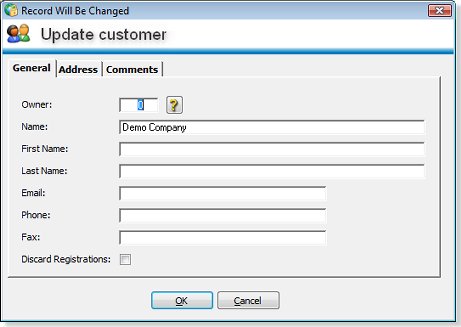
- Owner - If you have enabled multiple web users and creating
this records for a specific dealership, then you must select the
dealership as this records owner. The will ensure that the web
operator can see the records created via the windows interface.
- The email address entered here, will be used to email the activation code to the
client if the product's
email activation codes to customers is selected. Select Ok to accept changes or cancel to go back to the customer list.
-
Discard Registrations - All registrations requested for
this customer will not be saved and discarded. This is useful in
cases where a demo copy of your application is downloaded and used
with demo registration i.e. Demo Customer. *
Registrations
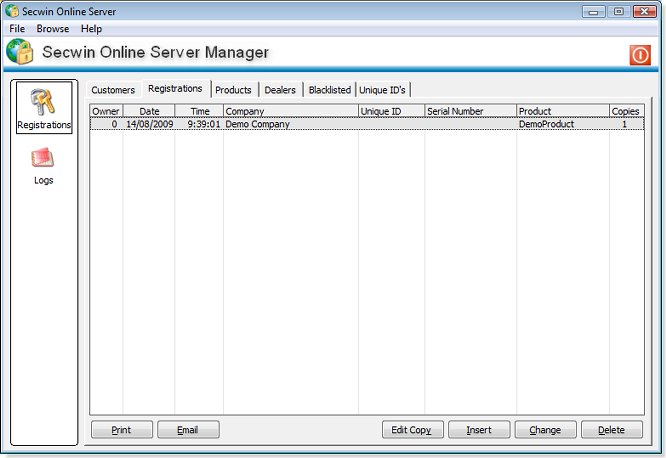
The registrations database can be maintained by inserting, changing and removing
registrations. The sort order by column in ascending or descending order can be
selected by a left mouse click on the applicable column header. Selecting an update button calls the following update screen.
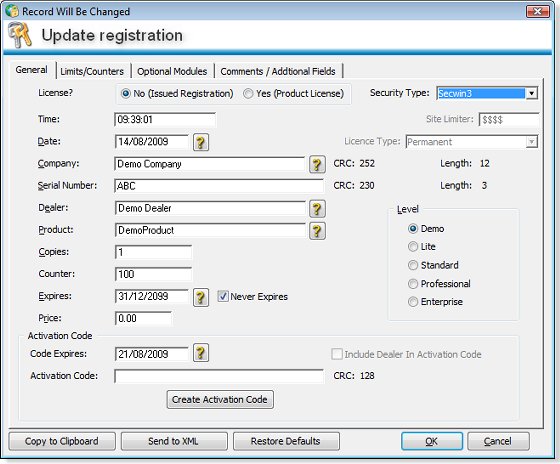
Enter the registration details for which the activation code must be generated.
A expiry date of 31/12/2099 represents an permanent activation code. The modules
become available when the product has been selected. This in turn is dependent
of the modules how have filled in for the product. By selecting the
GENERATE
button, the activation code will be generated and details will be filled in for
cutting & pasting, emailing or printing.
You can set the Registration License to "
No (Issued Registration)"
or
"Yes (Product License)".
- Secwin Online Server
has added a simple feature to product registrations, where the user
may decide if the registration is a License or Issued Registration.
- A license represents a
registration code for a customer's product, which allows the
customer to use that particular product for the specified period of
the registration.
- We typically know a
license as a permanent registration, which never expires, but a
license can be for a month, a year or any set period.
- If a customer
requests a registration code from SOS, only licenses are used to
decide for what period the registration code issued will be
valid. This be the expiry date entered on the license.
- When the requested
registration from the client application matches the license on
SOS, then the license will return a registration code which
expires according to the license's expiry date.
- Licenses are superseded by the next license in date and time order. So only
the newest license is valid. This also allows an audit trial of
all licenses issued to customers.
- If no valid license
is found for the code request, a registration will be issued,
according to the rules of the product's settings.
- A registration is a
code request from a client application. In this manner, SOS
separates all the client application registration requests from the
licenses issued.
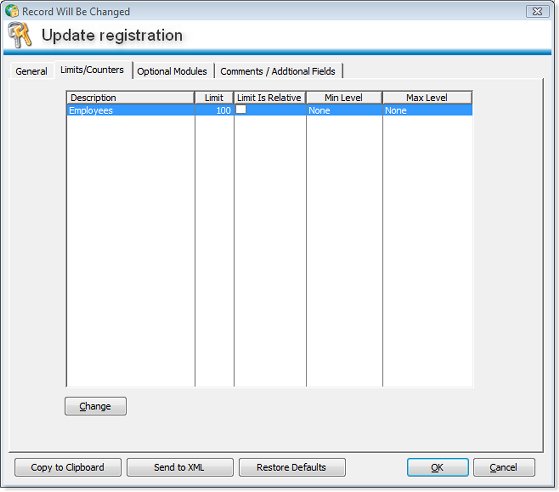
On the limits and Counter tab, you may change the value of you limiter for
Secwin 4 products only. The Limits and Counter Descriptions are defined in your
product.
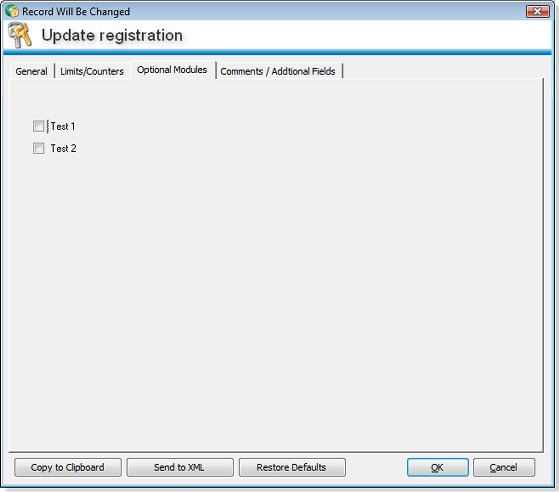
On the Optional Modules tab, you may select the modules for the product
registration you want to create. The modules are defined in your product.
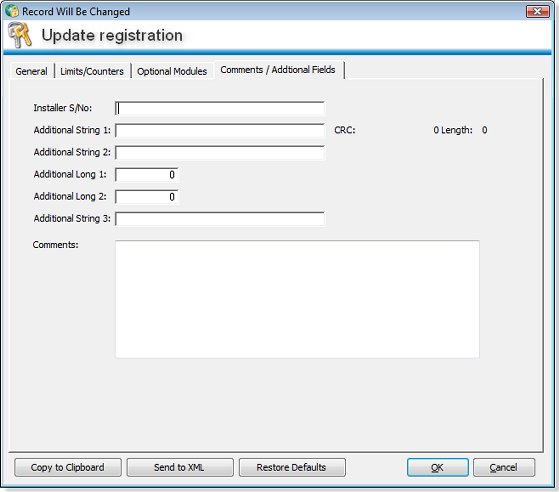
- Installer S/No - A
field that can be used with your installer to validate the license
- Additional String 1 -
String for use in Secwin4 Registration Codes
- Additional String 2 -
String for use in Secwin4 Registration Codes
- Additional String 3 -
String for use in Secwin4 Registration Codes
- Additional Long 1 -
Long for use in Secwin4 Registration Codes
- Additional Long 2 -
Long for use in Secwin4 Registration Codes
- Comment - This is a free
form field which any comments or additional information can be
entered
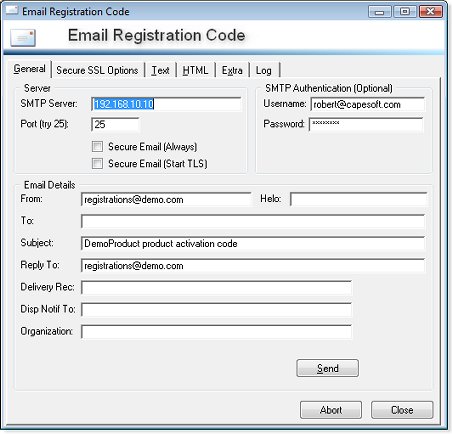
The activation code will be emailed to the customer's email address.
If the product has been configured to send the email to the
dealer on
behalf of the client, the the dealer's email address will be used. This
email address can be changed before sending the activation code. A progress bar
will indicate current progress in sending the activation code.
Products
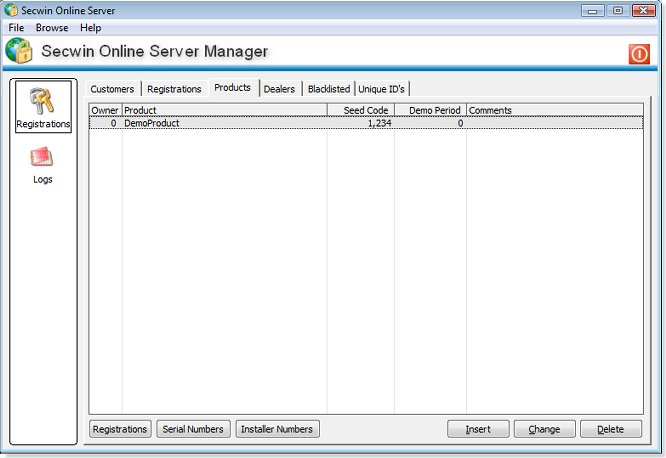
The products database can be maintained by inserting, changing and removing
customers. The sort order by column in ascending or descending order can be
selected by a left mouse click on the applicable column header. Selecting the
relevant update button calls the following update screen.
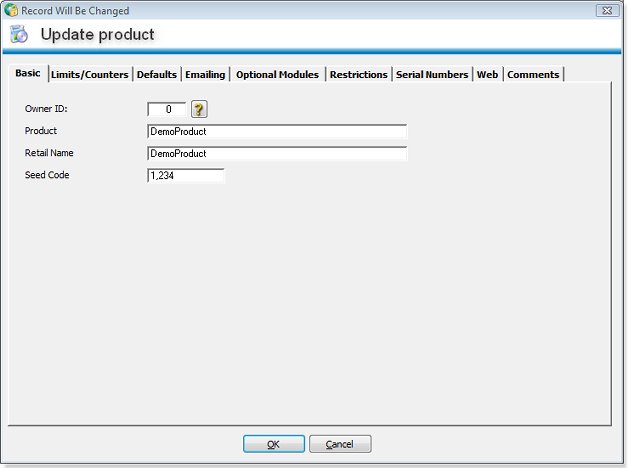 Basic Tab
Owner ID
 - Is defined when hosting multiple dealers via the web
interface. This allows you to separate the data between dealers.
The
product name and
seed code is required in order for SOS the
create an activation code.
The
product retail name allows you to enter a default name used in
correspondence by SOS, other than the product names defined in Secwin, which is
sometime too short for marketing purposes. Left blank, the product name will be
used.
Limits and Counter Tab
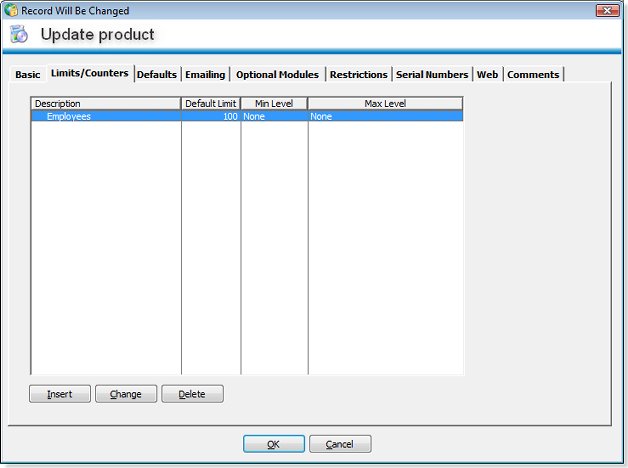
You can specify the table, the licence level range that the limit applies to.
Levels below the limit will not allow any records, and licenses above the
MaxLevel limit will not apply any limits to the table. The Default limit is the
limit that is applied for a Default temporary initial activation license - as
well as what is initially set in the manual registration screen.
Defaults Tab
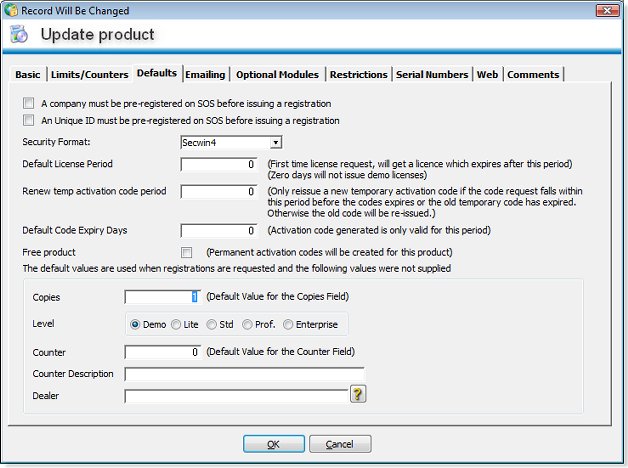
- A company must be pre-registered - If this option is
selected, a company must be already registered as a customer. The string
returned will be "Customer not found". If not selected, the company will
automatically be added as a customer.
- An unique ID must be pre-registered - If this option is
selected, an unique id must be already added to the unique ID list. The string
returned will be "Unique ID not found". If not selected, the existence of the
unique ID in the dataset will not be a pre-requisite for SOS to create a
registration code.
- Security Format -
Select if the code is a Secwin3 or Secwin4
registration code.
- Default License Period -
The first License issued for a customer will get
a license which will be valid for this period. Leaving this field to zero, will
return demo not allowed if a registration was not already created.
- Renew Temp Activation Code Period - If a customer's product is on a demo
license, then the customer will not get a new demo license if they request a new
code which falls outside the amount of days before their existing code expires.
- Default Code Expiry Days - The activation code generated must be entered
before this amount of days elapse. This prevents codes "floating out there"
which can be used indefinitely.
Emailing Tab
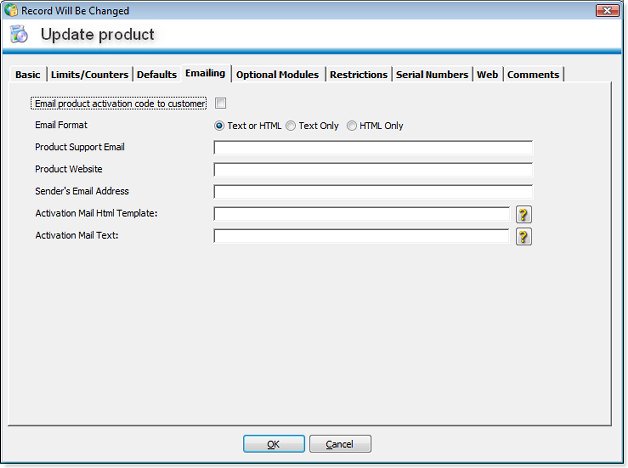
-
Email product activation code to customer -
Tick this selection on, if
you would the customer to receive an emailed copy of the product registration
details.
- Please note, that the dealer setting, "This dealer receives
registration emails on behalf of the client" will override this setting if the
dealer has been selected in the request for registration.
- Email Format - here
you can select if emails send to customers should be in text, html or
both formats. If text or HTML is selected, the email client will
determine which format will be displayed.
- Product support email address - this email address will be displayed as
the contact email address for product support on emailed activation codes and
web pages
- Product Website -
this email address will be displayed as the contact
email address for product support on emailed activation codes and web pages
- Email Sender - This is the name which will appear in the email's from
field received by the customer
- Activation Mail HTML Template
- The location of the HTML format mail
template used to notify customers about their product registration details.
- Activation Mail Text Template
- The location of the Text format mail
template used to notify customers about their product registration details.
Optional Modules Tab

The
optional modules entered here, will be available in the update registrations screen,
once the product has been selected. This allows you to create a generic product
i.e. Telephone Index with an additional module for example PINs. Press Ok to accept changes or cancel to go
back to the products list.
Restrictions Tab
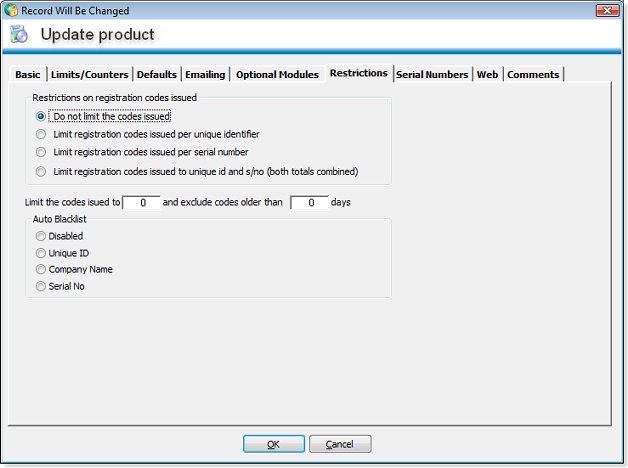
- Do not limit codes
issued - Unlimited valid registrations will be issued for the
same request
- Limit registrations
codes issued per unique identifier - limit the number of
registration codes (as set in the "Limit codes issued field") that
will be issued with the same unique identifier.
- Limit registrations
codes issued per serial number - limit the number of
registration codes (as set in the "Limit codes issued field") that
will be issued with the same serial number.
- Limit registrations
codes issued per unique id and s/no (both totals combined) -
limit the number of registration codes (as set in the "Limit codes
issued field") that will be issued with the same unique identifier
and serial number. These two totals are combined and may not exceed
the limit set. (Only one request will be counted, where a
registration has a matching serial number and unique id as per the
registration request)
- Limit codes issued to - Enter the number of registrations that may
be requested based on the type of restrictions selected above. If
the registration request based on the unique id, serial number or
both, exceeds the total set here, then the last registration code
with the original expiry date will be issued. I.e. if someone
repeatedly requests a demo code in an effort to prolong his demo
period, you can restrict the requests here.
- and exclude codes older than (days) - Setting this option will count all
the registrations issued per unique id or s/no or both, but exclude
registrations older that the total of days entered here.
- Auto Black List allows you to automatically add a registration
to the blacklist list after the first code was issued, which means only one code
can be issued.
Serial Numbers Tab
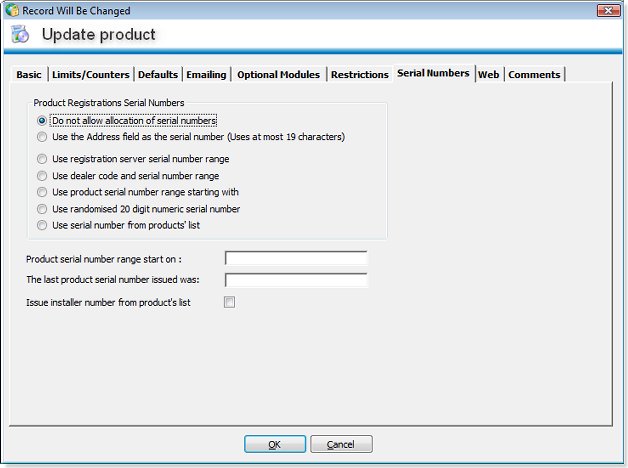 Issuing of serial
numbers
 - When one of the following options are selected and the
registration code request is defined as version 3, a registration code
with a serial number will be issued. See the example for more details.
- Do not allow the
allocation of serial numbers - no serial number will be issued
for this product by SOS
- Use the address
field as the serial number - The first 20 characters will be
issued as a serial number for this product by SOS
- Use registration
server serial number range - The next serial number in the
range for the registration server will be issued as a serial number for
this product by SOS
-
Use dealer code and
serial number range - The next serial number in the
range for the dealer will be issued as a serial number for this
product by SOS
- Use product serial
number range - The next serial number in the range for this
product will be issued as a serial number for this
product by SOS
- Product serial number starts on - This is the
first serial number issued for a registration in the number range for this product. The
next serial number will be incremented by one.
- The last product
serial numbers issued was - This is the last serial number
issued for a registration in the number range for this product. The
next serial number will be incremented by one.
- Use randomised 20
digit numeric serial number - A random 20 digit serial number
generated by SOS will be issued for this product.
- Use serial
number from from products list - On the products browse is
a Serial Number button. This browse holds a list of all valid serial
numbers for your product. SOS uses this number to verify the
customer name against the captured serial number and send this
information to the customer with the registration code information.
- Issue installer
number from products list - On the products browse is an
Installer Number button. This browse holds a list of all valid
installer serial numbers for your product. SOS uses this number to
verify the customer name against the captured installer number and
send this information to the customer with the registration code
information. Typically used with Setup Builder and maintenance plans
ID's.
Serial Numbers Tab
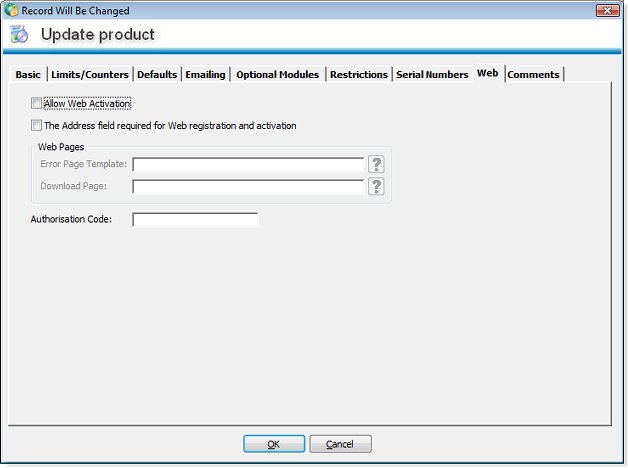
- Allow Web Activation
- This option allows this product to be registered to a customer and an
activation code emailed to the customer from a web page. An example of
this procedure is available in SOS Client Demo Example.
-
The address field is
required for web registration and activation - By selecting this
option, you will force the customer to enter their address information
from a web page. This is normally used in conjunction with serial
numbers when the are issued by using the first 20 characters of the
address information
- Error Page -
if web activation encounters and error, this page will be loaded,
otherwise the generic errors page will be loaded
- Download Page - if
web activation is successful, this download page will be loaded,
otherwise the generic download page will be loaded
- Authorization Code
- this code validates the authenticity of the client example update
program setregistration when it updated or adds registration codes to
SOS .
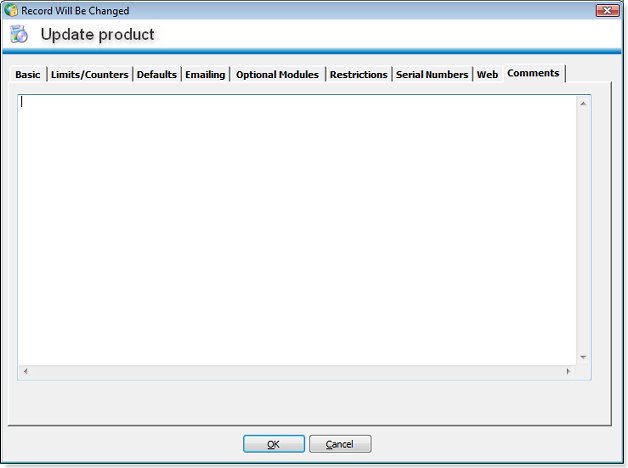
The product
notes field is a free format field in which general product
information can be entered.
Dealers
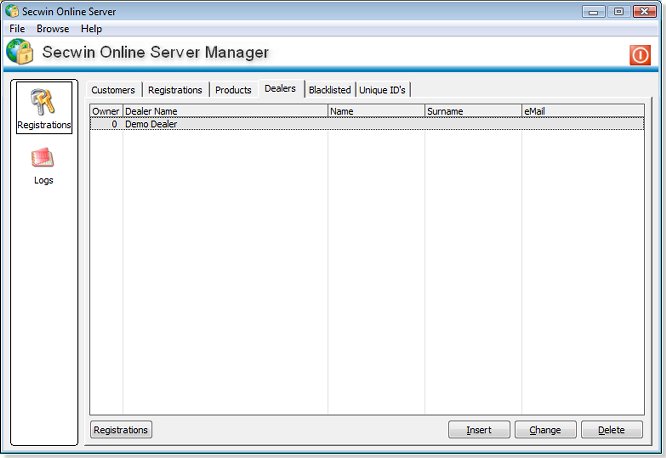
The dealers database can be maintained by inserting, changing and removing
dealers. The sort order by column in ascending or descending order can be selected
by a left mouse click on the applicable column header. Dealer information can be
entered in the product activation codes and allows for product activation codes
generated per dealer grouping. Selecting the relevant
update button calls the following update screen.
General Tab
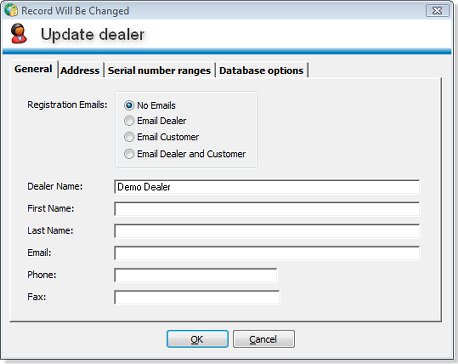
-
Registration Emails
-
- No Emails - No activation code emails will automatically be send
- Email Dealer-
selecting this option will default the activation code email address for the
customer to the dealer's email address. This allows the dealer to control the
registration codes on behalf of his customers.
- Email Customer-
selecting this option will default the activation code email address for the
customer to the customer's email address.
- Email Dealer and
Customer- selecting this option will default the activation code email address for the
customer to the dealer's and customer's email address.
-
Dealer Name - the dealers name
- First and Last Name
- are entered for reference purposes.
- Email
- Dealer's email address
- Phone
- Dealer's phone number
- Fax -
Dealer's fax number
Address Tab
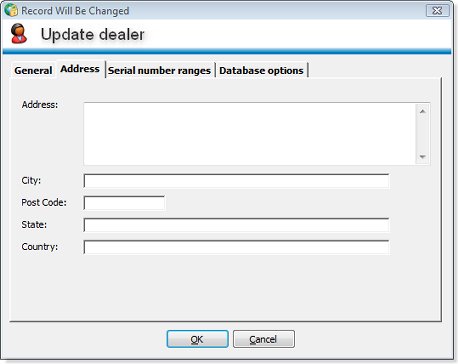
- Address
- Dealer's address
- City -
Dealer's City
- Post Code
- Dealer's postal code
- State
- Dealer's state
- Country
- Dealer's country
Serial Number Ranges Tab
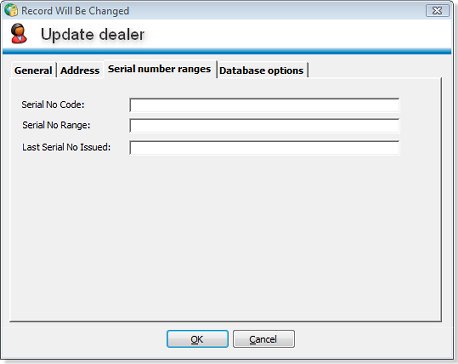
- Serial Number Code -
A three digit dealer code which is placed in front of the serial number
when created by SOS fir example Dem/007. This options is used by SOS, if
the product is configured to
use dealer code and
serial number range.
- Serial Number Range
- The start serial number for this dealer issued by SOS
- Last Serial Number
Issued - The last serial number issued for a registration with this
dealer. The next serial number will be incremented by one.
 Phone, fax, and other address
 details are entered for reference purposes.
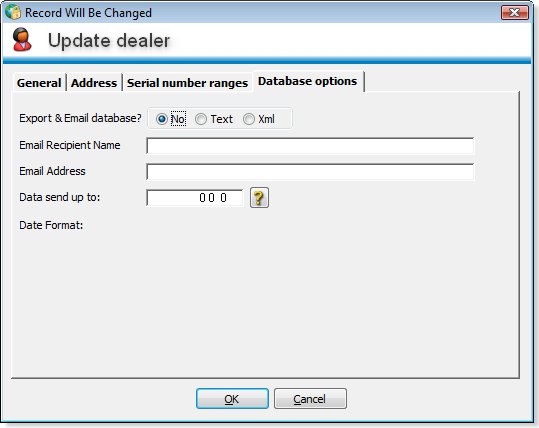
Database Options Tab
This option allows the latest SOS registration data relevant to the dealer and
for the selected product to be emailed to the dealer. Data is send for customers
and registrations separately in a comma delimited text file.
The
recipient name is the name of the person receiving the emailed data.
Enter the
Emails Address of the recipient above.
The
Data send up to field is a system updated field. This field is
updated with the current date once a day just after midnight when the
latest data is email to the dealer. Only registrations data newer than this date
will be emailed to the dealer.
This date can be manually changed.
A
forced export can be scheduled from SOS's
File menu as shown below.
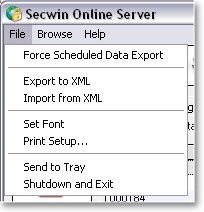
Press Ok to accept changes or cancel to go back to the dealers list.
Blacklisted
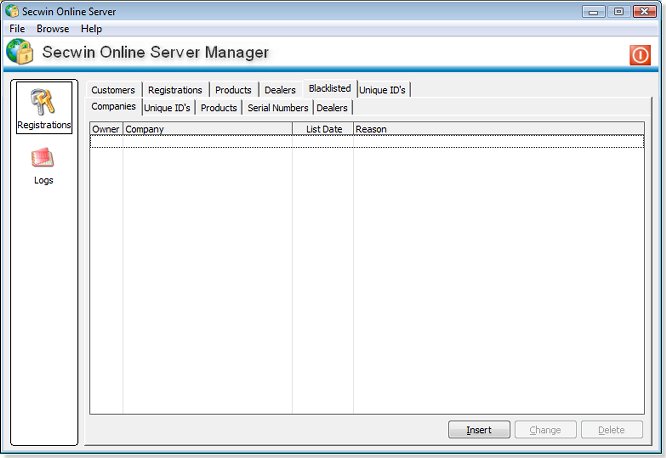
Companies, Unique ID's, products, serial numbers and dealers can and be
blacklisted. As soon as a the blacklist date is reached, a product
activation code will not be generated any more. The production
activation code field will receive a message from the server "Code
Denied". The blacklisted database can be maintained by inserting, changing and
removing listings. The sort order by column in ascending or descending
order can be selected by a left mouse click on the applicable column
header. Selecting the relevant update button calls the following update
screen.
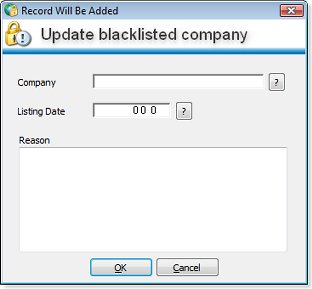
By adding a blacklist, you will effectively prevent
further codes being issued. This can be used in a case where a customer
keeps requesting an unreasonable amount of "demo" or "temporary"
codes.
The Unique ID identifies the customers and
prevents Secwin Online Server from issuing new codes, if the customer
makes subtle changes in the name or registration details and the
customer has been blacklisted. Press Ok to accept changes or
cancel to go back to the blacklists.
Unique ID's

Unique ID's can be added to this browse. If the product in SOS is set that
Unique ID's must be pre-registered, then SOS will check against this list if the
Unique ID exists. If it is does, SOS will issue a registration. Otherwise it
will return an Error, "Unique ID not found". Once the registration is issued,
then SOS will update the company name against the Unique Identifier.

Press Ok to accept changes or cancel to go back to the unique ID's.
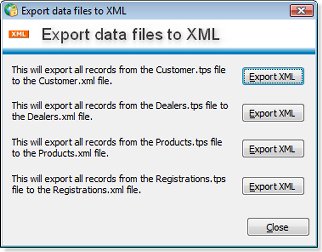
Exporting data in XML format
SOS data can be manually exported from the File menu either using the menu items Export to XML or Import from XML.

Selecting either XML options allows you to export or import to or from XML. Export files are exported
to and imported from SOS's current directory.
Creating temporary and permanent product activation codes
- Secwin
Online Server will create a default temporary activation code for
any product activation code request if:
- The product code request
is a new request or the first request for the specific company and
product combination
- If an existing activation
code has expired and the client or dataset is not blacklisted
- A demo activation code
will be issued if any of the
following registration details changes in the product
activation code request:
- Company Name
- Serial Number
- Product Level
- Product modules
- Product Counter
- Product High Word
- The expiry date of a temporary code is dependent on the "demo expires days" entered
for the product in the update product's form. A temporary code expires after the
date of issue plus the days entered in the field "Demo expires after (entered
days)"
- A permanent product code can be created by:
- Changing the expiry date
of the last issued product registration temporary activation code to
a date in the future. For example, use the date 31/12/2099. When the product
requests a registration code again, Secwin Online
Server will issue the permanent registration code
- Creating a new
registration code for the product and customer with an expiry date
of for example 31/12/2099.
- A product activation code
emailed directly from
Secwin Online Server or faxing the registration to the client and
having the client manually enter the registration code.
Note : Registration codes can be created via the user and or web interface
Web Interface
The web interface provides accessibility to Secwin Online Server in
instances where it is not feasible to use the program user interface. The web
interface replicates the windows user interface. All features of SOS are
thus available in both interfaces.
A case in example might be when SOS is installed in a locked server room or on a
web server. By using the IP address of the
machine on which
SOS is installed and the port defined under Settings, you can access the
web interface by typing the following address in explorer as follows:
http://192.168.1.1:6000
This will bring up the following screen:
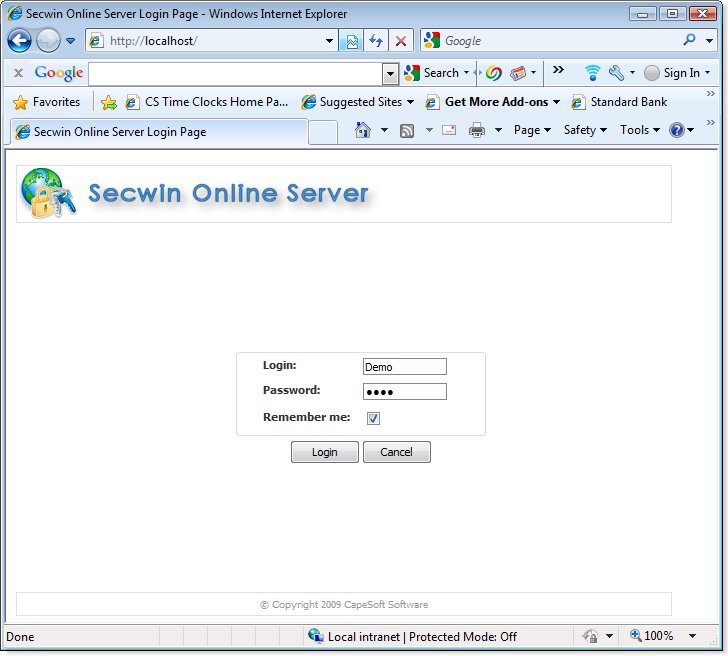
After a successful login, the options will become available on the
following screen:
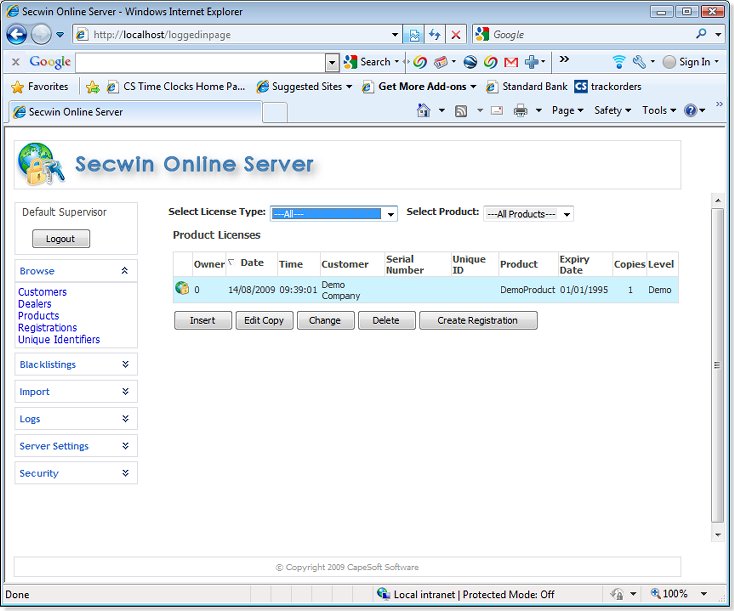
From this screen product registrations can be added and
changed and all the user options can be accessed.
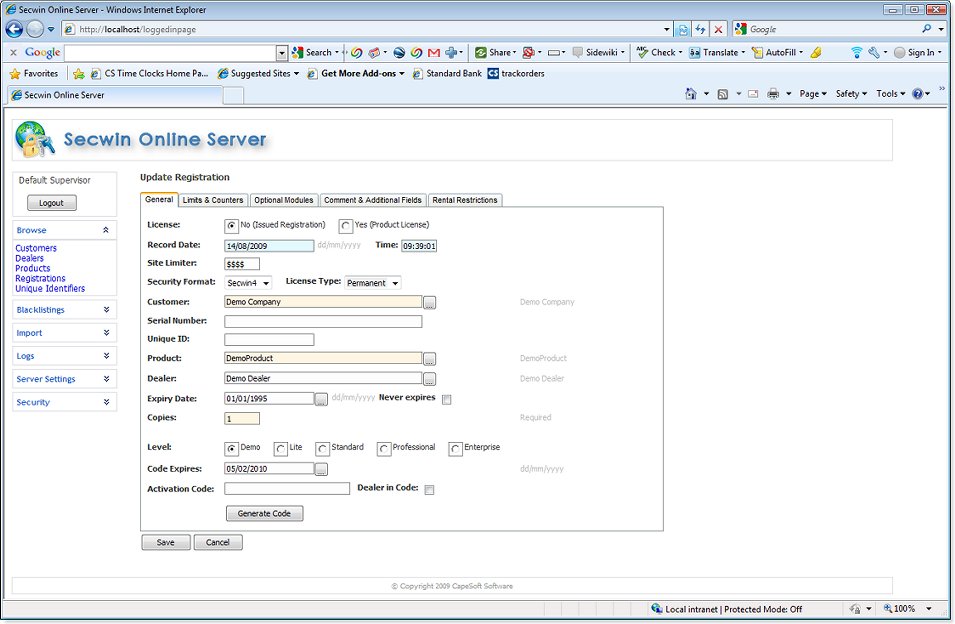
Adding, changing and creating customers, dealers and registrations is
similar to the applications interface options.
Secwin Online Server Client
Requirements
The Secwin Online Server Client in this example require the following
accessories and development tools.
The Secwin Online Server Client example has been installed in the Program
Files\CapeSoft\Secwin Online Server directory.
Introduction
This example has been built for users who own both
Secwin and
NetTalk.
It shows you how to build a registration screen in your application, which
fetches the Activation Code required from your Secwin Online
Server. The server is typically on the internet. The server itself is also provided as part of
Secwin Secwin Online Server and is discussed in the start of this manual. This example deals with the Client
side of the activation.
There are six examples and they are available in for Secwin 3
and Secwin 4.
- Register your
product via SOS using port 80
- Register product and get a serial number from SOS using port 80
- Register customer details and your product via a web page on the
Internet
- Register
customer details from a product and customer registration wizard
- Register
customer details from a product and customer registration wizard and
get a serial number from SOS
- Create
registrations and or licenses on SOS using a windows client
application from your workstation
This technique does not in anyway remove from the
existing registration functionality. But it does add a powerful online way for
users to get activation codes when required.
1. Register a product
using port 80 ( allows your request to go through proxy servers and firewalls - recommended procedures)
- Preparation
Firewalls can sometimes get in the way of registering your product using a
dedicated port. To overcome this is we can use port 80. Using port 80 will allow
traffic to pass though
proxy servers and firewalls, but requires specific header information. This example shows you how to achieve this.
This example uses the control, GetWebActivation, which is available in
Secwin 3.37.
- Steps to convert an existing
custom registration window
The setup and configuration is
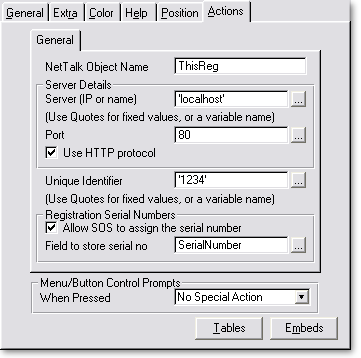
exactly as described in the previous example, except on the actions tab of the GetWebActivation
tab, use port number 80 and tick "Use HTTP protocol".
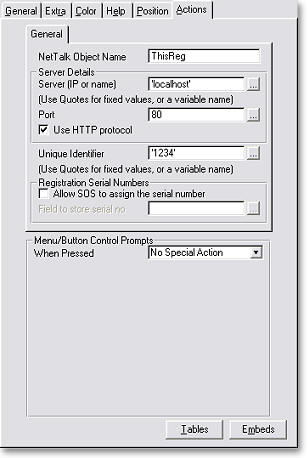
By selecting the "Use HTTP protocol"
options, the request packet is formatted as shown below. This allows the packet
to pass through firewalls and proxy server as a normal internet web page
request.
ThisReg.packet.bindata
= 'POST /GetActivation HTTP/1.1<13,10>' & |
'Accept: */*<13,10>' & |
'Referer: http://sos.tna4.com/Get.htm<13,10>' & |
'Accept-Language: en-us<13,10>' & |
'Content-Type: application/x-www-form-urlencoded<13,10>' & |
'Accept-Encoding: gzip, deflate<13,10>' & |
'User-Agent: Mozilla/4.0 (compatible; MSIE 6.0; Windows NT 5.1; SV1)<13,10>' & |
'Host: sos.tna4.com<13,10>' & |
'Connection: Keep-Alive<13,10>' & |
'Content-Length: ' & x & '<13,10>Cache-Control: no-cache<13,10><13,10>' & |
sub(ThisReg.packet.bindata,1,x)&'<13,10><13,10>'
2. Register product and
get a serial number using port 80
- Preparation
This example is based on the example in C.
- Steps to
convert an existing
custom registration window
The setup and configuration is
exactly as described in the example C, except on the actions tab of the GetWebActivation
tab, use port number 80 and tick "Use HTTP protocol".
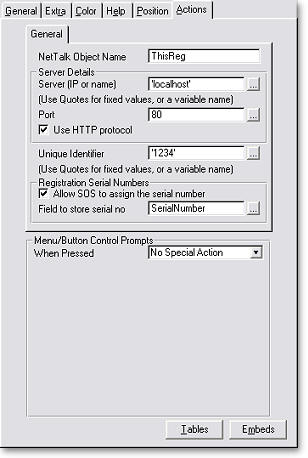
This selection enables the option to assign the field where SOS must store the
serial number. This field is typically the field on the product
registration screen where the product user typed in the product serial number,
as shown below.
You now have the option to make the serial number fields read only or even hide
it. The benefit in having SOS assign the serial number is that the sequence of
serial numbers is in the control of the supplier. By selecting the "Use HTTP
protocol" options, the request packet is formatted to pass through firewalls and
proxy server as a normal internet web page request.
3. Register customer details and
product via a web page on the internet
This demonstrates the ability to choose a product from a webpage and register
a customer. When successfully registered, SOS will email the new or existing
customer a product activation code. Please note that their are several ways to
format these web pages. This is an example of one.
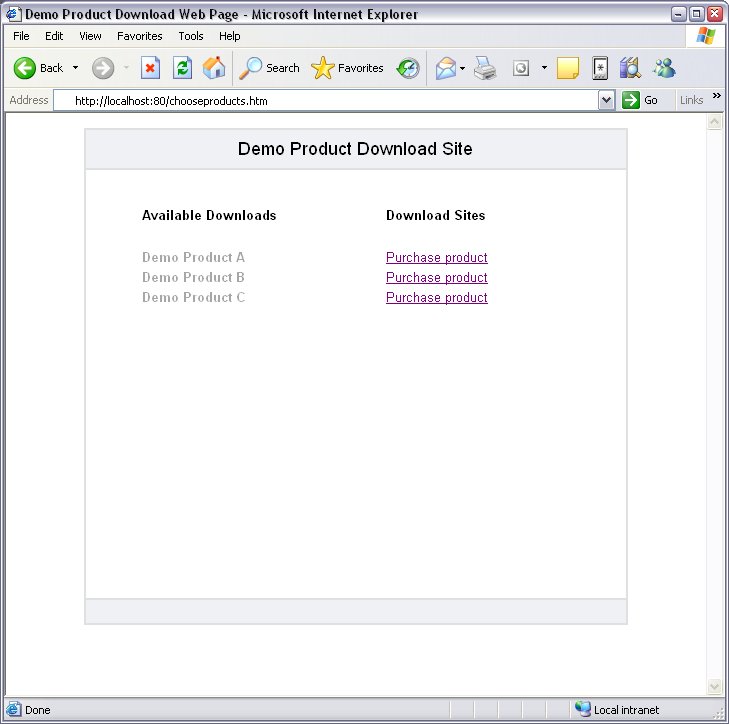
The choose products web page is a normal link to a customer registration webpage
as shown below.
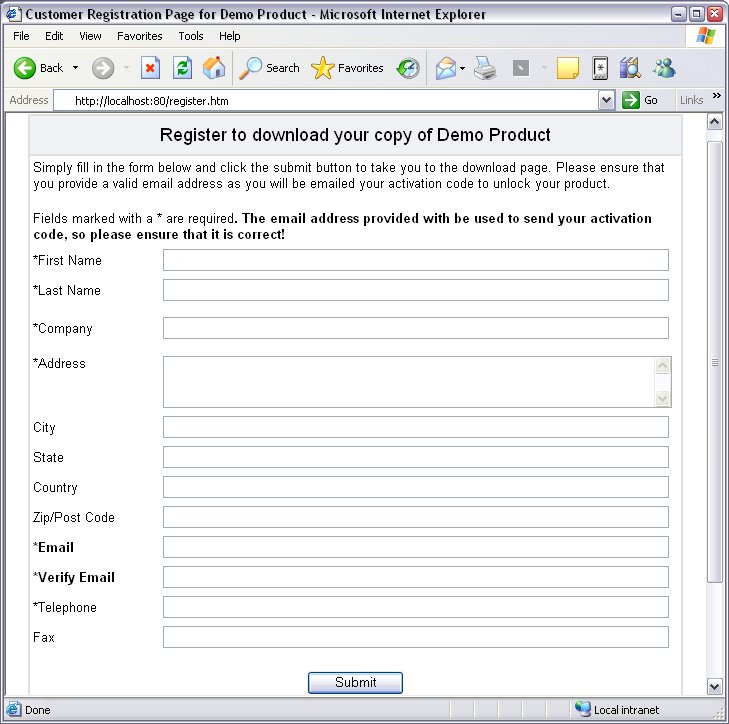
This product page has the following hidden fields:
<input type="hidden" name="
Product" value="Demo Product"><!--The name of the
product this page is registering-->
<input type="hidden" name="
Copies" value="1"><!--The copies of the product this
page is registering-->
<input type="hidden" name="
Counter" value="100"><!--The counter of the product
this page is registering-->
<input type="hidden" name="
Dealer" value="WebServer"><!--The dealer of the product
this page is registering-->
<input type="hidden" name="
Level" value="3"><!--The level of the product this
page is registering-->
<input type="hidden" name="
Optional" value="0"><!--The modules of the product
this page is registering-->
<input type="hidden" name="
Price" value="100"><!--The price of the product this
page is registering-->
Secwin Online Server collects the information from the hidden fields, and with
the customer registrations details, will create a product activation code, which
will emailed to the customers email address. If the customer registration was
successful, the download page entered in the products field will be loaded. If
no page is specified here, the generic download page genericdownload.htm will be
loaded.
4. Register customer details using a product registration wizard
This demonstrates the ability to register a customer's details and your
products from a custom product registration window. An existing example is
changed into a wizard which will basically have two phases. This first phase will
request that the customers' details must be registered or amended, and the second
phase will register your product after receiving an activation code from SOS.
- Create a wizard with four tabs. (The wizard attribute has been switched
off for this example.) The first tab acts as a introduction
page.
- The second tab collects all the customers details. Next will send a
request to SOS to add or amend the customer details. This request is
different to the normal activation code request and is defined in the send
request routine.
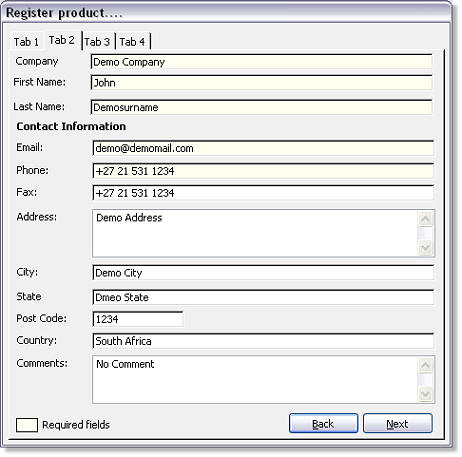
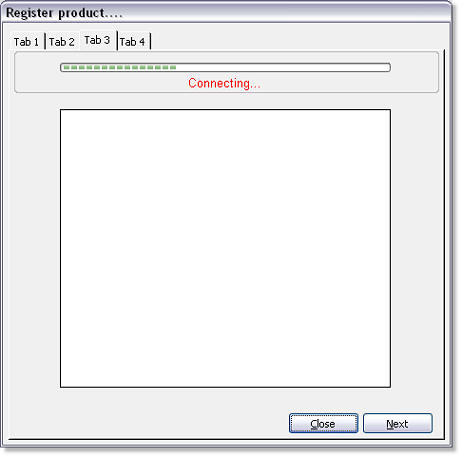
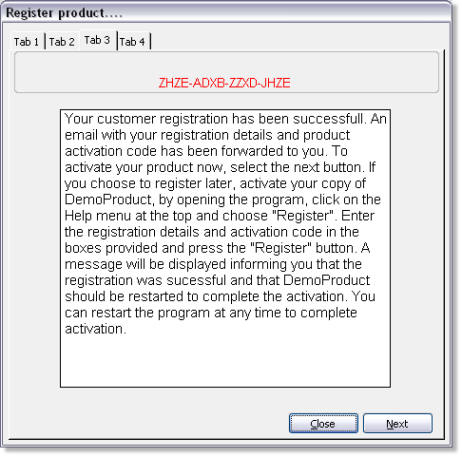
- The third tab sends the
applicable information to SOS. SOS will updates it's customer database with
this new entry, or update existing records. The text box will confirm if
the customer's details were added or updated successfully. The product
activation code is displayed for demonstration purposes and can be
suppressed.
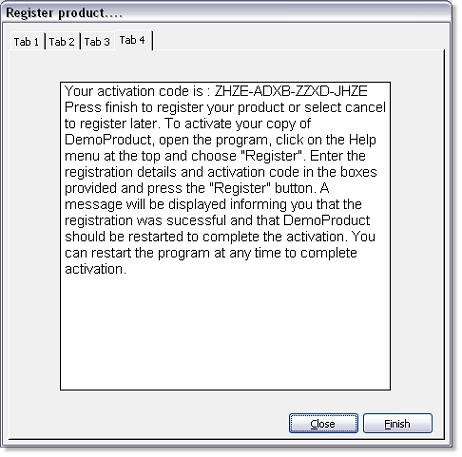
- The fourth tab gives you an example of an option to register the product
later. The customer would have to remember the activation code however.
5.
Register customer details using a product registration wizard and get a serial number
This demonstrates the ability to register a customer's details and your
products from a custom product registration window. An existing example is
changed into a wizard which will basically have two phases. This first phase will
request that the customers' details must be registered or amended, and the second
phase will register your product after receiving an activation code from SOS.
- Create a wizard with four tabs. (The wizard attribute has been switched
off for this example.) The first tab acts as a introduction
page.
- The second tab collects all the customers details. Next will send a
request to SOS to add or amend the customer details. This request is
different to the normal activation code request and is defined in the send
request routine.
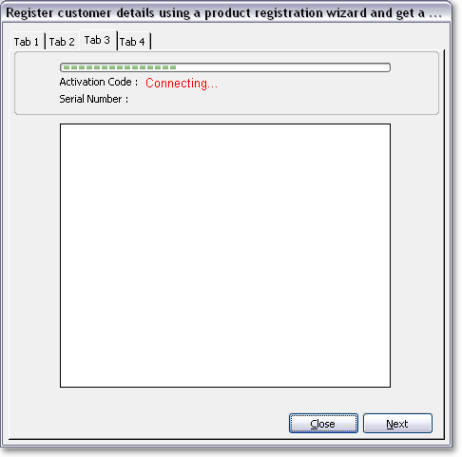
- The third tab sends the
applicable information to SOS. SOS will updates it's customer database with
this new entry, or update existing records. The text box will confirm if
the customer's details were added or updated successfully. The product
activation code and serial number is displayed for demonstration purposes and can be
suppressed.

- The fourth tab gives you an example of an option to register the product
later. The customer would have to remember the activation code however.

6.
Create registrations and or licenses using a windows client application from your workstation
Secwin Online Server ships with an example application and source code called
SetRegistration. SetRegistration is only available for Secwin 4 product
registrations.
SetRegistration allows you to add product and customer licenses directly on
SOS without having to use the Web Interface or having to remote onto the server
workstation.
SetRegistration takes the format of the update registration window in the
windows interface. Added to this window id the ability to enter more specific
company information as shown below.
Customer Details Tab
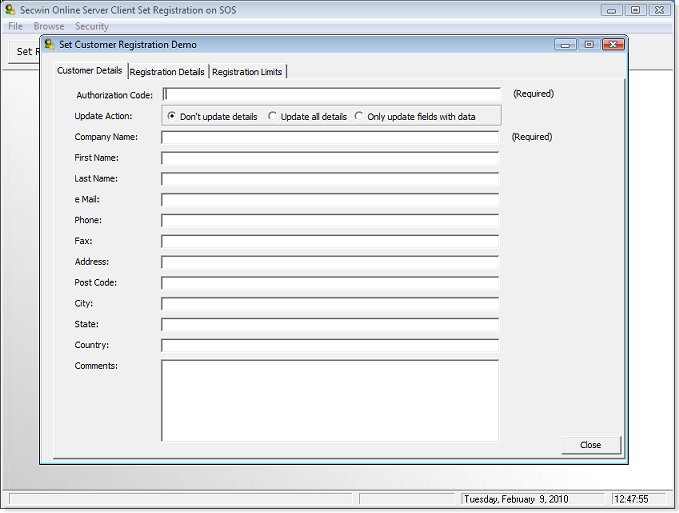
- Authorization Code - This code must match the
authorization code entered in your products' profile.
- Update Action
- Don't Update Details - Customer details will not be
updated on SOS
- Update all details - All customer details will be
updated. Irrespective if the fields are left blank or not.
- Only update fields with data - incremental update
of customer details where fields are not left blank.
- Customer Fields - these fields match the customer
record on SOS
Customer Details Tab
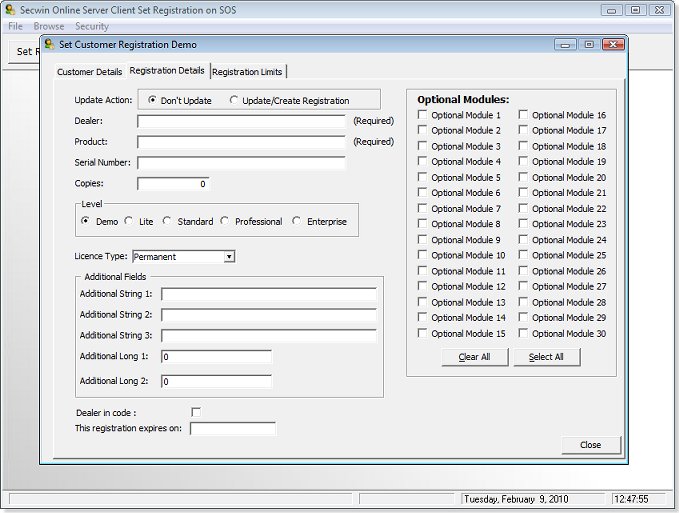
- Update Action
- Don't Update - This is helpful in cases where you
just want to update customer details
- Update / Create Registration - Creates
product registration according to the fields entered below
- Registration Fields - these fields match the
registration records on SOS
Registration Limits Tab
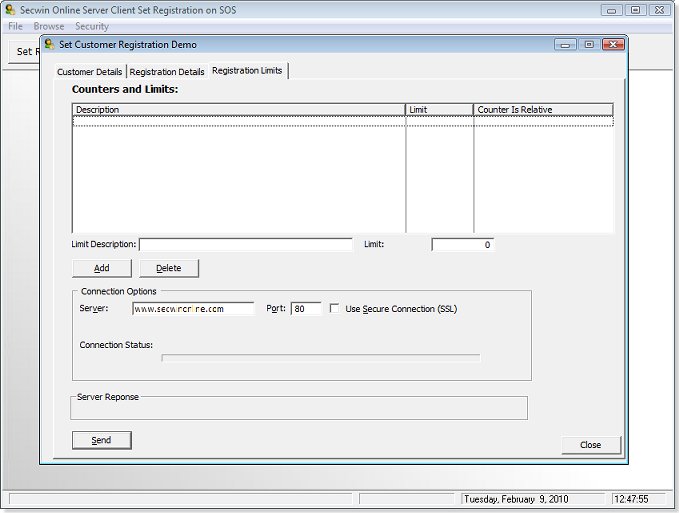
- Connection Options
- Server - The IP address or url the server where SOS
is hosted
- Port - The port used by SOS as defined in the
Client Application to Server Options (Web Server Port option) Tab of
SOS.
- Use Secure Connection - Tick this option if you
want to use a secure connection to SOS. You must remember to change the
port above to the port used by SOS as defined in the Client Application
to Server Options (Web Secure Server Port option) Tab of SOS.
- Registration Fields - these fields match the
registration records on SOS
Register a product using port 5984
(a dedicated port on the server where SOS is installed - (no longer supported - available
only for backward compatibility)
Preparation
This document assumes you are starting from a
position of having an existing custom registration screen (using Secwin) already
in your application. I will call this procedure
myProductRegistration in
this document. You can call it anything you like. If you don't have one then
you can skip this section and import from the example given.
Steps to Convert an existing custom registration window
- Activate NetTalk Extension to the App
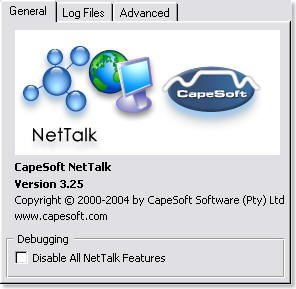
- Go to the myRegisterProduct procedure. Click on
the Extensions button.
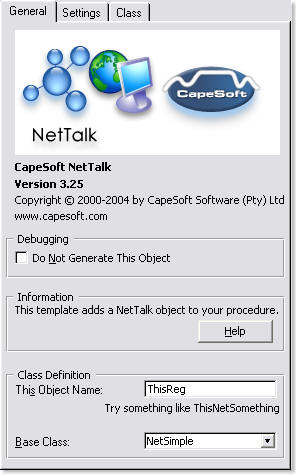
- Add a NetTalk object to the window using the
IncludeNetTalkObject extension.
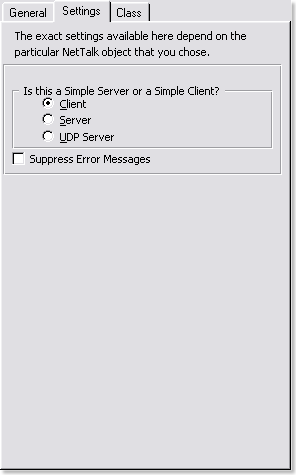
- Set the
Object Name to ThisReg
- Set the
Base Class to NetSimple
- Go to the window formatter for the
following procedure
- Select the Populate menu, Control
Template option. Select GetWebActivation from the Secwin section.
- Move the cursor to the desired place on the
window, and click. The 3 controls will appear. They include a button,
progress bar, and string control.

- Right click on the button and select Actions.
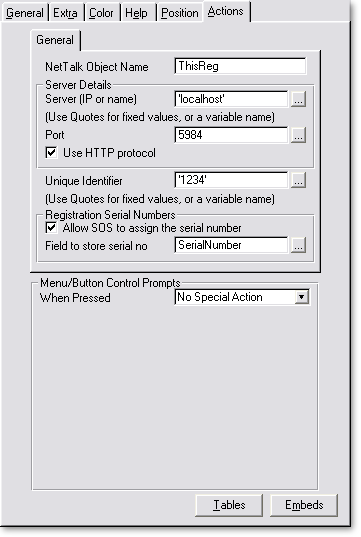
- Set NetTalk Object Name to ThisReg (This must match the name of
Nettalk's object name entered in the paragraph above)
- Set the Server to the IP name of your server. For testing set it to
'LocalHost'. "localhost
will point to the PC on which SOS is running. NOTE:
If you are using
a server name omit the "http://" from the
name, for example use the name in the following format: sos.demo.com
- Leave the Port set as the default 5984
for testing purposes
- Selecting the "Use HTTP protocol" option, encodes the request into HTTP protocol. This
allows the request to be used on port 80, which should be open in most
firewalls and will not be rejected by proxy servers.
NOTE:
When selecting the HTTP protocol option, the client will use SOS Web
Server port - remember to set the port of this client to SOS's Web Server
port number. This is normally port 80.
- The unique identifier
option allows you to distinguish the product by installation and PC. This
identifier is send with the activation code request to SOS. The value should
be unique and must preferably be a combination of a product dataset
identifier and or a PC identifier (Registry key entry will do). By
keeping the unique identifier in the products dataset, you will ensure
that the number gets carried across during restores etc. By looking at
the unique identifier fields, multiple requests for the same dataset,
workstation can be monitored. Using a combination of pc and
data identifier – makes it easier to verify if a user is moving data or
updating expired codes. If a variable is used for the identifier, assign
the value at the embed point ?GetActivationFromWeb.Accepted.
- Selecting the "Allow SOS to assign the serial number" option, request
a serial number from SOS with the activation code request. The serial number
will be placed in the field assigned. This allows SOS to control the
sequence of serial numbers.
How it works at Runtime
If you click on the button it calls a (template
generated) routine called GetActivation. This connects to the server, and
requests the code. When the code arrives (asynchronously) it is filled into the
Activation Code field. The user then needs to click "register" as normal.
Register product and
get a serial number using port 5984 - no longer supported -
available only for backward compatibility)
Preparation
This example is based on the example in A.
Steps to convert an existing custom registration window
The setup and configuration is
exactly as described in the example A, except on the actions tab of the
GetWebActivation tab, tick "Allow SOS to assign the serial number".
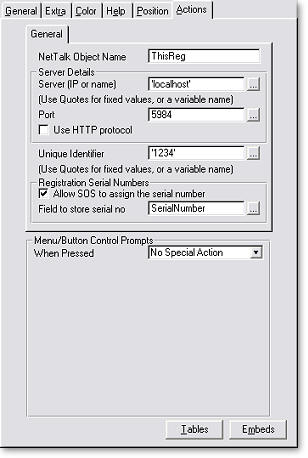
This selection enables the option to assign the field where SOS must store the
serial number. This field is typically the field on the product
registration screen where the product user typed in the product serial number,
as shown below.
You now have the option to make the serial number fields read only or even hide
it. The benefit in having SOS assign the serial number is that the sequence of
serial numbers is in the control of the supplier. The supplier can now use this
serial number against orders or validate activation code request by serial
number.
Jump Start
Keen to get started? Then this section is just for you - the basics on
how to get SOS up and running with your application as quickly and
simply as possible.
Install SOS
For the initial setup and testing purposes, I would recommend that you
install SOS on your development PC. Run the SOS Setup file. When the
installation process is completed, select the option "Run Secwin Online Server"
or run the server from the Start Menu / CapeSoft/ Secwin Online Server folder.
SOS starts with default settings which includes setting for the web server
(port 80) and registration server (port 5984). Do not change any of these
settings initially. Now proceed to the following section.
Add your product to SOS
Before SOS will generate a registration code for your product, your product
information must be added to SOS via the manager' products tab.

The products database can be maintained by inserting, changing and removing
customers. The sort order by column in ascending or descending order can be
selected by a left mouse click on the applicable column header. Selecting the
relevant update button calls the following update screen.
 Basic Tab
The
product name and
seed code is required in order for SOS the
create an activation code.
Demo Expires - the number of days entered here will be the default demo
expiry date calculated from the date of request plus the days entered here. If
zero is entered, no demo activation codes will be issued. The string returned
will be "No Demo Allowed".
Reissues a new temporary code - This option allows you to set the period
before an issued demo activation code expires, in which a new demo activation
code will be issued. All code requests outside this period will be issued to
original activation code.
The above options is the minimum required for SOS to be able to issue a
registration code.
Add Secwin "MyRegister Product Window" to your application
The quickest manner to create a customized registration window for your
product, would be to import the
Register a product using
port 80 SOS client example from the example directory.
This window is setup to request a registration from SOS on your
local PC. Compile you program (remember that you need NetTalk and Secwin).
You are now ready to test.
Test
Open your product's registration window and enter the company details, serial
number product level etc. You do not have to create to company name in SOS. This
will be done for you by SOS.
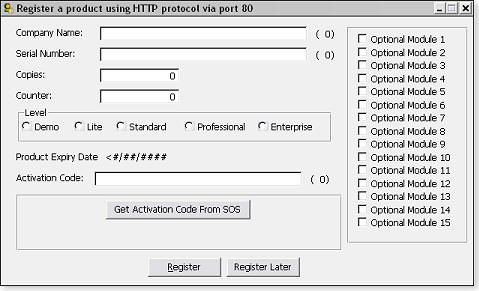
Now click on the "Get Activation Code From SOS" button. In a few seconds,
registration code will be displayed in the activation code field. You can
now select the register button to register your product.
Other Information
Case Studies
Case Study A
Requirement: The
client must request an activation code every fifteen days during a sixty day
trail period.
Reason for implementation:
This method reminds the client that he has not purchased your product every
fifteen days and forces the client to reregister the product. It creates a
subtle reminder with a bit of effort for the client, but still allows the
client to use the program. If the client wants this reminder to go away, he
can simply buy it and get a permanent registration.
SOS Implementation plan:
Configure SOS to issue a one temporary activation code every fifteen days,
but allow the client to request a new activation code if the code expires
within two days. The client is not allowed to request more than four
temporary codes (The four times fifteen makes up your sixty day trial
period)
SOS Configuration:
- In SOS Manager Registrations section, select your product which you
want to setup the specified trial period for.
- To setup the product's 15 day demo expiry period, enter the value of
fifteen in the "Demo expires after" field. You might want to set your
products demo period in Secwin's extention template to 15 days as well,
if you do not want to force the client to register a code for the
initial fifteen day trial)
- Only allow the client to get a new activation code, if the current
demo code is within two days of expiry by entering the value of two in
the "Reissue a new temporary activation code if the code falls within
x day(s) of the product demo expiry date" field.
- Limit the trial period to sixty days by entering the value of four
in the "limit the codes issued to x field" and enter the value of
999 in the "exclude codes older than x
days" field.
Client Configuration
Summary: By forcing the client to get
an activation code every fifteen days, it allows the SOS user to monitor
which companies have downloaded and are using your product. By reporting on
the repetitive requests for registrations, the SOS user can also determine
how long the client used the product in the demo period, before buying it or
not at all.
Case Study B
Requirement: The client must register his contact details via the program and and will
receive his activation code via email.
Reason for implementation:
It forces the client to provide at a minimum a legitimate email address
which the supplier (SOS User) can use to track the progress of the potential
client.
SOS Implementation plan:
Import the customer registration wizard as per the example into your
application and configure the product settings of SOS to email the
activation code to the client.
SOS Configuration:
- In SOS Manager Registrations section, select your product which you
want to setup. This product name and seed code must match your
application.
- Setup the product's trial demo expiry period, enter the value in the "Demo expires after" field.
- Only allow the client to get a new activation code, if the current
demo code is within two days of expiry by entering the value of two in
the "Reissue a new temporary activation code if the code falls within
x day(s) of the product demo expiry date" field.
- Set the "Optional Settings" Email product activation code to
customer. This options will email the customer their activation code to
the email address entered in the wizard.
- Here is a nice bonus. The dealer or supplier can also get a copy of
the email generated, send to him by selecting the option, "Export
database" in the update dealers form and adding your product to the list
provided.
Client Configuration
- Import the customer registration window procedure form SOS's client
demo app (in your clarion examples directory).
- Open the procedure's embeds at the Procedure Routines and select
"!!Set your server ip or name and port here!!". Enter SOS's port
as set on the web server tab of SOS and the IP address or name of the pc
which SOS is running ('localhost" if you are testing on the same Pc).
- Open the procedure's embeds at the Procedure Routines and select
"!!Set your products license details here!!". This section allows you to
set the products licensed copies, counter details, optional modules and
level. If these variables are left blank, the product's default values
as setup in SOS will be used.
- Open the procedure's embeds at the Procedure Routines and select
"!!Set option here if SOS must provide the serial number!!". Change the
variable to 1, if you want SOS to allocate the serial number. Remember
to set you product options for this feature as well.
- Open the procedure's embeds at the Procedure Routines and select
"!!Load customer and company information here!!". Change the set values
of the company and customer information to variables you have declared
or fetch the values from i.e. an ini file, registry entries etc (where
you stored the customer details).
- Open the procedure's embeds at the Procedure Routines and select
"!!Save customer and company information here!!". Change the set values
of the company and customer information to variables you have declared
or save the values to i.e. an ini file, registry entries etc (where
you normally save the customer details).
- Tab4 of the wizard is for testing purposes. The next button will
automatically get the activation code, so you can hide or customise the
controls on this tab if required.
- Customize the wizard and give it a little makeover to fit with your
product's look and feel.
Summary: .This registrations method
allows to capture more than jus the customer name and ensures that you can
build a contact database for your product.
Case Study C
Requirement: The
client must register his contact details via the internet and and will
receive his activation code via email. The email will provide the download
link and product activation code for the product
Reason for implementation:
It forces the client to provide at a minimum a legitimate email address
which the supplier (SOS User) can use to track the progress of the potential
client.
SOS Implementation plan:
Provide a hyperlink in you application which will open the web browser to
your products registration web page.
SOS Configuration:
- In SOS Manager Registrations section, select your product which you
want to setup. This product name and seed code must match your
application.
- Setup the product's trial demo expiry period, enter the value in the "Demo expires after" field.
- Only allow the client to get a new activation code, if the current
demo code is within two days of expiry by entering the value of two in
the "Reissue a new temporary activation code if the code falls within
x day(s) of the product demo expiry date" field.
- Set the "Optional Settings" Email product activation code to
customer. This options will email the customer their activation code to
the email address entered in the wizard.
- Select the option "Allow Web Activation". This option enables Web
Page and Activation Mail templates. If none are entered the default
shipped will be used or customise your pages from the examples
provided.
- Force the customer to the enter the address field in the web by
selecting the ''The address field is required for Web registrations and
activation"
Client Configuration
- The client requires a hyperlink (CapeSoft's Hyperactive can do this
for you) on the products registration page. This will open the
registration web page as per the client example shipped with this
install. Please customise the "register.htm" page to fit in with your
product web site's look and feel.
Summary: .This registrations method
allows to capture more than just the customer name and ensures that you can
build a contact database for your product from the internet. This will also
guarantee by default that the client will be connected to the internet to
register.
Case Study D
Requirement: The
client must register the product using a customised product registration
window, but does not have to enter details such as the product's level,
modules, counter.
Reason for implementation:
This options is used where you product must simply be registered and does
not have and level or counter restriction. By having the client only fill in
their company details, it also simplifies the registrations process
SOS Implementation plan:
No additional settings are required (but ensure the default settings for the
product is set in SOS.)
SOS Configuration:
- No additional settings are required (but ensure the
default settings for the product is set in SOS.)
Client Configuration
- In your customised registration window, hide the level, counter,
copies and module fields, but set default values.
Summary: .This registrations method
allows to capture more than jus the customer name and ensures that you can
build a contact database for your product from the internet. This will also
guarantee by default that the client will be connected to the internet to
register.
FAQ
1) What is unique ID's ?
By assigning a value to the field
iunique
(LONG) at the embed point ?GetActivationFromWeb.Accepted (myRegisterProduct)
in the client example, a unique identifier can be created which is send to the
server. The value must preferably be a combination of a dataset identifier
and or a PC identifier (Registry key entry will do). By keeping the unique
identifier in the programs dataset, you will ensure that the number gets
carried across during restores etc. By looking at the unique identifier
fields, multiple requests for the same dataset, workstation can be
monitored. I like using the combination of pc and data identifier – makes it
easier to verify if a user is moving data or updating expired codes.
2)
There is a second counter (highword) option. What can it be used for?
This option can be
used within your apps and is compatible with your existing applications. It
allows you to use a second counter with a different value in say on of your
applications modules.
3) Must the SOS client be added as a product for SOS to issue an activation code?
No, SOS will generate an
activation code for any product on condition that the seed code is added to
the activation code request. (The option to turn
this off will be added to SOS when blacklisting rules are added).
Please
note that transmitting the seed code of your product is note
ideal and
not secure! The seed code can be transmitted by
assigning a value to the field
iseed
(LONG) at the embed point ?GetActivationFromWeb.Accepted (myRegisterProduct)
in the client example.
4) What is the difference between selecting "http protocol" and not selecting
"http protocol" in the client?
Selecting the "Use http protocol"
wraps the request in a http (web browser) formatted packet, which will go
through most firewalls and proxy servers (assuming that those firewalls and
proxy server allow web traffic). This setting should be used as default.
Note that this option selected uses SOS web server port, so remember to make
sure the client's port matches.
5)
I am using "http protocol" to request activation codes, but the client only
receives " HTTP/1.1 or HTTP/1.0"
The request from the client
application to get a registration code from SOS, is being 'hijacked' by a
web server. Check your server name or ip address in the product's
registration window. Ensure that you are not running SOS with another
web server on the the same PC using the same port.
6)
I am using no modules in my application, but the registration code request
received by SOS has a value under modules or highword
If your application uses Secwin's
demo level, all modules will by default be enabled. The modules have to be
cleared before sending the activation code request to SOS in your customised
registration window. See the client demo example app for an example.
7)
Do I need to add a company's details to SOS, before the client can request a
registration code?
No. SOS will create the Company
name for your if it does not exist, as long as the matching product
has been added to SOS.
8)
When will SOS issue temporary registration code or permanent registration code
from a client request?
If no matching permanent
registration exists for the customer and product combination (i.e. no
product license exists for this client), then a temporary registration code
will be issued. The expiry date of the temporary registration code depends
on the basic settings of the product. If a matching permanent registration
exists on SOS, for the product and customer combination, the the permanent
registration code will be issued.
9)
The client has requested a registration code from SOS and a temporary code was
issued. How do I make this registration a permanent registration?
A temporary
registration can be changed to a permanent registration by changing the
expiry date of the registration to 31 December 2099. After this was
completed on SOS, you can email the code from SOS to the client or the
client can simply request the registration code again and the permanent
registration will be issued.
10)
I am running Skype on a PC with SOS Server, but cannot access SOS's web
interface
Skype has a
connection option to use port 80 and 443 as alternatives for incoming
connections. This option set will prohibit you from accessing SOS's web
interface on port 80. Untick this option in Skype in the Tools / Options/
Connections menu. Restart SOS and Skype.
11)
Can SOS run as a service?
Yes. Install SOS as a service from the Server Options Tab.
12)
SOS records have owner ID's. What are they sued for?
- Owner ID's
identifies to which dealer the records belongs to and is only used to
separate records from dealers in the web interface.
- The SOS Web
Interface Administrator will created a dealer called for example DealerABC.
He will now add a user for this dealer and assign the dealer company to that
Sos web user. This limits the SOS web user to records only belonging to
DealerABC.
- The SOS Web Administrator can see all records belonging to all dealers,
Version History
Version 1.41(16 February 2023)
- Updated to include latest Nettalk 11.55.
Version 1.40(20 March 2020)
- Fixed regression bug from vs 1.39 in ClientLicenseRequest API, which
sometimes caused
the wrong activation code to be returned.
Version 1.39 (18 March 2020)
- Implemented blacklisting support for the ClientLicenseRequest API
- Implemented product rules support for the ClientLicenseRequest API
- Cosmetic web style updates in the product and blacklisting web forms
- The install now does not override the email settings anymore.
Version 1.37 (13 March 2020)
- Added support for Secure Email (Start TLS) setting on the Email
Client Settings tab
Version 1.36 (12 March 2020)
- Updated Nettalk 11
- Added support for TLS to the webserver
- Updated web interface and theme
- Varius small internal refinements
Version 1.35 (16 May 2019)
- Updated Demo to support Nettalk 11
- Updated Web Server to Nettalk Version 11
Version 1.32 (3 March 2015)
- Updated Client License Request Demo
- Updated Nettalk Version
- Expiry dates of licenses can now be changed in the browse
- Added a new serial number format option DDDMMYYCCSSS
Version 1.31 (1 November 2013)
- Fixed the product registration wizard function, which did not always
return the last valid
license
- Updated Client License Request Demo to automatically and silienlty check
the last valid License on Secwin Online Server and update the application
license accordingly if required.
- Changed the format of Client License Request Demo to a wizard. The
wizard support and License File Drop or Get License Online option
- Updated Client License Request Demo to display license changes
Version 1.30 (21 October 2013)
- Fixed Return Last Valid License function which sometime included issued
registrations
- Added new example called "ClientLicenseRequestDemo". This example
clients shows how to request the latest Secwin license from SOS and update
your application license by sending SOS the application license serial
number and company name.
- Update SOS to Nettalk 7.
Version 1.29 Beta (11 May 2012)
- Fixed server setting for the bind to IP Address, which was not saved.
Version 1.28 Beta (6 September 2011)
- Fixed server setting for the bind to IP Address, which was not saved.
Version 1.27 Beta (3 August 2011)
- Fixed web browse which did not display black listed customers
- Made cosmetic changes to the server tab descriptions
Version 1.26 Beta (22 December 2010)
- Fixed web port setting which was not saved when changed
- Fixed customers, resellers and products registrations browse which did
not display any data
- Updated the register online web page procedure to support SecWin4
product default settings
- Added the option to have pre-registered unique identifiers enforced for
a product
- Added the ability to get customers details from SOS in the SecWin4 Demo
Registration Wizard
Version 1.25 Beta (11 March 2010)
- Updated sections of the documentation.
- Added SOS User access rights on the users form, access tab
- Fixed blacklist options form which did not display the correct setting
- Added a file manager program for Secwin Online Server as a separate
application.
Version 1.24 Beta (9 February 2010)
- Mayor release. Make backups before upgrading.
- Web interface has been updated to use NetTalk 4 Web Server.
- Added Secure Server support to the web interface
- Downscaled support for the old net simple registration server and moved
this functionality over to the web server.
- Improved support for SecWin4 and fixed various related bugs.
- Added support for pre-registered unique ID validation on registration
code request
- Added support for pre-registered serial numbers validation on
registration code request
- Added support for installer serial numbers validation on registration
code request
- Added SMTP Authentication and SSL support for email client settings
- Added support for filtering of SOS records per operator depending on the
dealer code assigned to the operator. This is helpful to limit records when
more than one dealer may access your SOS.
- Added a discard registrations option for a customer with a particular
company name - Did company Demo come to mind?
- Added support to products to force a unique ID and or Company name to be
pre-registered on SOS before SOS will generate a registration.
- Added support to products to auto blacklist a Unique ID, Company Name or
Serial Number after the first registration was issued.
- Added product list serial number range and an installer serial number
range option to the products Serial Number Options
- Dealer registration email options were extended to send emails to the
dealer only, customer only or both.
- Data (daily incremental) can now be automatically exported and emailed
to the dealer for backup purposes in Text or XML format
- Blacklisting options for dealer is now supported
Version 1.23 Beta (18 December 2007)
-
Fixed the login page which was displayed inside the frame contents page as a
duplicated login page when the server session expired.
- Fixed the installer which overwrote existing data with the sample set
shipped. This is a critical update.
Version 1.22 Beta (14 December 2007)
- Recompiled with Secwin4 Version 4.37
- Fixed web pages which displayed duplicate records for registrations per
product, dealer and customer
- Updated email registration web and windows interface
- Fine tuned support for Secwin4
- Fixed update registration web page which cleared current registration
information when selection new customers and dealers
- Updates client demo's and split the Secwin3 and Secwin4 client demo
- Added support for secure registration update from a client application
and included an example client called SetRegistration in the install
- Updated product and registration web forms layout
- Fixed register by webpage example which did not call the downloads page
- Added a product option to force a client to be pre-registered before the
client is allowed to get a product registration
- Added the ability in the web interface to import customers and
registrations via an excel file
Version 1.21 Beta (19 September 2007)
- Updated the site limiter which was coded in the web form and exposed it in the
web interface.
- Fixed the product limited and registration limits' web browses which
inconsistently duplicated rows or displayed no information
- Fixed discrepancy between the web interface activation code generation
and the code generated when a xml file is created when the code expiry date
was changed
- Fixed discrepancy between the web interface activation code generation
and the code generated when a xml file is created when the dealer status or
inclusion was changed
- Fixed the the formatting of the xml file generated by SOS in that the
company name field was incorrect, causing the drag and drop client
registration to fail
- Added support for pre-defined installer serial numbers for products
which can be included in the emails to clients or dealers
- Added support for pre-defined registration serial numbers for products
- Added options on the products, dealers and products' web browses to view
issued registrations
- Customers, dealers and products' web browse forms are now primed with
the relevant dealer, product or customer's information
- Fixed the registrations browse of Customers, dealers and products, which
inconsistently omitted registrations
- SMTP password on the windows interface is now masked
- Fixed the incorrect display of user levels in the web browse
- Added back support for user and administrator privileges in the web
interface
- Added back support for user product and dealer filtering according to
the user's access area in the web interface
Version 1.20 Beta (22 August 2007)
- Added lookup buttons to the update registration form
- Updated client example for Clarion 5
- Added serial numbers per product and an option to the product settings
to allocate serial numbers from the product's available serial numbers
- Added the ability to import serial numbers for a product
- Fixed auto allocation of serial number according to product settings, in
the registrations form which did not work
- Fixed product, customer and dealer registrations list which did not
display all the records in the web interface
- Changed registration fields name for the additional longs and
strings which were not named correctly. This could result in xml
registrations failing.
Version 1.19 Beta (3 August 2007)
- Fixed possible protection fault caused when creating an activation code
and the registration's product level was not set
- Fixed product file's ID which did not auto increment when adding a
product via the web interface
- Fixed install which reset the operator login for the web interface
Version 1.18 Beta (2 August 2007)
- Update registrations window now defaults the license type to 'Temporary'
if the license type was not previously set
- When toggling between a Secwin 3 and Secwin 4 security
format in the update registration window, the appropriate security format
controls are enabled and disabled
- When toggling between a Secwin 3 and Secwin 4 security
format and selecting a new product in the update registration window, the
limits and counter queue for Secwin 4 registration will now be correctly
re-loaded from the current selected product's limits and counter's list.
- Fixed CRC and Length display which did not work correctly
on the update registrations window
- Fixed the limits and counters tab which did not always
display on the update registrations window for Secwin 4
Version 1.17 Beta (30 July 2007)
- Moved Secwin Online Server web interface over to Nettalk Web Server
generated pages
- Fixes Secwin4 emails which did not include the registration xml file
Version 1.16 Beta (12 July 2007)
- Added support to blacklist dealers
- Added support to product options to issue registrations if the customer
has been pre-registered on SOS
- Fixed display of blacklisted browses
- Added support for Secwin 4. File structures are upgraded for this
purpose. Older registrations are still backward compatible with Secwin 3.
- It is recommended that you run the File Menu option called "Upgrade
Default Counters" after files have been upgraded. This ports the old
registrations counters into the same format as the Limits and Counters
supported by Secwin 4. This process is optional, and will not affect Secwin
3 compatibility.
Version 1.15 Beta (16 May 2007)
- Fixed cosmetic bugs in the send to log
- Fixed cosmetic bugs in the select registrations or logs options in the
options panel
- Updated FAQ in the docs
- Added Jump Start and Case Studies in the docs
- Updated and simplified the client demo examples
Version 1.14 Beta (26 January 2007)
- Added support to bind the SOS server to an IP address
- Added support to set the session timeouts of the web server
- Fixed a bug where no registrations were displayed for a customer in the
customer's list, if a page was previously selected in the registrations list
- Added logout button to user web pages
- List now displays if the current user's session has expired
Version 1.13 Beta (20 October 2006)
- Fixed the broken products link in the web interface
- Fixed the file access error when registering a customer, using the
client wizards
Version 1.12 Beta (17 October 2006)
- Upgraded web server engine from NetTalk 3 to NetTalk 4
- Product seed codes in logs are now hidden from operators using the web
interface
- Products views and maintenance are now not available to operators using
the web interface
- Fixed install which did not place examples file in the selected
directory
- Split the web servers and registrations window into two separate
windows
- Updated examples
Version 1.11 Beta (10 August 2006)
- Added support for multiple SOS web interface users with their own login
and password
- Web interface users can be limited access to data by dealership and or
products
- Added support to export and import SOS data in XML format
- Added support to SOS to email the latest company and registrations data
daily to the dealer in comma delimited format
- Registrations emails to dealers and client can now be set as text or
html only.
- Fixed regression which prevented product web page and email templates
from working
- Fixed regression which prevented the webpage customer and product
registration from working
Version 1.10 Beta (8 May 2006)
- Added the ability to make a current registration a product rental.
- Added locators to all SOS's web interface lists
- Fixed incremental locator on all browses
- Fixed Web Server and Registration Server settings, which were not
automatically reloaded when changes were saved
- Added server "Serial Number Range Start" and "Last Serial Number Issued"
fields to Registration Server web interface
- Added the ability to Edit a Copy of a product registration
Version 1.09 Beta (9 February 2006)
- Added product retail name to products database. This is a "friendly"
product name which will used in emails to customers and is normally the
products retails name.
- Added page loaded lists to the web interface for all lists.
- Fixed bug which where a customer details was not to be saved using the
customer registration wizard.
- Enlarged all company name fields to 255 characters
- Enabled the use of Html and Text email templates for each product, which
can be used in lieu of the default wording for emails send to customers by
SOS. Two samples were added to the install called democustomhtml.htm and
democustomtext.txt
- Fixed dealer name which could not be changed when using customer
registration
- Added more spaces between registrations details and crc codes to avoid
random characters been copied and pasted
Version 1.08 Beta (15 December 2005)
- Fixed customer and dealer registration emails which was not emailed
- Changed emailing of registration codes to email customers if the
registration request dealer was invalid. Note that the product must still be
set to email registration codes to customers
- Fixed client request for product serial number which only returned five
digits
- Updated client demo to include customer and serial number registration
wizard
- Added support for 30 modules per product
- Changed request for serial number option to return the original serial
number issued, if the unique identifier in the activation code request
matches that of the original activation code issued
- Added alphabetical index to web page lookup lists
- Made web page index case insensitive
Version 1.07 Beta (2 December 2005)
- Fixed session management which failed under certain server environments
- Alphabetical index to web page lists added
- Cancel and save button to SOS's system settings added
- Implemented a free product option in products
- Fixed client customer details update which only updated the company name
and ignored other fields
- Fixed time display in lists which were blank
Version 1.06 Beta (14 November 2005)
- Enforced the use of sessions in the web interface
- Fixed web interface session timeout which did not work
- Synchronised the web interface update forms with the application update
forms
- Added display of log information to the web interface
- Added an option for SOS to assign a serial numbers to activation codes
requested
- Fixed emailing of activation codes
- Added an option for activations codes to be emailed to the customer's
dealer/reseller
- Added an order number and order date field to registrations
- The limitation on the number of registration codes issued to one
customer, can now be limited by the total registrations issued to the unique
identifier, to a serial number or by both the unique identifier and serial
number combined.
- Added support in SOS to create and issue activation codes via the web
server address and port
- Fixed online customer registration error page where the tags were lost
after an error
- Fixed install which did not preserve newer SOS system settings
Version 1.05 Beta (3 August 2005)
- Expanded error log information
- Expanded the use of "Only allow one registration code issue per unique
identifier" to limit number of codes to be issued within a set number of
days
- Changed product's "Demo expires after" option not to issue demo codes
if set to zero.
- Dropped the background graphics in favor of a background color to
provide a uniform display on all graphic cards
Version 1.04 Beta (23 June 2005)
- Support to automatically email product activation codes to dealer of customers
was added
- A new log displaying customer database related events was added
- The demo expiry period was tweaked not to issue a product demo code if
the product's demo expires days are set to zero. The last valid registration
code will however be returned to the application
- Added a new parameter for products called "Only allow one registration
code issue per unique identifier". This only allow one registration code to
be created per unique identifier.
Version 1.03 Beta (15 April 2005)
- Added support for customer contact details and address information
- Added support for customer registrations from SOS clients or Web Pages
- Improved log file layouts
- Log history is now saved
- Created new examples for SOS's Client demo, which now includes an
example to register a customer and or application from a wizard and an
example to register a customer from a web page
- Added support to automatically email product activation codes to
customers
- Added support for customer details to be updated from a SOS client or
Web Page
- Original demo activation codes are now re-issued on request if they fall
outside a specified period from the product's demo expiry date
- Added support for product demo expiry period per product
- Updated the send log to provide specific information relating to new
codes issued or old codes re-issued
- Added a blacklist log
Version 1.02 Beta (19 January 2005)
- Updated SOS Client Demo application
- Updated the install demo with default data as an example
- Fixed web interface which did not save selected modules when adding and
updating registrations
- Changed the default expiry date when receiving activation code requests
for non registered products to 30 days. Note : this requires the
client to send the seed code for the activation code to work. See the FAQ
for more details.
- Changed the default behavior of SOS to reissue a temporary activation
code when receiving an activation code request for an existing, but expired
registration.
Version 1.01 Beta (18 January 2005)
- Added option to set font, style and size in the file menu
- Added option to set program dates to European date format or us
date format
- Added options to blacklist companies, products and serial numbers
- Added demo default days option to products
- Added blacklist web pages to web interface
- Added issued registrations lookups to customers, products and dealers
- Fixed display of login password on web interface's system options
- Split program user and web interface systems options into categories
- Changed the transaction descriptions in the Send Log
Version 1.00 Beta (20 December 2004)
- Base release for Secwin Online Server Beta
License, Copyright, & Disclaimer
Copyright
- This product, and all the files contained therein, are
Copyrighted © 2013 by CapeSoft Software cc.
License
- Each Developer needs his own license to use
Secwin Online Server.
- Secwin Online Server license authorizes the use the program on one
server or workstation per licensed site
- You are not allowed to copy, reproduce, or distribute any of the
other files shipped with SOS, including but not limited to:
- Template files (.tpl)
- Library files (.lib)
- Resource files (.rsc)
- Documentation files (.htm, .chm, .hlp)
Disclaimer
CapeSoft Software, employees of CapeSoft Software, and
Dealers of CapeSoft Software products, explicitly accept no liability for any
loss or damages which occur from using this package. This product is used entirely at your own risk.
Use of this package constitutes agreement with the above license.
Purchasing Secwin Online Server
Remember: Upgrades are, at the
moment, FREE! Please make sure you keep up to date with the latest version
of SOS. To update now, go to the
SOS
Download page.
The full working version of SOS (Each developer needs his own license to use
SOS), is available from:
| Download SOS Demo |
| SOS has a fully functional 30 day demo,
which can be download from
here |
| CapeSoft Sales |
| Web |
www.capesoft.com |
| Email |
 |
| Telephone |
+27 87 828 0123 |
| Fax |
+27 21 715 2535 |
| Post |
PO Box 511, Plumstead, 7801, Cape Town, South Africa |
| Hosting Subscription |
A Secwin Online Server is hosted by
CapeSoft on our server in the USA. Developers who want access to SOS,
but do not want to host SOS themselves, can subscribe to our hosted SOS
for $69 per annum.
The annual subscription will give the
developer a login and password for the web interface,
which will allow
you full access to all your products, registrations and related
data.
In addition, new registrations and daily backups of data can be
emailed to you. |

www.clarionshop.com |
| CapeSoft Support |
| Email |
 |
| Telephone |
+27 87 828 0123 |
| Fax |
+27 21 715 2535 |
| Post |
PO Box 511, Plumstead, 7801, Cape Town, South Africa
|
